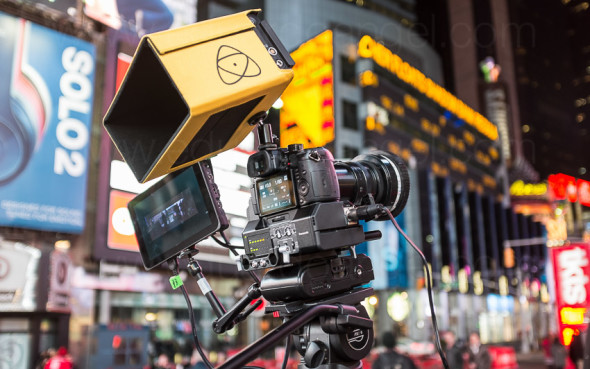
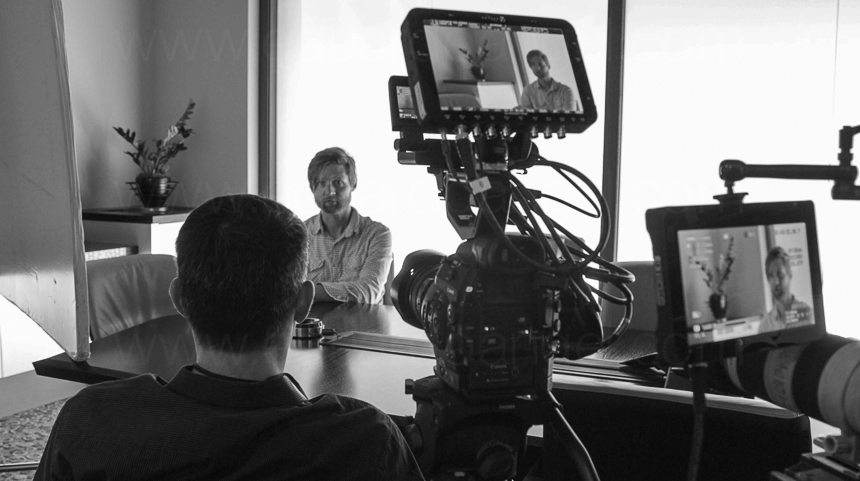
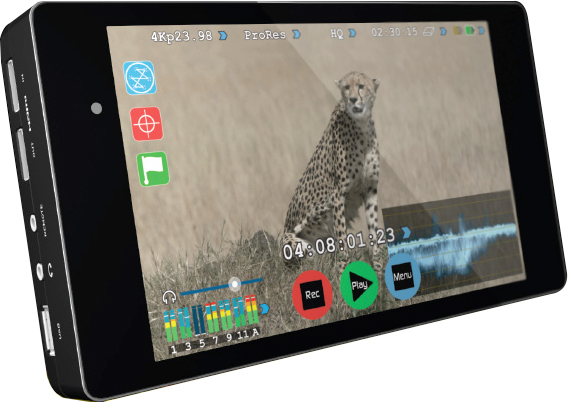
Video
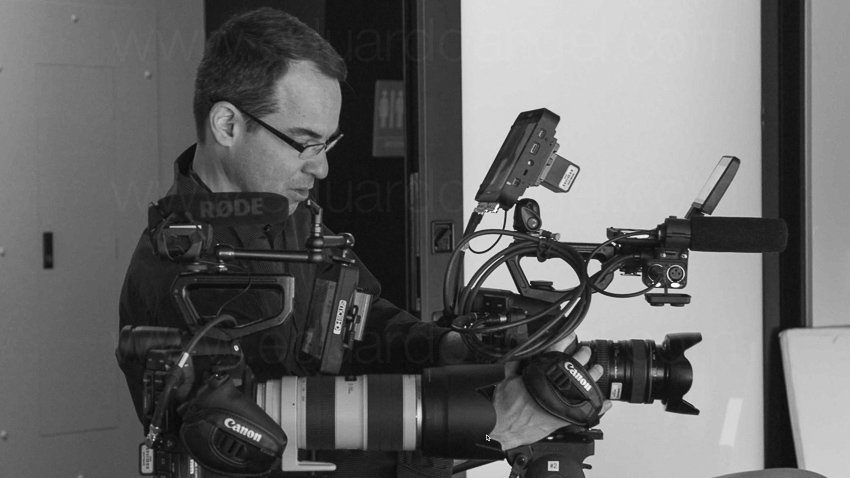
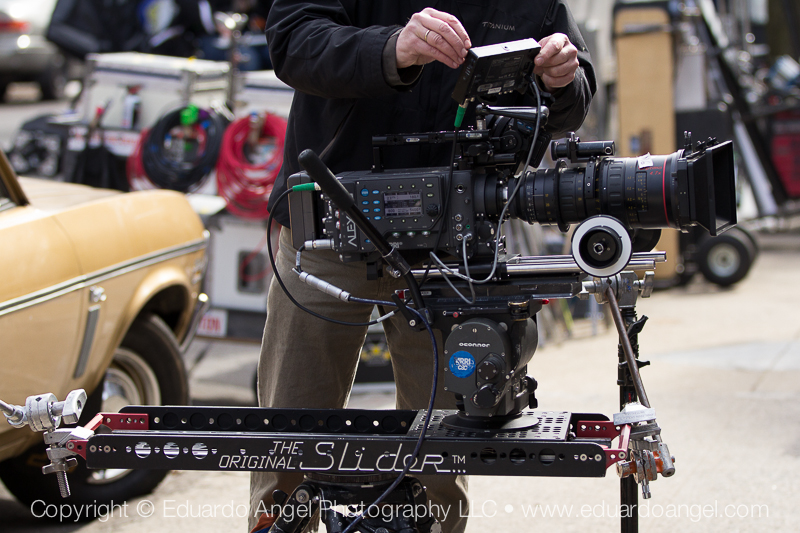
Gear, gear and more gear.
Pretty much after every single consulting session, workshop and webinar we offer, a group of people will ask: what do you recommend for _____?
My answer is always the same “it depends.” Are you shooting alone? Only video or stills also? Do you need to move from location to location? For how long? What’s your budget? Do you already have lenses? If so, what kind/brand/mount?
You get the idea. So as a solution I decided to spend several hour compiling all the gear we use very frequently into 3 short lists: a) when shooting alone, b) when changing locations often and c) when spending more time at each location.
I added a few thoughts on each and every item. I truly hope these lists serve as a guide and more importantly, save you time while researching gear, and lots of money wasted on unnecessary toys.
Simply click on the image to access all three gear lists.
If I’m missing some essential items or you have further questions don’t hesitate to shoot me a note or send me a tweet. Happy shooting!
Video
Filmmaking Essentials for Photographers. Mini Courses.
Why Filmmaking Essentials?
One of the main challenges photographers face when starting to shoot video is to focus too much on hardware and software, and forget about the most important part: the story. While this informative course includes some technical information, the main goal is to provide an overview of the many aspects of filmmaking, and identify potential business opportunities with motion. Click HERE.
The “Filmmaking Essentials for Photographers” course is based on a popular event we have been presenting for several years, but it has been greatly enhanced with additional visuals and examples. Some of the clients and sponsors for the live event include Adobe, Adorama Pro, B&H Photo, Cinevate, Future Media Concepts, Gulf Photo Plus (Dubai), HOW Design Conference, International Center of Photography, Lynda.com, McCann Erickson, NAB Show, Panasonic, Photo District News, PhotoPlus Expo, Photokina (Germany), Savannah College of Art and Design, School of Visual Arts, Sony, and X-Rite, among others.

Click on the Image to access FREE Tutorials.
Why these Mini Courses?
Sometimes we don’t have time for three-hour lessons; rather, we just need a quick and concrete answer for a very specific question. Because of that, in addition to longer courses we’ve released these mini courses, averaging three-to-five minutes each. Click HERE.
Click on the Image to access FREE Tutorials.
Video
Filmmaking Essentials for Photographers. Online Intro Course.
In 2011 I was invited along with National Geographic photographer David McLain to present a series of two-day workshops nationwide. The events were produced by Photo Quest Adventures and sponsored by PDN, Sony, Adobe, and other leading brands. The main goal was to help photographers transition into video by simplifying key concepts and providing shortcuts, resources, and advice on what gear to buy.
I have been honored to teach “Filmmaking Essentials” at all major industry events, from PhotoPlus to Imaging USA to NAB, from South America all the way to Dubai, Hong Kong, and Thailand, and at home in New York.
Few people know that I never use the same presentation twice. Each and every time I add things I’ve learned, plug in valuable feedback from attendees, students, and this website’s readers, and I strive to improve the educational experience with better examples and shorter explanations.
When looking at the advancements in digital technology since those first workshops it seems like decades have gone by. Today, we have access to a variety of brands and models of very compact cameras that can see in the dark, shoot 4K or higher resolutions, offer incredible frame rates, and even offer GPS and WiFi features so they can be easily controlled by smartphones and tablets. The future is definitively here.
But something quite odd has been happening to my personal and professional focus. The more gadgets we have at our disposal, the more I’ve shifted towards the craft of storytelling. Instead of getting more stuff, I’ve been increasingly interested in constructing and enhancing my stories to better engage the viewer. Naturally, this approach has been reflected in the educational content I produce.
Now, and for the first time, I’m proud to offer an awesome version of my one-hour presentation online. Click HERE.
The “Filmmaking Essentials for Photographers” course is based on a popular event we have been presenting for several years, but it has been greatly enhanced with additional visuals and examples. Some of the clients and sponsors for the live event include Adobe, Adorama Pro, B&H Photo, Cinevate, Future Media Concepts, Gulf Photo Plus (Dubai), HOW Design Conference, International Center of Photography, Lynda.com, McCann Erickson, NAB Show, Panasonic, Photo District News, PhotoPlus Expo, Photokina (Germany), Savannah College of Art and Design, School of Visual Arts, Sony, and X-Rite, among others.
Who is this course for?
Well, as the name implies, this version of “Filmmaking Essentials” covers concepts already mastered by advanced filmmakers or by experienced photographers who are very technically savvy. But I’m confident everyone else could learn a thing or two.
As often as possible we’ll be adding new courses, covering topics like pre-production and post, tips for one-man crews (like journalists) working stills and video assignments, advice on getting started with Color Grading, and many other fascinating subjects. As mentioned above, most of these courses are not and probably won’t be hardware or software driven, but would focus predominantly on answering the why’s, not the how’s, of the fascinating craft of filmmaking.
Also as a first, we are offering several mini-courses (averaging three minutes each and many of them for free) for those who need concrete answers to very specific questions.
So, if this is the kind of content and format you desire, vote with you wallet and let your voice be heard.
Thank you for your continued support. Click HERE to start learning.
Click on the Image to access FREE tutorials.
Video
Video for Photographers: Filmmaking Essentials.
As we have covered in numerous articles before, still photographers can reasonably quickly learn the most essential filmmaking techniques and greatly expand their creative options and the range of professional services.
In our latest Lynda.com course we help bridge the gap between still pictures and moving images, by explaining and showing, what it takes to transition from one craft to the other. We tried our best to include the most essential video productions techniques; from framing and lighting for continuous shots to directing the viewer’s attention and incorporating camera movement and sound, and even offering a brief overview of our post-production workflows.
This course, our fifth on Lynda.com is the “theory course.” Our goal is to explain why certain techniques, steps or tools are important. Other topics include:
• Understanding the 5 Cs of cinematography
• Choosing the right camera
• Framing for continuous shots
• Lighting techniques
• Using camera movement to enhance your story
• Leading the senses with sound
• Working with different microphones
• Editing and post-production considerations
A follow-up “practical” course (available in a few weeks) will cover hands-on composition, camera movement, sound and lighting techniques, among other useful tips like packing and working with very small budgets and crews.
Enjoy!
Video
Hybrid Assignments Equipment List: The Essential 41 Items
In aviation, an MMEL (Master Minimum Equipment List) is a categorized list of on-board systems, instruments and equipment that must be operative in order to flight. Any additional equipment not included in the MMEL may break temporarily but it won’t make the aircraft inoperative. Here’s an attempt to create a hybrid MMEL for three different crew sizes.
Let’s start with the definition of “Hybrid.” What I normally mean by this term are productions or assignments where one or two people are required to be the photographer, filmmaker, sound recordist, producer, and even editor. And, these gigs are becoming increasingly popular. It sounds crazy and these sorts of shoots can be. One of the keys to making them run smoothly relies on great planning and working with less equipment that gives you more control in less time. It also helps to team up with other people who can complement our weaknesses.
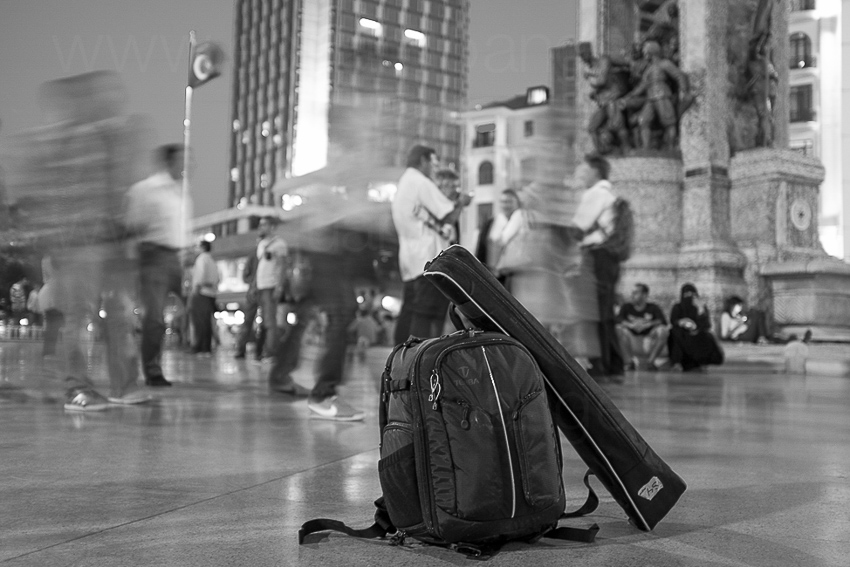
Short and one-man crew hybrid projects
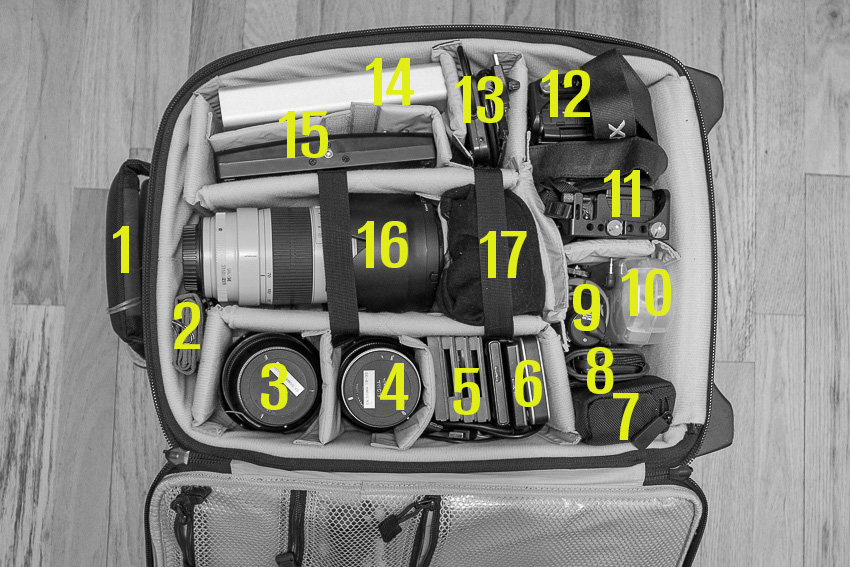
One substantial challenge for photographers shooting video is how to travel as light as possible while carrying a full production and post-production setup that is literally on their back. Here’s a picture of my backpack, which contains every single piece of gear that I’d need for from one up to three days, except some clothes and toiletries that will go on a small backpack.

Bag for a 1-day or 2-day gig by myself.
1. Media Credentials which sometimes, but not always, can give you special access, get you discounts and the most important part, allow you to travel with some heavy or oversized gear without paying a fortune. Here’s a link to Delta, American, and United Media Baggage policies.
2. Two external portable hard drives. I suggest this one, or this one.
3. Audio field recorder like the H4n (or a more current model and smaller version like Tascam’s DR-05) to capture interviews and my own production notes.
4. Camera A for video, in this case a Panasonic GH4 (Amazon and B&H) with a Lumix 35-100mm 2.8 lens (Amazon and B&H). I’m in love with this lens. So small, yet so sharp!
5. Camera B for video, another Panasonic GH4 with a Lumix 12-35mm 2.8 lens (Amazon and B&H)
7. Camera for stills and location scouting; I always carry my Fuji X100s (Amazon and B&H)
8. A variety of Tenba Tool Boxes (Amazon and B&H) to pack all the batteries, chargers, cables, adapters and other small accessories.
9. A small tripod (Amazon and B&H)that sometimes serves as an improvised handheld rig. A car mount works great for time lapse and even to hold the H4n or small lights during interviews.
10. At least one Rode VideoMic (Amazon and B&H) to capture some ambient sounds or interviews.
11. A 15″ MacBook Pro (Amazon and B&H) with Adobe Creative Suite (Amazon and B&H) and Shot Put Pro.
12. One of my favorite photo bags ever, the new Tenba Shootout (Amazon and B&H)
13. In terms of lighting, for these assignments I try to use mostly available/natural light, but I bring a 5-in-1 Collapsible Reflector.
And here’s my typical outfit and setup for some of these solo hybrid gigs.
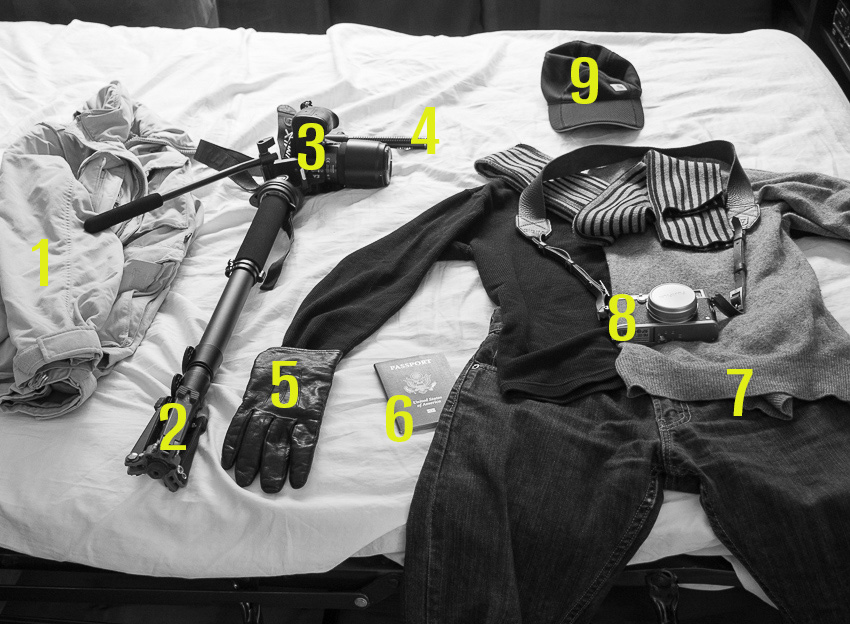
My outfit for hybrid shoots.
1. My good ol’ Columbia jacket/vest has been traveling with me to more than 40 countries. It has lots of pockets, a hoodie, and because it has a self-stowing pocket, it sometimes doubles as a pillow on the road. A priceless item, to be sure.
2. Benro S4 Video Monopod. Small, relatively light, and sturdy. Works great.
3. Panasonic GH4 with a Lumix 35-100mm 2.8 lens.
4. Rode VideoMic Shotgun
5. I always bring gloves unless I’m going to the Caribbean in July. Montreal was pretty cold and wet!
6. Obviously, the most important tool if you are crossing any borders: the passport. This website compares the “power” of passports from many different countries, and, as Americans, we are blessed to have the most powerful one.
7. I like to dress in layers and in dark colors when shooting on the road. Black hides dust and stains very easily. A cashmere sweater is worth its weight in gold.
8. Camera for stills: The Fuji X100s is especially handy after a very long day, when I don’t want to carry more gear but still want to capture a few night scenes of nice-looking dishes during my evening meal.
9. A hat—another essential item.
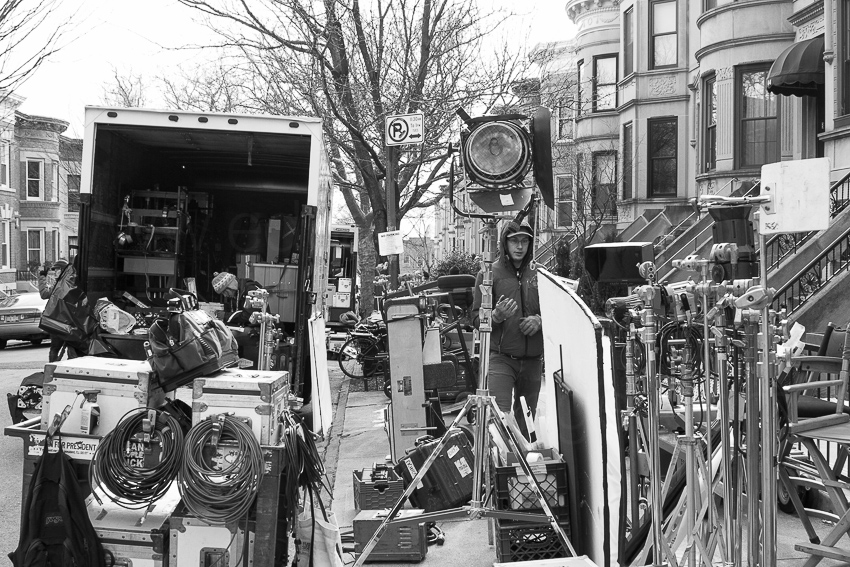
Longer projects and bigger crews
For a longer hybrid assignment where I’ll have one or two more people (gaffer/grip and a second camera/DIT) I’d bring a few more items. In this case we wouldn’t need to carry everything on our backs, but we definitely need to pack as little and light as possible.
We would bring a Tenba Transport Rolling Tripod/Grip case, to pack one or two Benro S8 tripods, a Benro S4 monopod, a very compact and portable slider that would take the same fluid head from the S8 tripod and/or the S4 monopod. Some grip accessories that I consider essential are at least a couple of adjustable Gaffer Clamps, and a couple Collapsible Reflector Holders which also double as boom stand. These two light and inexpensive items effectively function as one, and sometimes two, additional crew member. A no brainer if you ask me.
On the camera package I’d include an external monitor/recorder like the Atomos Shogun with plenty of Solid State Drives (you can also rent them for only $28 per day!), and all the charges and cables you can imagine, and a power strip (get one with a long cord) that becomes essential when downloading all the footage every night AND charging all the batteries for the next day. I use one Tenba Roadie Hybrid bag for the most expensive, essential and fragile items, namely cameras, lenses, Shogun and hard drives. The brilliant design of the Roadie Hybrid allowa me to treat is as a standard rolling carry-on, but I can also use it as a (very heavy) backpack on uneven terrain, subway stations, etc.
Here’s a view of my carry-on bag.
My carry-on bag for longer jobs and/or when I have a bigger crew.
1. Tenba Roadie Hybrid bag
2. Media pouch with ten 64GB SD cards
3 and 4. Sigma 18-35mm f/1.8 and Sigma 24-105mm f4. These are the same lenses I used last year on another one-man Hybrid project in Istanbul and Europe
5. SanDisk Solid State Drives for the Atomos Shogun
6. Two external portable hard drives
10. H4n Audio field recorder.
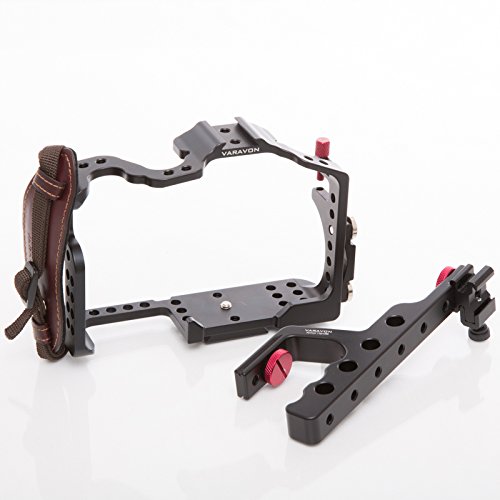
11 and 12. A couple of Panasonic GH4 bodies with Varavon cages, one with a Metabones Speedbooster (for the Sigma and Canon lenses) or a couple of Canon C100 Mark II or C300 Mark II bodies if the job doesn’t require stills.
13. USB 3 reader for Solid State Drives (included with the Atomos Shogun kit)
14. 6TB G-Tech External Hard Drive (compact, super fast and awesome)
15. Atomos Shogun
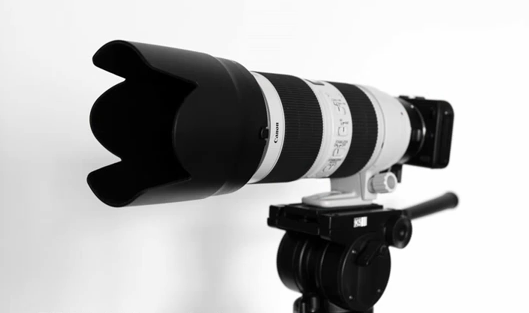
16. My sharpest and heaviest lens, Canon 70-200mm f/2.8 [
17. Panasonic Lumix 12-35mm 2.8 lens and Panasonic GH4 with a Lumix 35-100mm 2.8 lens. These lenses are the equivalent to a 24-70mm 2.8 and a 70-200mm 2.8 but super light and small
18. In terms of lighting I usually bring two or three 1×1 Bi-Color LED Panels with batteries and two Chimera 1×1 Lightbanks with grids. That pretty much covers all me needs. Another option is a Fiilex kit, which I like a lot, but find it way too expensive. I’ll need light stands and cables.
19. Depending on the job we would add another camera movement tool, like a Glidecam or a Ronin or even jibs and dollies. It depends on too many different factors.

All the bags packed. The LED lights are in the back seat.
Well, there you have my little setups for hybrid assignments. Obviously, there isn’t a perfect setup of gear list, just like there isn’t a perfect camera, but these items have been working great for us. I hope this article benefits some of you involved or interested in run and gun, single-operator scenarios like weddings, events, corporate shoots, documentaries, red carpet premieres, product launches, sporting events, video podcasts, and even student films.
If you are interested in some packing and traveling tips, especially when shooting overseas, or what to do the day before your video/shoot shoot, we have written about that too. Did I forget anything? Let me know here!
And of course, there are those crazy long, crazy hectic, crazy complex and crazy awesome projects that require everything and the kitchen sink.

Video
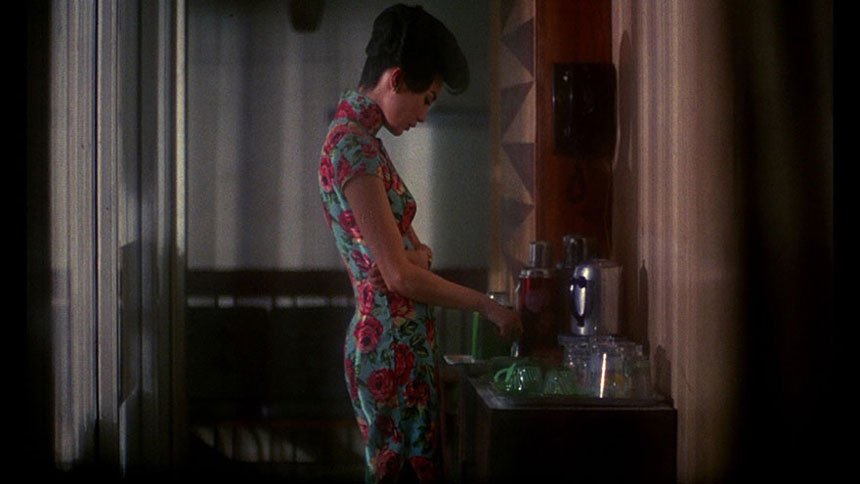
In the Mood for Love Redux.
I love Asian cinema and I feel a strong and special attraction and respect for Wong Kar-Wai’s work, especially his earlier collaborations with Chris Doyle. Wong Kar-Wai is known for his “romantic and stylish films that explore—in saturated, cinematic scenes—themes of love, longing, and the burden of memory.” In terms of photographing urban landscapes, especially at night, I can’t think of a better cinematographer than Doyle.
For the past couple of months I’ve been revisiting his movies, his video interviews, and reading as much as possible about his production methods and unconventional approaches to filmmaking.
Check out the following books to learn more about this amazing director:
“The Sensuous Cinema of Wong Kar-Wai” by Gary Bettinson
“Wong Kar-Wai: Auteur of Time” by Stephen Teo
“Wong Kar-Wai” by Peter Brunette
The long-awaited and complete Kar-Wai retrospective with more than 250 photographs and film stills will be released in September but it can be can pre-ordered now.
In order to better understand his compositional and directorial choices I imported “In the Mood for Love” into Premiere Pro and selected my favorite scenes, including those critical to the story, those that are brilliantly original, and scenes that are flawlessly executed or contain a number of technical achievements (like the impeccable use of dolly moves). I then re-cut all my favorite scenes from the original 94 minutes into a single 18-minute clip (below), always trying to keep the integrity of the story. My goal here is to help someone who hasn’t seen the movie grasp its (very convoluted) story in one 18-minute clip.
If you haven’t see the movie, I highly recommend it, and I’d love to hear from you once you see it.
If you have seen the movie, did I leave any key cinematic moments out?
Video

The eternal quest for “the best” digital camera.
I often receive emails asking for advice about “the best lens” or “the best camera” or even “the best laptop.” I believe it is simply impossible to determine a “best” of anything as there are too many random factors such as experience, budget, expected lifetime of the product, intended use, availability of accessories (like lenses or batteries), and even tech support in certain areas. That’s not even considering more subjective factors like personal preference, sense of loyalty to certain brands (or dislike for others), and even the size or weight of such tools. Interestingly, we are currently experiencing one of those “what’s the best” dilemmas ourselves, and not a minor one by any means; we are reconsidering our standard camera package for 2015–16.
Renting vs. Owning:
For many reasons, I believe renting is one of the best options for most people. When all you have is a hammer, the solution to every problem requires a hammer. That’s a very limiting factor to your creativity and a disservice to clients. Sometimes you can get the job done with a Swiss Army Knife like MacGyver, sometimes you need a nice toolbox, and sometimes the best approach is to have a professional plumber do the job.
Another huge reason to rent is to keep overhead as low as possible. Unless you are shooting several times a week with the same system, having something that is guaranteed to quickly decrease in value simply collecting dust in a drawer isn’t the best financial move. Unfortunately, renting is not an easy or affordable option in many small cities.
Lenses:
In terms of lenses I own a nice selection (from 8mm all the way to 200mm) of mostly Canon L glass, some Sigma ART lenses (with Canon mounts), as well as a couple of Panasonic Lumix lenses. I also have one Metabones Speedbooster adapter (Canon EOS to MFT).
Accessories:
We own a set of LED lights and basic accessories that I use frequently and will last a long time like monopods, tripods and a few camera movement tools. I also own a complete audio kit simply because we use it quite often. Audio tools tend to be fragile, and we have a very specific preference for brands and settings. Ultimately, because sound is such an important element of any video project, completely trusting it gives me an additional peace of mind. But I digress. The point of this article is not audio equipment, but cameras.
Cameras:
We own a Panasonic Lumix GH4 bodies and still have a couple of GH3 bodies. They have served me extremely well on hybrid assignments. I am very happy with the quality of the footage and always having the option to shoot 4K, HD, built-in slow-motion, and time lapses with the same camera and media. For video-only productions we usually rent Canon C100 Mark II or C300 Mark II bodies, which I also like very much.
The Challenge:
Several upcoming projects will require a more “complete” camera package, and we seem to have enough projects in the pipeline that it might make sense to own instead of rent, not only financially, but to save time picking up/returning and to be certain that the tool we plan on having in pre-production is the same tool we use on location weeks or months later. So, what’s the best cinema camera (for us) right now?
Technically speaking, we will need a main camera (Cam A) that ideally shoots 4K and has all the standard bells and whistles like XLR ports, HDMI, a good viewfinder, variable frame rates, peaking, ND filters, etc. Great low-light performance is key. For several projects we’ll need to shoot high-quality behind the scenes footage, so we will need a second camera (Cam B) that is either the same or very close to the quality of Cam A.
To make the riddle even more interesting, some of these projects will be “hybrid” projects that require on-location, mostly unplanned, and available light shooting with a very small crew (two or three people max). So the gear package needs to deliver great stills, great footage, and be easily operated by one person, which means light and compact.
Possible Solutions:
I will only discuss the main components of the package, so additional batteries, cables, memory cards won’t be included in the total price.
1. Canon
The first and obvious move would be to buy a couple of Canon C100 Mark II bodies. We already know and like the system, and own the lenses, so there’s no need for adapters. Unfortunately the C100 Mark II does not offer 4K, it is good but not great in low-light performance, it is small but not super light or compact, and it does not shoot stills, so I’ll need to get a Canon EOS 5D Mark III or at the very least a Canon EOS 70D. I’ll get the cinema features I need on only one of the systems.
1x Canon C100 Mark II = $5,500 (Amazon • Adorama)
1x Canon EOS 70D = $900 (Amazon • Adorama)
Total = $6,400
2. Sony
The second option would be to get a Sony FS7 AND a Sony a7S as a B Cam (and also for stills and BTS). The first one seems to be the new cool kid on the block, with raving fans and over the top reviews. It seems portable enough for a cinema camera and matches most of our technical requirements (I still need to test the low-light performance). Its little sister, the a7S shares the same outstanding reviews, it is clearly number one in low-light performance and it can even capture 4K to an external recorder. The catch, and this is a big one, is the cost. The FS7 goes for $8,000 and the a7S goes for $2,500. In order to use my existing lenses I’ll need two Metabones Speedbooster adapters (Canon EOS to NEX) at $650 each, but I will not have AF capabilities when shooting stills, which is a major issue. Also, in order to fully use the a7S as the B Camera we probably would need an Atomos Shogun adding a lot to the budget.
1x Sony FS7 $8,000 (Amazon • Adorama)
1x Sony a7S $2,500 (Amazon • Adorama)
2x Metabones adapter (Canon EOS to NEX) $800 (Amazon • Adorama)
1x Atomos Shogun $2,000 (Amazon • Adorama)
Total = 13,300
3. Panasonic
A third, and more affordable option would be to get a second Panasonic Lumix GH4 body and keep them as A Cam and B Cam (4K, HD, and stills) and something like the Panasonic HC-X1000 as a C Cam for BTS. I am still missing the “standard bells and whistles” I mentioned above, and I still have to test the X1000’s performance under low-light. Getting the YAGH (“brick”) wouldn’t make much sense in terms of money, size, weight, and additional power sources.
1x Panasonic Lumix GH4 $1,500 (Amazon • Adorama)
1x Metabones Speedbooster adapter (Canon EOS to MFT) $600 (Adorama)
1x Panasonic HC-X1000 Camcorder $3,200 (Amazon • Adorama)
Total: $5,300
4. Blackmagic
We briefly considered Blackmagic systems but found too many cons to even add them here. Another topic for another day.
Conclusions:
Honestly, there aren’t any. Not yet, anyway. We are still trying to figure out what to do. The Panasonic Package (#3) is the cheapest and easiest as we would have a very small learning curve (with the HC-X-1000) but low-light performance remains to be seen (and it is good but not great on the GH4). The price is great but we would only have the cinema features we need in one of the three cameras.
The Canon Package (#1) is right in the middle, but we would lack 4K, slow motion, a codec over 50mb/s, and only one of the two cameras offers the bells and whistles we are looking for.
Sony (#2) seems to offer the best solution, but costs twice as much as Option #1 and $8,000 more than Option #3. We would lack autofocus for stills, only one camera will have the cinema features, and the FS7 could require a significant learning curve.
An alternative, suggested by an experienced filmmaker, would be to keep using our GH3 with the Panasonic lenses as our stills camera ($0), use the GH4 with our Metabones and Canon and Sigma glass as Camera B, and simply buy one Sony FS7 ($8,000) and a second Metabones (Canon EOS to NEX) adapter $400 for a total investment of $8,400. Altogether we would get AF for stills, 4K, slow-mo, no need for new lenses, but only OK low-light performance, and only ONE system with XLR ports, ND filters, etc. I am also seriously concerned with the additional time (and expense) in post to make everything look somewhat close.
Money and lenses are obviously very important considerations, but there are many other things that have to be factored into camera choices like post workflows (software and hardware), internal codecs, etc. Color science is something else we tend to overlook, and we shouldn’t, as certain camera choices will multiply the amount of time you need to spend in post to get them to look like what you’re used to.
So, clearly, there isn’t a “perfect” camera that will meet all our requirements. So the best approach is to consider what we have (budget, lenses, software, hardware, accessories, etc.) what we need, and what we are willing to sacrifice. So, what is “the best” camera package for us, giving our existing gear, ideal requirements and upcoming needs? Now I need YOUR help to figure this one out.
UPDATE 01: Since I wrote the first draft for this article I’ve been hearing highly reliable complains about the FS7 working with lens adapters and Canon lenses. That pretty much kills the Sony package option for us.
UPDATE 02: There are strong rumors that Panasonic will be announcing an updated version of the AG-AF100 at NAB, which apparently would include 4K. That could be a great solution for our full blown cinema camera.
UPDATE 03: Another strong rumor is that Canon will replace/update the 3-year old 5D Mark III with a 4K version. Kinda cool, but it still doesn’t solve our “bells and whistles” camera dilemma.
UPDATE 04: For the past 3-4 weeks I’ve been using the Atomos Shogun (Amazon • Adorama) and I must admit I’m VERY impressed. This gadget not only provides an exquisite 1920 x 1080 ultra sharp (and fairly accurate) image, but it’s main purpose is being a 4K (or HD) recorder via Solid State Drives. The best price/quality I’ve found are these 240GB Sandisk for $146 with a 10-YEAR warranty. Not bad at all.
Something I didn’t consider when getting the Shogun is that now I have XLR options, making the GH4 a much more powerful beast. The provided batteries only last about 30 minutes of recording time. I got this off-brand ultra cheap ($36) set of 2 batteries with chargers and so far they have performed perfectly. To keep in perspective, a single Sony battery costs $199….
UPDATE 05: The Varavon cage for the GH4/GH3 works perfectly with a Metabones Speedbooster. This set up and the Atomos Shogun are making me rethink my camera strategy. Now I can have a very comfortable grip, add a shotgun for run and gun or a monitor/recorder with XLR mics on sticks. Hmmmm this is getting REALLY interesting!
More to come.
Video

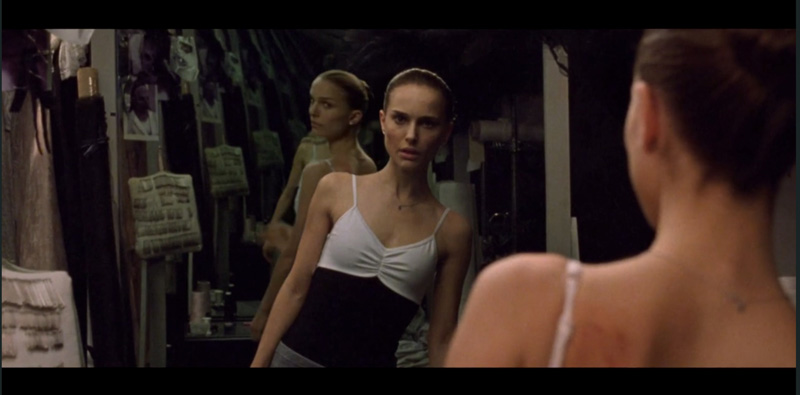
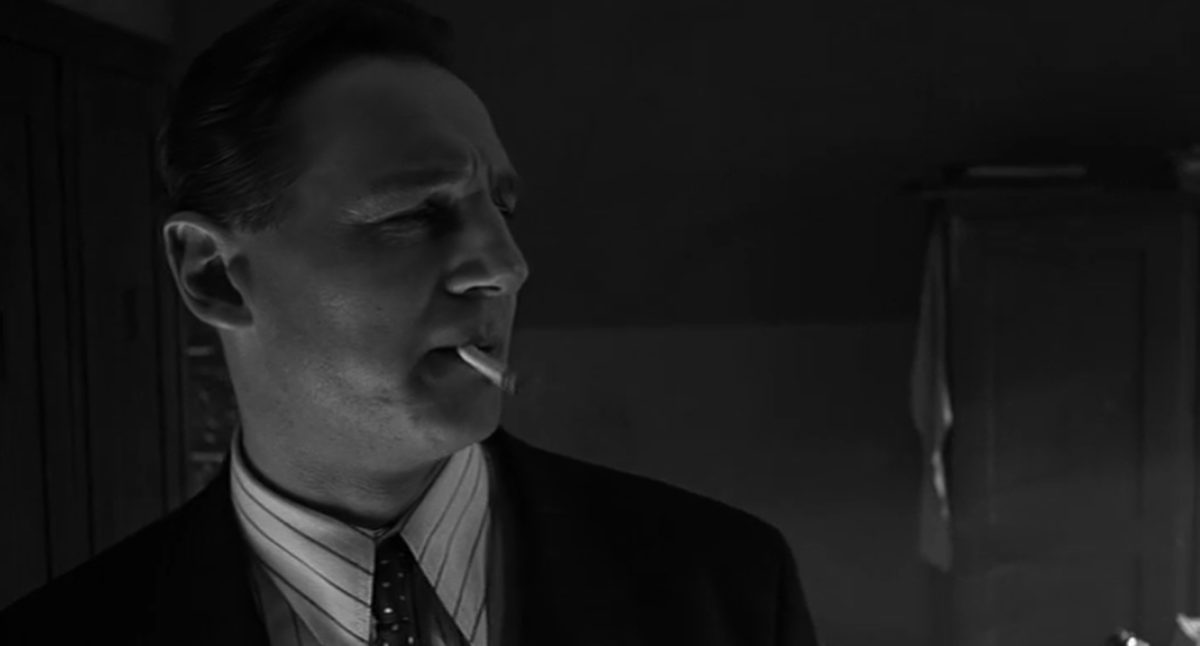
Shooting the Black Swan.
How was the film Black Swan shot? How did the filmmakers deal with all the mirrors? How many lights did they use and what kind? Those were my thoughts while watching Natalie Portman’s remarkable performance. Here, I have compiled the most interesting technical aspects of the movie, gathered from several articles and forums, including a great interview by American Cinematographer’s Stephen Pizzello with the Director of Photography Matthew Libatique.
Mirrors
Regarding the mirrors and avoiding camera reflections, which is the real reason why I did some serious research on this movie, Libatique says “we did as much as we could practically, but we knew there would be moments when we wanted to create seemingly unachievable shots, and for those we just removed the reflections digitally with the help of Dan Schrecker, our visual-effects supervisor at Look Effects. A good example of Look’s work is the scene where Nina is rehearsing in front of a mirror, the lights go out, and her reflection starts moving independently; the camera was right where you see the reflection, but Darren wanted to get tight eye lines, so we had to paint ourselves out in post. For other scenes, it was easier to just hide the camera or shoot from angles where you couldn’t see it. We also used one-way mirrors to get a shot where we created an ‘infinity reflection’ of Nina sitting in front of a dressing-room mirror. We positioned Natalie between two one-way mirrors and just shot from behind them. We wanted the film’s horror beats to be a bit more stylistic.”

Lighting
The main lighting source was “a strip above the dancers’ heads. We had about eight rows of 1K cinema globes running 60 feet across the stage. We just used different gels and put the lights on different channels; we’d go from a green gel to white to magenta, and we also started to mix them, which was nice. It was less complicated than using moving lights. For one sequence, we combined a moon backdrop with a rain effect that we created by filling a pool of water with broken glass and placing it at the base of the background. We just powered Source Fours into the pool and modulated the water movement with fans.”
 Cameras
“The movie was a single-camera shoot except for maybe one day, and our main camera was an Arri 416, which we used with Arri Ultra Prime 16 lenses. We used a Canon 7D or 1D Mark IV for all the subway scenes; I could just carry a 7D and shoot on the subway all day with a very small crew. I did some tests with my wife beforehand to figure out my ASA, my stop, and how I was going to deal with the focus. I didn’t use any rigs with it because I wasn’t trying to shoot in the traditional way. I tested a bunch of different exposures and then brought the footage to Charlie Hertzfeld at Technicolor, who put it in the system so I could look at the highlights, the moiré and the resolution. Then I went back to the drawing board to do more tests. The 7D has more depth of field than the 5D, but I needed that because I didn’t have a follow-focus unit and needed to work really fast. I shot everything documentary-style. I did all the focus pulls by hand, and we’d just look at it on the camera’s monitor. I ended up shooting on a Canon 24mm lens at 1,600 ASA to get as much depth of field as possible at a stop of T81?2.”

Special Effects
Check this short documentary on this movie’s special effects.
Camera Movement
Every performance was covered in long master shots, which “we just augmented with other moves as necessary. To Natalie’s credit, we rarely did more takes for her; if we required additional takes, it was usually for us. We knew we’d be shooting her from the chest up most of the time, but we knew we’d be in great shape, performance-wise, as long as we could see her face and arms. For wider shots, we could just use her dance double. We did almost everything handheld.” The only Steadicam shot is at the climax of the final dance number. Unreal.
The movie is now available on Blu-Ray.
Video
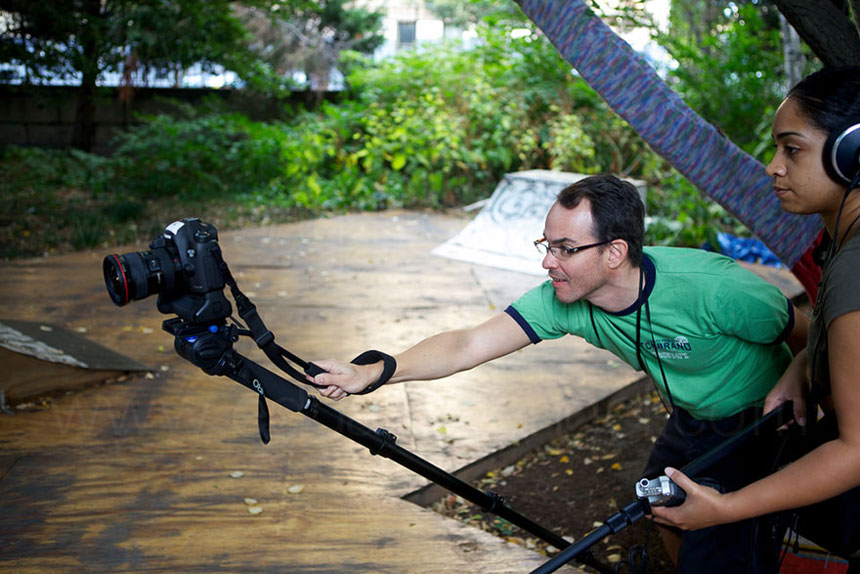
How to avoid the slideshow look when shooting video.
As we discussed previously, one piece of equipment you will be able to find in almost most any photographer’s kit is a monopod. This tool provides enough stabilization for us to open up the aperture and work with longer exposures. But, how well does this piece of equipment translate for someone making the transition from stills to video?
When it comes to shooting video, monopods often gets a bad rap. They are not stable enough. It’s impossible to get smooth pans and tilts. What if I need to walk away from the camera to adjust the lighting or sound?
Many people will tell you that the first thing you need to buy to support your camera is a good fluid head tripod, but I actually often recommend a monopod over a tripod for someone who is just starting out as a filmmaker. The monopod’s “limitations” force us to think differently about the borders of our frame. And it is a simple way to introduce camera movement and avoid the locked off “slideshow” look that is prevalent in so many DSLR productions.
Most critics of monopods often come from a narrative filmmaking perspective and do not take into consideration the conditions that are common for run and gun documentary style filmmaking. If you are trying to capture unpredictable, real time action, it is nice to be able to move quickly through a crowd without knocking people down. Adjusting the height of your tripod can be a real pain if you are working with a heavy camera rig and do not have an assistant or grip helping you set up. Another important consideration if you are planning to shoot on a street of a big city like NYC is that tripods often require a permit, but monopods are perfectly acceptable. Go figure.
If you are working with a small crew and under a tight schedule a monopod can provide you just enough stability, while still retaining a small footprint and flexibility.
Of course it is important to remember that a monopod will never be a complete substitute for a tripod. It will never provide the same degree of stabilization for static shots and pans and tilts especially when working with long focal lengths or long shot durations. You certainly don’t want to be caught filming a two hour-long interview on a single leg and in certain situations the inherent sway of a monopod can be incredibly distracting. There are very few cameras that can produce decent handheld footage without some form of rig or stabilization. So here’s a simple rule of thumb: use a monopod on any scene that you might consider shooting handheld.
Another option would be to use a shoulder rig, but how often is the most dynamic angle for a scene going to be shot from shoulder height? Not often.
With a monopod you can get the angles you want and have the floor as opposed to your shoulder supporting the camera’s weight. Even if the tip of the monopod is not touching the floor its weight can do wonders to support your footage. Because of its small footprint it doesn’t add much to bring it along with your kit and it could be just what you need to get out there and start shooting.
To learn more, check out our new Camera movement course on Lynda.com, where we worked extensively with Benro Monopods and Tripods to show off the advantages and disadvantages of each.
Video

6 Lighting Tips for Shooting Video.
Here’s the thing — we can make a film without sound, without color, and without a single camera movement, but we can never make a film without light. Wehile we can sometimes use available light or cheap practical lights, here are a few things to consider:
1. The biggest advantage of natural light is the price. It is readily available and doesn’t cost much to harness or enhance. If nothing changes and everything can be accomplished in one shoot, one can probably get away with this method.
2. Unfortunately, video often requires shooting over extended periods of time, and tear down and reproduce scenes shot days or weeks before. Additionally, as professional photographers and filmmakers we can’t rely on clouds, having enough windows, or even the weather forecast.
3. We often have to work fast with limited tools. A typical example for us is shooting B-roll the same day we arrive to a new city. Understanding simple techniques like harvesting harsh noon sunlight, or harnessing available shade can make or break a day on location.
4. Even when we can carefully plan our shoot, we need to truly understand the role of lighting in our story so we can select the ideal tools and techniques to develop it.
5. I find it fascinating how warm tones pop out of the frame, while cool colors recede into the frame. Or how through proper lighting we can make the same exact scene look peaceful, enigmatic, elegant, happy, or even scary.
6. As photographers and filmmakers, light is our palette. With light we can provide a sense of space and establish a time of day. We can create beautiful morning light in the evening as well as spectacular moonlight at noon.
Light is such a powerful and adaptable element that by understanding it and mastering it, we can greatly enhance our video productions without breaking the bank. Check out this tutorial, using ONE utility light during daytime:
Like these tips? That’s exactly what my course “Lighting Design for Video Productions” is all about.
Additional free video tutorials are available here!
UPDATE: May readers and Lynda.com subscribers have been asking about the equipment we used on our Lighting course on Lynda.com. Here are the answers:
We used a variety of lights, but the main ones were Bowens Limelite Mosaic 30x30cm Daylight LED Panel.
As our A Camera we used a Canon EOS C100 Cinema EOS shooting to an Atomos Ninja-2 recorder. As our B and C Cameras we used a couple of Canon EOS 5D Mark III. We used a variety of lenses, but the main one was the Canon EF 70-200mm f/2.8L IS II USM.
Video
Amazon adds storytelling tools to its arsenal.
updated 20140114
Amazon Studios was launched 3 years ago to develop feature films and episodic series. In a new effort to pack another punch to its arch enemy Netflix, as well as increasing its original content catalog, the company has rolled out the beta for “Storyteller,” a free online storytelling tool that (more…)
Video
How to shoot a zero budget film in 17 hours without a crew.
Being busy should never be an excuse for not participating in creative challenges. Not having a budget, crew, or even actors, are simple excuses as well.
Let me explain. (more…)
Video
Tips and Tricks 008: Is there an ideal shutter speed to use in video?
Is there an ideal shutter speed to use when shooting video? We have previously discussed this topic, but we keep getting the same question so let’s go over this again.
The quick answer is yes, there is, and you really need to pay attention to that. (more…)
Video
Thoughts on getting started in Filmmaking.
As I’m packing my gear for a four-day sunrise-to-sunset video shoot I realize that I really enjoy filmmaking. There’s so much to learn, watch, read, and improve upon.
Photographers making the transition into video shouldn’t be daunted. I think that video is something that is really good for us as photographers, as it is just another tool that we have at our disposal. Instead of being afraid and thinking that there is something else you need to learn, you should embrace this. Video is not going away!
A few random thoughts:
• Let’s start with a “simple” question I get all the time that’s potentially difficult to answer: what makes a good video? Basic elements of photography, for sure. Interesting subjects, definitely. And good light. And clean sound. And a great story, which often means a tight script.
• When starting out (and pretty much all the time, really) it is important to team up with a good editor. If you are a photographer, and single, do your best to date or marry an editor!
• When we are shooting stills, we are looking to freeze time, to capture the essence of a moment. With motion, we are looking for a lot of other things besides framing and exposure. We are thinking about movement, continuity, angles, and how we are going to connect everything in post. It takes a very different mindset.
• Using very shallow depths of field as a creative element sounds amazing. In reality when the camera moves and the subject moves and you have two inches of focus, then it is not that amazing.
• A 21-megapixel-full-frame-sensor size is 5600×3700 pixels, but that’s for stills. When you are shooting video, you are really only getting a fraction of that. HD, which is 1920×1080, is two only 2 megapixels. Yeah, I know, do the math. But, we are shooting 2 megapixels 24 or 30 or even 60 times per second. That is a lot of information, which means more memory cards, longer download times, and more runs to the store to get additional hard drives.
Be brave…this is just the tip of the iceberg. In upcoming articles I’ll flesh out details like achieving the ideal setup, the nuts and bolts of shooting quick interviews, and crucial elements you want to be sure to get right before the shoot.
Video
Wes Anderson’s Top 10 Movies, and the Color Trilogy.
I recently read an article where Wes Anderson picked his 10 favorites movies from the Criterion Collection. Guillermo del Toro does the same here. Some of their picks are “Pigs and Battleships“, “The Insect Woman“, and “Kuroneko.” Clearly, I have a LOT of movie watching to do this Summer.
I will also be reading the latest Criterion’s Film Essays. The one about Krzysztof Kie?lowski’s “three colors trilogy“; Blue (1993), White (1993), and Red (1994) is simply spectacular. (more…)
Video
DSLR Video Shooter Interview; Panasonic GH3, Post NAB gadgets, backup solutions and more.
Update 20130706: Amazon just posted a crazy deal: $1,049 for the GH3. Not sure how long it will last but if you have been considering this camera, go grab it now!
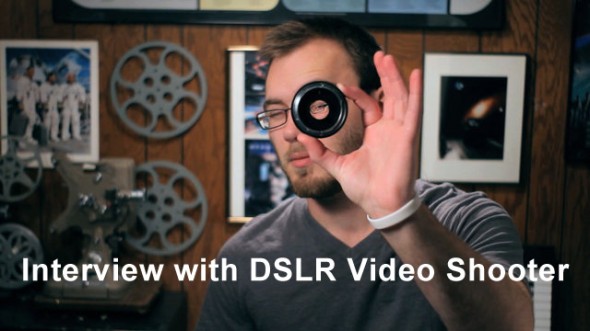
Recently, we sat down for an interview with our friend Caleb Pike of DSLR Video Shooter, a blog dedicated to videographers and cinematographers that use HDSLR video for quality storytelling. It was great to chat about NAB 2013, upcoming events, gear he have been using or testing like the Panasonic Lumix GH3, and share other useful digital workflow solutions. (more…)
Video
10 (new) Cool Gadgets for Photographers and Filmmakers. Part 2
6• Convergent Design Odyssey 7.
Two super interesting monitor/recorders are the Odyssey7 and Odyssey7Q by Convergent Design. For $1295 and up you get a 7.7” 1280 x 800 OLED external monitor that also doubles as an external recorder capable of receiving 4K RAW data as well as other compressed and uncompressed formats onto two 2.5” SSDs.
Here’s the twist; out-of-the-box, these two products are monitors only, with all the usual settings (waveform, histogram, false color, vectorscope, zebras, and focus assist) but without any recording or playback capabilities. (more…)
Video
Post-NAB 2013 wrap-up.
Our Digital Technology Resource is a monthly conversation about news, trends, and events for photographers and filmmakers. On our upcoming issue we highlight the most relevant products and trends we witnessed at NAB, including:
• Edelkrone SliderPLUS
• Redrock Micro One Man Crew
• Blackmagic Pocket and 4K Production Cameras
• Atomos Ninja 2
• Convergent Design Odyssey 7
• Tascam DR-60D and Samson Zoom H6
• G-Tech Evolution Series.
• Adobe Lightroom 5 and Premiere Pro “6.5”
• Imagine Products ShotPut Pro
It is never too late to sign up. Do it now!
Did you miss a previous issue? Don’t worry, be happy. Here are the links:
January 2013 Issue
February 2013 Issue
March 2013 Issue
Video
15 Valuable Lessons Learned on Movie Sets.
For a while I’ve wanted to share some small (but valuable) lessons I’ve learned while working on movie sets. The following list is in no particular order; however, I will say that the first item of business in any shoot should be deciding where the camera should be placed. Everything else follows this decision.
• There’s cable wrangling and data wrangling, and as hierarchy goes, there’s a big difference between the two.
• The digital imaging technician (DIT) does a lot more than just data wrangling. He needs a deep knowledge of cameras, color, RAW workflows, monitors, backup strategies, etc.
(more…)
Video
Expanding our International Workshops.
We are hoping to expand our Photography and Filmmaking workshops to Hawaii, Thailand, Nigeria, Kuwait and South America. But first, we would love to hear your feedback.
Please click here if you have time to answer a few simple questions that will help us a LOT.
Thank you in advance.

Video
NAB 2013 is here. Ghost Town goes wild with DSLR Shooters.
This coming weekend I’ll be working with Jem Schofield and a very talented crew on a unique DSLR Video Field Workshop in Nelson, Nevada. The event, hosted at an awesome Ghost Town and surrounded by incredible landscapes, focuses on the craft of filmmaking, camera movement and lighting controls.
Attendees will have four production stations to shoot:
• Tripod, Slider & Dolly Station (with actors)
We will learn how to properly balance a tripod system, operate a camera on a slider and how to use a proper dolly system (including being a dolly grip).
• Rigs Station (with actors)
How and when to use handheld and shoulder mounted rigs from a number of manufacturers to get different looks in camera. Students will focus on tracking shot and other set ups while filming live actors.
• Jib Station
Learn how to operate small to medium sized jib systems, to get “money” shots of the town for establishing shots, reveals, etc.
• Filters & Exterior Light Station
Controlling natural light for exterior shots using a selection of filters, reflectors and silks is paramount.
We’ll have great equipment from sponsors such as Genus, Ikan, Indie Dolly, Induro, Kessler, Lastolite, Manfrotto, Marshall, Nice Industries, Redrock Micro, Tiffen and Zacuto.
Check the video below, and I hope to see you there!
Registration includes round-trip transportation from Las Vegas Convention Center to Nelson Nevada Ghost Town, lunch and on-site instruction.
Video
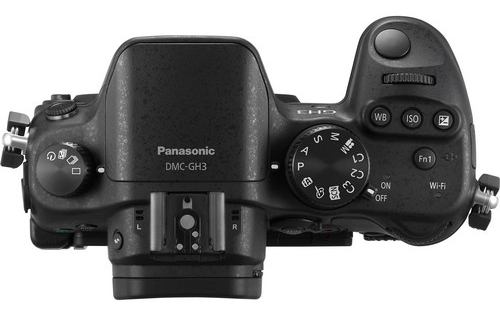
Shooting with the Panasonic Lumix DMC-GH3. Field report and impressions.
The friendly waiter at the Turkish restaurant in Sohar, Oman, saw the camera on the table and asked “Nikon? Canon? Which one is better?” To which I replied, “actually, this is the Panasonic GH3.” He stared at me, his expression turned from excited to perplexed to confused to annoyed within seconds. After an uncomfortable silence he finally asked, “Are you ready to order?”
That was pretty much my reaction when, a few weeks ago, just two days before I started teaching a “Digital Cinema for Photographers” event in Dubai, I found out that Panasonic, a major sponsor of the event, REALLY wanted me and my students to use a couple of GH3s and several lenses in my hands-on workshop.
Panasonic is one of the largest consumer electronics companies, and the GH3 is the third generation of their very successful Micro Fourth Thirds DSLM (Digital Single Lens Mirrorless) system. For a while I have been aware of the low-budget-filmmaking community’s devotion to the hacked DMC-GH2 and its ALL-I codec. I saw the DMC-GH3 at Photokina last year, but I had never before shot a single frame with a Panasonic camera. The bodies that I was given were running Firmware v0.5. Add to this a nine-hour time zone difference and jet lag, and you can begin to imagine my pain.
While I’ll be using some geeky terms, this is not an in-depth technical review, nor a scientific analysis of the GH3. You can dig into tech specs and MTF charts somewhere else. My goal is simply to share my honest and independent impressions, go over the things I liked and didn’t like, and communicate my wish list for future features. I want to emphasize that all the conclusions in this article are subjective and strictly based on my own personal experience.
“I have to warn you, I’ve heard relationships based on intense experiences never work.”
-Keanu Reeves in “Speed”
I have to respectfully disagree with Keanu on this one. Much to my surprise, the camera was much more intuitive than Sony’s NEX system, and several video features got my full attention right away.
FEATURES
• Full HD 1920×1080 60p/50p (NTSC/PAL) with 30p/25p/24p options.
• Ultra-high bit rate video recorded at 72 Mbps (ALL-I) or 50 Mbps (IPB).
• Capable of recording continuously for an unlimited time for NTSC and 29 min 59 sec for PAL.
• Native support for MOV (h.264), MP4, and AVCHD formats.
• Time Code support in the MOV and AVCHD formats.
• Extremely fast and accurate contrast-detection Autofocus.
• A 3.5mm mic input AND a headphone jack AND the option to manually adjust the sound recording levels via touchscreen controls.
• Full-time AF, AF Tracking, and Face Recognition AF are available for VIDEO. The Touch AF mimics rack focusing.
THE WORKSHOP STORY
Not having enough time to field test the Panasonic systems before the Workshop, I shot dummy clips in my hotel room and made sure that the footage would work in Adobe Premiere Pro CS6. The test went surprisingly smoothly. I then set both GH3 cameras to the same video settings: MOV at 1920×1080, 24p, 72 Mbps ALL-I, Standard Photo Style, White Balance at 5500K, got ND filters for all the lenses, extra batteries, and a few Class 10 SD cards. And then I prayed.
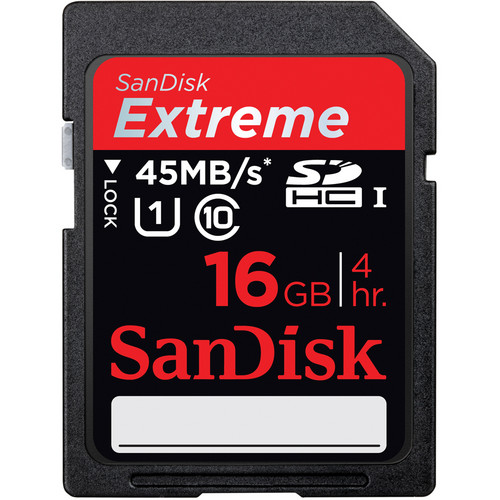
You must use a Class 10 SDHC card when recording Ultra-high bit rate video at 72 Mbps (ALL-I).
Note: It’s extremely important to point out that full HD on this camera requires memory cards with the fastest speed available. My “older” memory cards didn’t work, giving me only four seconds of recording time.
VIDEO
We spent the first day of my three-day Digital Cinema Workshop covering all the technical similarities and differences between stills and video. On the second day, we planned a location shoot with a Capoeira team and spent a couple hours shooting in the afternoon. On the third and last day we covered the different hardware and software requirements for post production and spent three hours editing the footage. I am especially proud of the short clip my students put together in such a limited amount of time and with newly acquired knowledge (and using brand new gear!).
Capoeira in Dubai. Student Project. from Eduardo Angel on Vimeo.
We could obviously use a few more days sweetening the audio, fine tuning transitions, and grading, but for a two-hour shoot and a three-hour edit, I believe this is a good example of what can be accomplished with great teamwork, interesting subjects, and the GH3’s many customizable options.
SAMPLE CLIPS
Below you will see a few additional sample clips, all shot as H.264, 1920 x 1080, 23.976 72Mbps ALL-I, using the GH3’s “Standard” profile (Contrats = 0, Sharpness = 0, Saturation = 0, Noise Reduction = 0). The Exposure and White Balance were set manually. The lens was the Lumix GX Vario 12-35mm F2.8 set on AF Tracking mode, which worked very well most of the time. Despite the lens having “environmental sealing,” as you can see the fine desert’s sand inevitably found its way to the sensor. I put the clips together on Adobe Premiere Pro CS6, and have NOT done any grading nor sharpening. These short clips are intended to show you what the GH3 is capable of, not to tell a specific story.
SOMETHING INTERESTING
So, mission accomplished, right? Not so fast. A couple of days later, as I was wrapping up my day, a friend asked “Are you busy? I wanna show you something interesting.” With only the GH3, the 12-35mm 2.8 lens, a 4GB card and a low battery I jumped into his car. The “something interesting” happened to be access to the Royal Suite at the 7-star Hotel Burj Al Arab—a notoriously difficult area to access. With limited amount of storage space and battery life I managed to capture a few keepers.

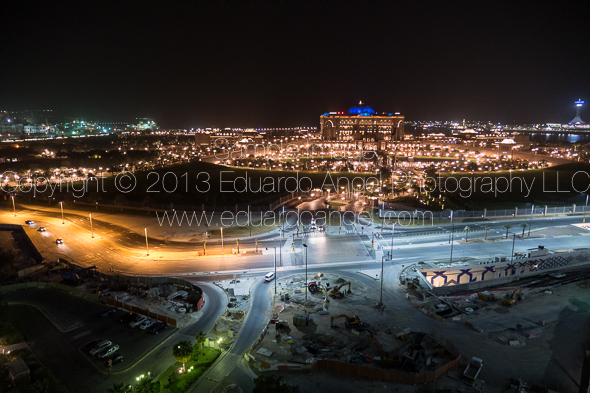
The 7-star Burj Al Arab hotel resembles a giant sail rising over the Gulf, with changing colors visible for miles at night.

The very next morning (on my “day off”), I headed out to meet an old friend for brunch at the Atlantis. Should you ever find yourself in this neck of the woods, I strongly recommend that you pay the Atlantis a visit. As we enjoyed the seemingly endless food, my friend received a call to drive to Abu Dhabi right away to pick someone up and then drive back to Dubai. Would I like to come? Guess what I had hanging on my shoulder? This time I had a full battery and a 16GB card, but nothing else to shoot the magnificent mosque and the impossibly opulent Emirates Palace. Once again, the GH3 did a fantastic job.
A nice view from a 25th floor overlooking the magnificent Emirates Palace in Abu Dhabi.
MORE FEATURES
These are some of the GH3’s features that are not obvious to the naked eye, but are interesting once you are aware of them:
• A magnesium alloy camera body that Panasonic describes as “splash proof and dust proof.”
• The Panasonic RAW files (RW2) work fine in Adobe Lightroom [add link to LR workshop] but the most current version (4.3 as of this writing) is needed. Unfortunately there are no Panasonic lens profiles available as of this writing.
• All the video formats worked seamlessly on Adobe Premiere Pro CS6. Even the video recorded at 72 Mbps was easy to preview and edit on a two-year old MacBook Pro (with 8GB of RAM and an external 7200 RPM Hard Drive as a Scratch Disk).
• HDMI monitor output can be sent with or without information overlays.
• I had a DMW-MS2 Stereo Shotgun Mic with me, but was happy to learn that the camera’s built-in internal microphones provide stereo audio.
• The GH3’s sensor has a 4:3 aspect ratio.
• Built-in Time Lapse, and HDR but unfortunately it works only for JPGs not RAW.
• Five physical function buttons, and two touch-screen function buttons, all customizable with close to 40 options to choose from.
• Virtually all the key shooting controls are within the right hand’s reach. This frees up the left hand to hold the camera or focus manually.
• Excellent battery life, lasting a full day under normal operation. For extended video sessions I’d consider getting the DMW-BGGH3 Battery Grip.
• Apparently (I have not tested this) the GH3 is also capable of real-time image output to the LVF or the rear monitor AND to an external monitor via HDMI.
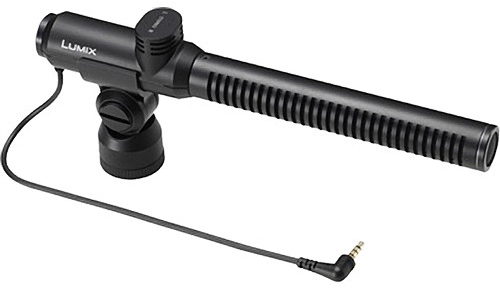
DMW-MS2 Stereo Shotgun Mic
LENSES
I shot extensively (more than 2,000 images in 18 days) with the Lumix GX Vario 12-35mm F2.8. The lens is tiny. And fast. And awesome. It has the equivalent focal length to a 24-70mm F2.8 on a 35mm system but it is a fraction of the size and weight. As you already know, this is a very good start when dealing with packing issues.
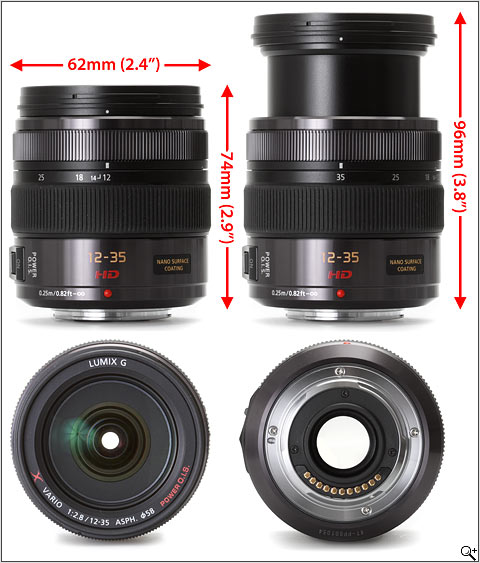
Lumix GX Vario 12-35mm F2.8
In terms of depth of field, the lens behaves like a 16-45mm F3.5 lens on an APS-C sensor, or a 24-70mm F5.6 lens on a Full Frame sensor. It is hard to get used to this, especially when shooting another system simultaneously, but it is not a disadvantage per se.
Click to keep reading (more…)
Video
What to bring and how to pack when shooting overseas.
For a limited time, Tenba is offering a 10% off ANY item on their website using the Code: EduardoAngel
—
I have always been fascinated with bags and how photographers pack their gear. I remember reading the equipment lists of National Geographic photographers when I was younger. I used to wonder how they moved around the world with so much stuff.
Those times, as you might have noticed, are over. Nowadays, we need to deal with increasingly tighter airline safety, weight, and size regulations.
We have covered the “essential” video gear on previous posts. However, when it comes to deciding what to bring on a trip as carry on, what to check, and what to leave behind, the theory becomes much more interesting.
I tend to start with the personal stuff. Medicines, pain killers, toiletries, travel documents, etc. Some of these items are not easily replaceable; some are, but it would be inconvenient to forget them (think passport, credit cards, or headphones).
Disclaimer: The images below are taken with my phone, simply to illustrate this article. They are not intended to be fine art masterpieces of any kind. And yes, the “background” is my bed.
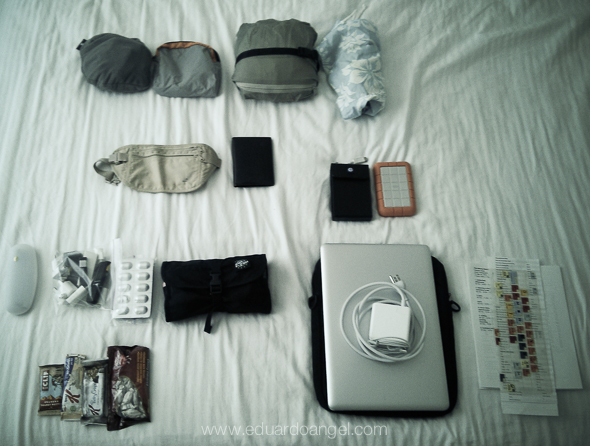
Personal Stuff.
This is my “rolling studio” when shooting on location in New York. Add a fluid head tripod, monopod, three hot lights, umbrellas, cables and light stands. It is a lot, but two people can easily carry everything even on public transportation.
Click to keep reading (more…)
Video
What’s the big deal with ND filters?
What’s the big deal with Neutral Density (ND) filters? Do we REALLY need to use them when shooting motion? We created a short video tutorial using Canon’s (super awesome) EOS C300 to demonstrate what happens when you can’t really control the light (shooting outdoors), you have too much of it (bright day, noon) and you want to use the aperture as a creative tool, not only as an exposure compensation tool. Remember that when shooting video we pretty much set and forget the shutter.
The C300 has three built-in ND filters; ND1 (+2), ND2, (+4) and ND3 (+6). We don’t have that luxury when using HDSLR systems, but we can always get a very nice variable ND filter that covers up to 8 stops!
Check the video below:
Looking for answers to your workflow questions? Want to make the most of your new gear? Book a virtual or on-site consulting session today.
Video
Schindler’s List Cut by Cut: Part 3.
After taking a deep look (check the first and second part of this post) into a famous and very important sequence from the film Schindler’s List, we begin to understand not only the relationship between Oskar Schindler (Liam Neeson) and Itzhak Stern (Ben Kingsley), but also the cinema ingeniousness of Steven Spielberg (director), Janusz Kaminiski (director of photography) and Michael Kahn (editor).
Here’s a poster we created that sums up all the cuts in the sequence altogether.
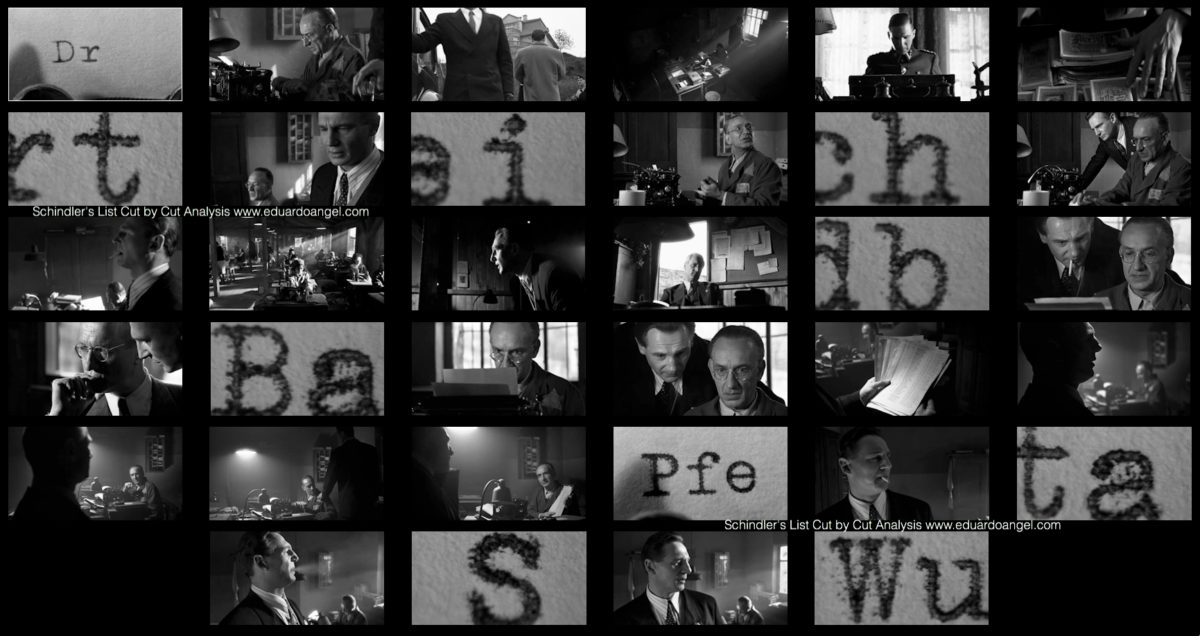
And here’s the complete sequence.
For those of you missed our Schindler’s List cut by cut analysis, here are Part 1 and Part 2.
Are there any other sequences that you would like us to review or break down cut by cut? Let us know by giving your thoughts and feedback in the dialog box below and we might just make it a future post!
Video
Adobe Lightroom Tips and Tricks 004. Creating Storyboards.
Today’s Tip & Trick is about creating a storyboard in Adobe Lightroom. Have you used storyboards on previews projects, and if so, which application did you use?
If you don’t need all the Adobe Creative Cloud bells and whistles, consider their photography plan which includes Photoshop CC + Lightroom 5 and 20GB of cloud storage for only $9.99/month!
Got specific questions or want to learn more? We offer virtual one-on-one sessions to give you customized solutions and personalized training no matter where you are in the world. Sign up now!
Video
Schindler’s List Cut by Cut: Part 2.
Last week, we analyzed one of the most important scene’s from Schindler’s List and the amazing editing work by Michael Kahn. We suggest you read Schindler’s List Cut by Cut: Part 1 first.
Great editing can only be accomplished if there is great footage to begin with. Look closely at Kaminski’s compositions; whether handheld or locked down he constantly plays with all the corners of the frame, showing dynamic blocking and camera movement to work in conjunction with the pace set by Kahn’s editing. This is what making a good picture is all about.
Michael Kahn’s editing is just phenomenal. His transitions are abrupt, but we never lose sight of the story. Let’s continue dissecting Schindler’s and Stern’s dialog while they create THE list of “essential” people.
Cut 15 Two-shot: Stern and Schindler trying to remember a name.
Cut 16 Typing a name.

Cut 17 Low-angle close shot of Stern trying to recall a name. Schindler seconding him off screen.
Cut 18 Typing a name.


Click here to continue reading (more…)
Video
Schindler’s List Cut by Cut: Part 1
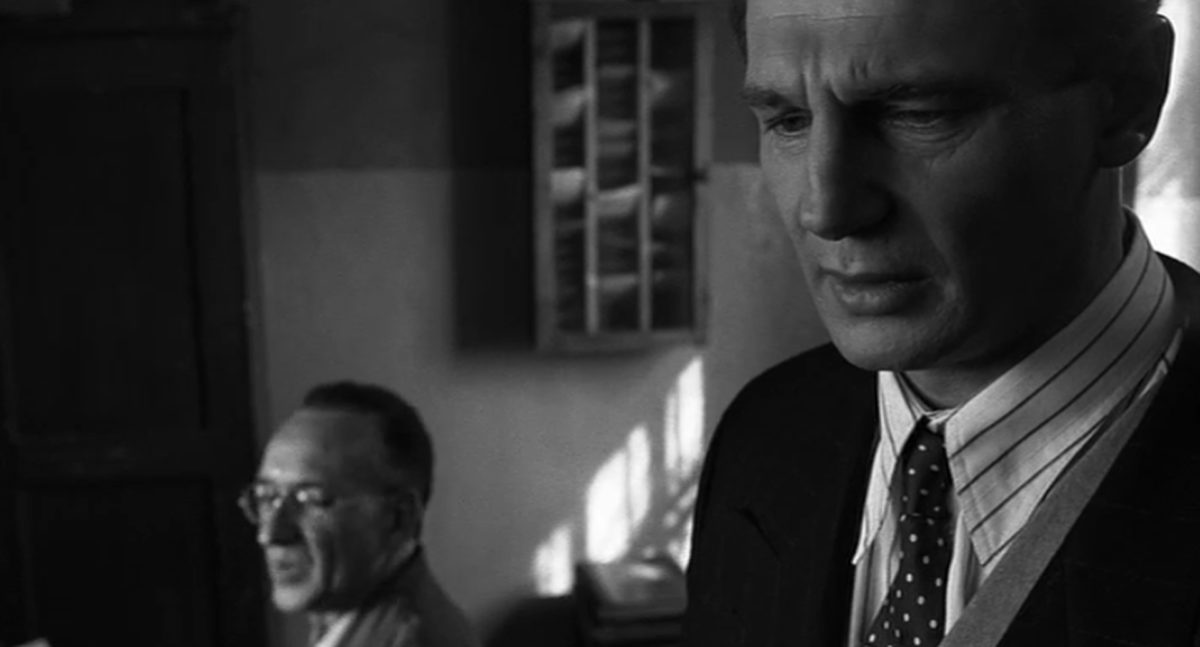
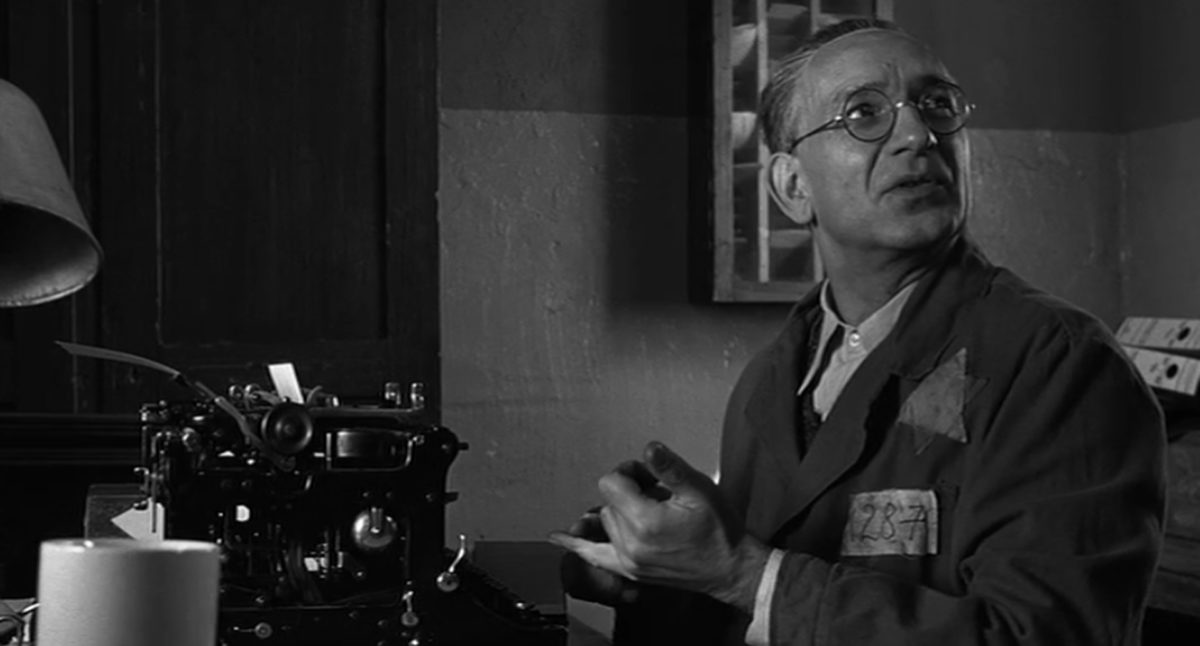
Steven Spielberg’s Schindler’s List, tells the story of a German businessman who devises a plan to save over a thousand Polish Jews from annihilation by the Nazis. The picture’s narrative, acting, music and emotional impact are all outstanding. For obvious reasons, one of our favorite aspects of this movie is the beautifully composed and lit black-and-white cinematography by Janusz Kaminski. But the editing…..wow! Michael Kahn who happens to be the most-nominated editor in Academy Awards history (eight nominations) received the the Best Editing top recognition for this movie (and also for Raiders of the Lost Ark and Saving Private Ryan).
Throughout Schindler’s List, the story is pieced together with the use of “parallel editing“, or “cross-cutting”, a cinematic convention in which “two or more concurrent scenes are interwoven with each other.” Kahn and Spielberg successfully illuminate the hardships of the Jews and the opposing comfort and optimism of Schindler and the Nazis in Poland through this convention.
Why this blog post? In 2012 the Cinema Editor Magazine published a great article where the author dissected, cut-by-cut, one of the most important scenes of “Schindler’s List.” Last week we rented the DVD, went back to the article, and created screen grabs of each of the cuts in order to better understand Kahn’s editing. There are so many cuts (28) that we will split this post in two. We wanted to post the entire sequence but due to copyright issues, we can’t.
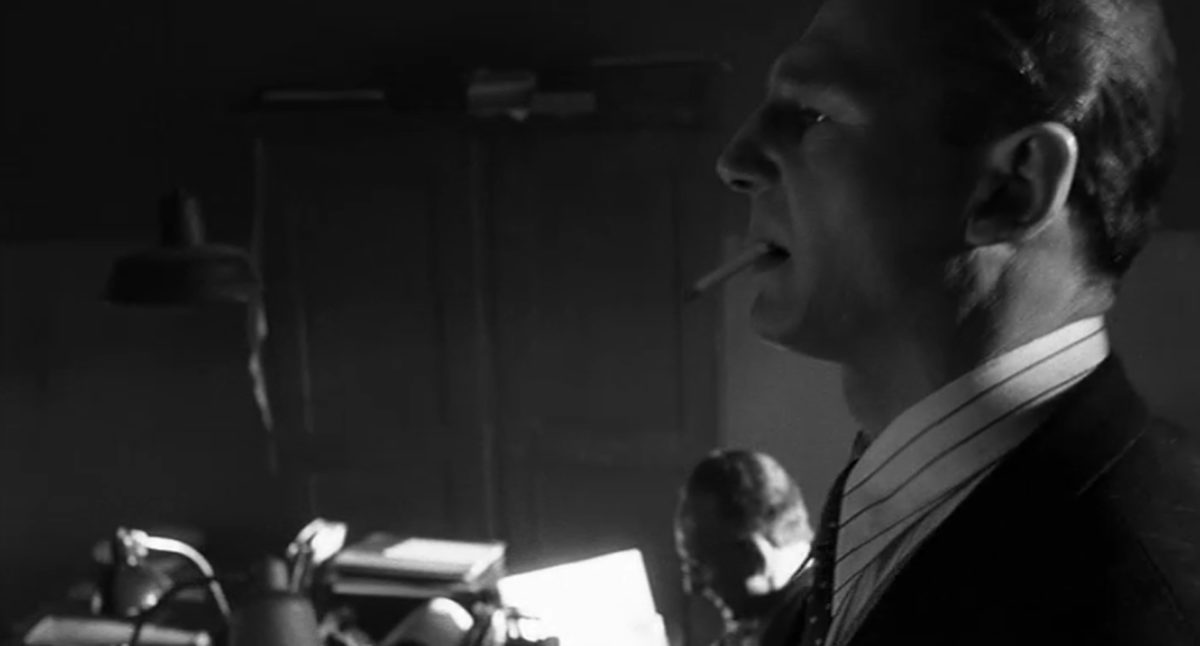
Schindler (Liam Neeson) and Itzhak Stern (Ben Kingsley) falsify documents and create a list of names to ensure that as many people as possible are deemed “essential” by the Nazi bureaucracy.
Cut 1 Extreme close-up of typewriter keys pounding out three names: as the screenplay puts it, “the letters the size of buildings, the sound as loud as gunshots.”

Cut 2 Medium shot of Stern typing; camera tracks with Schindler pacing past him, reciting the names of Poldek Pfefferberg, his close crony among the Jews, and Poldek’s wife, Mila.
Cut 3 Extreme close-up: “Pfefferberg” being typed.

Cut 4 Medium shot: Schindler giving another name. Pan right to include Stern at typewriter.
Cut 5 Extreme close-up of the name “Stagel” being typed.

Click to keep reading (more…)
Video
Canon EOS C300 Cinema Camera Insights.
Over a year ago, when Canon’s EOS C300 was announced, we wrote about the significance of the new EOS CInema system for photographers (you can read some of our previous articles here, and here). Since then, we practiced on the very clever online “Menu Simulator,” attended several Canon events, watched all the outstanding tutorials on Canon’s Digital Learning Center by Jem Schofield, wasted hours day-dreaming with the Accessory Configurator and played with the system on and off.
But not until last week did we have the chance to really go down and dirty with the system, shoot for several days, tweak some hardcore settings, create “custom picture presets” and see what the camera was made of.
The verdict? Absolutely impressive. Instead of writing a long post about it, we decided to use our 10-minute break and shoot a quick video with our impressions. Here it is, and we hope you enjoy it.
Canon EOS C300 Cinema Camera Insights. from Eduardo Angel on Vimeo.
Video
Gulf Photo Plus 2013 Workshops in Dubai.
We are truly honored to be a part of the upcoming Gulf Photo Plus (GPP) Workshops in Dubai. From March 1-8 2013, we will be teaming up with industry leading professionals Joe McNally, Gregory Heisler, David Hobby, Zack Arias, Peter Hurley, Bobbi Lane, and other great photo instructors for an unforgettable event. We will have a jam-packed week with workshops and activities aimed to help improve skills, inspire, and educate photographers at every level of expertise. Taking place at the core of the Middle East’s photo community, this is going to be one incredible week!
We are thrilled to present two “Photo Friday” seminars AND two 3-day Workshops introducing the craft of Digital Filmmaking to photographers. As we all know, the emergence of HD Video in current cameras has opened up a new world to photographers and cinematographers, widening the creative palette for visual expression. Our workshop’s emphasis will be on reinforcing the theory behind the technique; understanding the equipment and processes rather than concentrating on a finished product. Here are some of the many topics we will cover, all while working as a small film crew: Digital cinema workflow, new terms and techniques, Adobe Premier Pro, script writing, production considerations, budgeting, and the most essential gear.
Check out below what our workshop is about:
David Hobby, the famous and respected “Strobist” recently said “I happen to think this is the best photo week of its kind on the planet. If you are anywhere near that part of the world, GPP is a no-brainer. But even if you are far away, it’s worth the trip.”
That’s what I call a statement.
Below is an AWESOME shoot-out during last year’s GPP between Hobby, Martin Prihoda and Gregory Heisler. Simply brilliant.
Shoot-Out, GPP 2012 from gulf photo plus on Vimeo.
For a look at what GPP 2013 has to offer, check out their complete list of workshops. This can be the trip of a lifetime.
Photography
The New York Public Library designs the future.
The New York Public Library is doing an outstanding job incorporating education, technology and design into their present and future plans. If you share a hope for a better education system and a love for digital learning solutions as we do, then this should strike your interest.
• A new plan, designed by the great British architect Norman Foster, will create a state-of-the-art circulating library within the main branch (which is called the Stephen A. Schwarzman Building), a 101-year old landmark in New York City. Foster’s design will open spaces currently closed to the public, creating a four-level atrium, with bookshelves, sitting areas and desks, and will incorporate the books, programs, and services now found at the “heavily used but seriously deteriorating” Mid-Manhattan Library across Fifth Avenue. The project, expected to be completed in 2018 will cost $300 million. Half of that will come from the city and the rest from donations and the sale of properties. Long term, the project will save $12 to 15 million from the library’s tight yearly budget according to Anthony W. Marx, the library’s president.
After the renovation, which has been somewhat controversial, the building is expected to receive 4 million visitors per year. It will be open seven days a week, most days until 11 p.m. Incredibly enough, the branches will remain open throughout construction! Check out the 3D renderings and benefits for project below (it does not have sound, your speakers are fine!):
Benefits after the renovation:
- More public library space than is currently available in all three locations combined
- Open 7 days a week, 12+ hours most days
- Books and DVDs to browse and check out
- Natural light and beautiful views onto Bryant Park
- New spaces for children and teens
- Classrooms, computer labs, expanded research areas
- Business Research Center and Job Search resources
- Expanded spaces for scholars and writers
- Research materials properly preserved beneath Bryant Park
- Savings that can be spent on new librarians and curators and more books
Click here to keep reading (more…)
Photography
Visual Serendipity.

After finishing a client meeting on Lexington and 66th Street, I walked by the “Seventh Regiment Armory” and saw this. I diligently took my weekly picture, and rushed to my next meeting. A few days later we found out that what was happening inside is called “the event of a thread”, a multisensory affair, with “readings, sound, and live events within a field of swings that together invite visitors to connect to the action of each other and the work itself, illuminating the experience of the singular and collective body.”
Here’s the complete info. Please share below if you have been or are planning to go to this event! Sounds pretty cool.
Video
Adobe discontinues support for CinemaDNG on Premiere Pro.
We have watched this comparison test between Blackmagic’s Cinema Camera (4:2:2 10-bit image), and Canon’s 5D Mark III (4:2:0 8-bit image) way too many times.

And here’s a low-light comparison between Sony’s FS100 and Blackmagic. We believe the footage speaks for itself.
We are seriously considering getting Blackmagic’s amazing camera next month when it finally becomes available. Because of this, we are extremely surprised and dissapointed by Adobe’s sudden decision to drop support for their own CinemaDNG format on Premiere Pro. CinemaDNG is one of the many features we really like from the Blackmagic Cinema Camera. This is Adobe’s statement:
“The Cinema DNG Initiative has been discontinued and is no longer hosted on Adobe Labs. The CinemaDNG format continues to be an open format, and its development is not limited to Adobe. CinemaDNG files can still be opened by any current Adobe application that includes the Camera Raw plug-in (note: which is NOT the case fro Adobe Premier Pro) for importing DNG files.”
Right after our NAB 2012 wrap-up report (where we highlighted Blackmagic’s Camera AND the announcement of Adobe Premiere Pro CS6) Adobe had this to say:
(more…)
Video
Photokina TV Interview.
Earlier today we sat down for an interview for Photokina TV in Cologne, Germany. Here’s a segment that is available online:
Video
Photokina 2012 focuses on HDSLR Video.
Every two years there is one focal point in the Photo industry: Photokina, the world’s leading imaging fair. Photokina covers the entire spectrum of imaging, from image capture to image processing and storage to image output. This is where new trends and major innovations are presented to the world, and where the spotlight is on groundbreaking technological developments including mobile imaging, connectivity, and moving images. The show always delivers an impressive program of workshops, symposiums, photography exhibitions and many special events at the exhibition centre and at sites all over Cologne.
As you might know every Photokina show focuses on one single topic. Because filming withHDSLR systems is increasingly becoming a necessity for professionals, this year’s topic is HDSLR Video.
The show has created a “Shoot Movie Park” in Hall 4.1, offering a unique area where suppliers have an optimal location to present themselves to the attendees. The Movie Park will be supplemented by a series of lectures, workshops and exhibitions. Canon will present Richard Walch, sailor, snowboarder and photographer. Zeiss will have Sebastian Wiegärtner, one of the first users in the German-speaking region to understand and make use of the capabilities of the new HDSLR systems. We are very excited to be representing X-Rite, and show our most recent Color Management Video Tutorials (Video 1, Video 2 and Video 3).
Representatives of ADF — Arbeitskreis Digitale Fotografie (digital photography working group) will also be sharing their expertise as they answer visitors’ questions about digital photography and film. More information about the “Shoot Movie” program can be found here.
Stay tuned! We will be sharing the most exciting news and products live from Photokina via Twitter and Facebook. If you are not yet following us, do so today!
Video
Canon EOS M – Part II. Hands-on Review
Exactly one month ago we wrote about Canon’s brand-new mirrorless system. We covered the new features and discussed the reasons why we preordered one here.
Since then we have had the great opportunity to play with one of them and we want to share our impressions in this post.
The Good
• Lenses: We tested the kit lens, an ultra wide “pancake” EF-M 22mm ƒ2.0 and the image quality is amazing. We also tested the EF mount and shot stills and video with the EF 70-200 ƒ2.8 and the EF 24mm ƒ1.4. They both worked like a charm.
• Video: This is a controversial topic. The movie files are recorded in MPEG-4 format, using AVC.H.264 compression and a variable bit rate. The quality is very good, with only a very tutored eye being able to differentiate the M versus the 60D footage. We only shot 1080p at 24 fps and our impressions are based on that test. Read this if you want to understand HD Video compression. Another great video feature that got our attention was that both Program and Manual shooting modes are supported in movie mode. So far, so good. The real issue (as you will read below) is the lack of fast and easy access to adjust exposure.
• Size: The main reason we wanted this camera was so that we could use it as a C (third) camera on our video shoots. Having such a tiny body with the same APS-C 18.0 Megapixel CMOS sensor we have on our EOS 7D (with the latest firmware update) and EOS 60D would allow us to put the camera in tight spaces, and it would make using a handheld rig or a steadycam a much more pleasant experience.
An Overview of What Should and/or Will Be Improved
In all fairness, the camera that we had was a prerelease sample. It was not a production piece, which means that the hardware, as well as the firmware, will be modified and improved.
• Touchscreen: Having a touchscreen is not only great, it makes absolute sense. The more we “flip” and “pinch” our smartphones and tablets, the more second nature these “gestures” become. Have you seen the video of the five-year-old girl who thinks a magazine is a broken iPad?
Click to keep reading (more…)
Video
Interview with WPPI en Español.
For over 30 years, Wedding & Portrait Photographers International (WPPI) has been a main source of events and education for professional photographers. We are thrilled to be part of their ongoing interview series with photographers and filmmakers. I shared some insights about our work, the transition from architect to photographer, and our passion for everything visual. We briefly discussed how we successfully built a business that is able to maintain an equal balance between technology consulting, education and training, and visual storytelling.
Please take a few minutes to check out the interview, and as always, post your comments and questions below.

Video
Notes from the Field.
This is a scan from my journal that I bring with me to every preproduction meeting that I have with clients, directors, producers, and others. In this scan you can see my handy “preproduction notes.”

Here’s how my system works: first, I like to get the conversation going by sharing movies that we like and movies that could be related to the project at hand. This helps tremendously in our effort to understand both technically and aesthetically what the client or director is going after, and if we are a good match for the project.
About a year ago I sat down with a director who began envisioning a project as “film noir meets science fiction/kung fu—but in a funny way,” which saved us both a lot of time, as I was definitively not interested!
Let’s take a look at the other things I consider on every video production:
• Script: Do we have a script? Is it from a book or is it an original script? When can I see it? If there isn’t a script, who is going to write it and when? This is a very important step. Even though I always write the scripts for my own projects, it needs to be clearly defined who will perform this integral part when it comes to someone else’s project. I have been using Celtx, and I am very happy with the results. The script is by far THE most important piece on any video production puzzle.

• Shot list: As soon as I have the script, I start creating a shot list: what kind of gear do we need? Do we own it? Do we need to rent it? How many shots can we accomplish in one day? The answers to these questions can vary greatly depending on location, the scenes’ complexity, permits, and even the weather.
• Location Permits: Since most of us don’t have access to Hollywood’s sets and production budgets, being creative is extremely important. Having access to locations that other people don’t have access to is key. There are several beautiful abandoned buildings on Wall Street that no one knows about. In Harlem there are fantastic mansions that you can shoot if you know the right people. Battery Park is Federal property while Central Park is not. Both require shooting permits, issued by different offices.

• Location Scouting: I am often surprised to see how many people ignore this critical step. In cities like New York things change, and they change fast. The park that you so fondly remember is now a parking lot. And that awesome abandoned building? Well, it’s now a luxury condo.
Video
Canon EOS M Images.
UPDATED 0828 Canon EOS M – Part II. Hands-on Review
Yes, the answer is a most emphatic YES to everyone who has asked if I plan to purchase the brand-new Canon Mirrorless system. I just placed my order here. You have until October to change your mind. I seriously doubt I’ll change mine.
So, in a nutshell, we have a tiny camera body with a powerful DIGIC 5 image processor, and a very nice APS-C 18.0 Megapixel CMOS sensor, which is the same sensor size one finds in the wonderful EOS 7D and EOS 60D. The touch screen and UI are virtually identical to the brand new Rebel T4i. Apparently you can purchase the body only, but I have only seen the kit with the EF-M 22mm ƒ2.0 pancake lens. All the expected features like ISO settings from 100 to 12800, with expansion to ISO 25600, standard aspect ratios (3:2 plus 4:3, 1:1 and 16:9), and 1080p at 24/25/30 fps and 720p 50/60 fps are there, BUT now we have continuous autofocus.

The hybrid (stills and video) AF system uses “phase-difference AF to achieve approximate focus and drive the lens at high speed, then switches to contrast AF for final focusing.” The movie files are recorded in MPEG-4 format, using AVC.H.264 compression and a variable bit rate. Program as well as and manual shooting modes are supported in movie mode.
And the cherry on top? The EOS M will take EF lenses thanks to the adapter shown below. Enjoy the view.


Canon EOS M Lens Mount Adapter
click to keep reading
Video
Great interview with X-Rite Coloratti on Color Management.
Last month, I was invited to join the prestigious X-Rite Coloratti team, which includes the world’s top professional photographers. I was interviewed by X-Rite about my work, as well as my thoughts on color management for digital photographers, and specifically for those shooting video. We also chatted a bit about my views on how video has changed the playing field for all professional photographers. Please take a few minutes to listen to this short clip of our conversation.
We recently shot a series of video tutorials, focusing on the importance of color management and monitor calibration for video editing. Here’s the most recent episode.
If anyone is interested, there are a few spaces left at my upcoming workshop: Inkjet Printing: Color Management and Calibration at the International Center of Photography in New York City, Aug 4th, 2012.
Please feel welcome to leave any feedback, questions or comments below.