Photography
Photoshelter + Adobe Lightroom = Awesomeness
Many of you know how much I love Adobe Lightroom. However, what some of you may not know is that I have been using PhotoShelter as my main online portfolio for my stills work for several years.
Why am I writing this post? One reason: (more…)
Photography
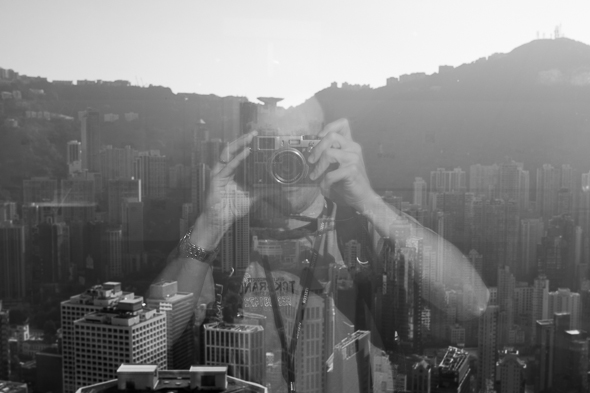
Fuji X100S Hands-on Review.
I’ve put this little thing through every imaginable shooting situation, and tried most, if not all, of its settings, shooting more than 8,200 images on four different assignments in 5 countries in less than a month’s time. And yeah, I know, I’m almost a year late to the Fuji party.
But, as I tell my students who seem to be magnetized to the flatiron building after moving to New York, it doesn’t matter if other people have photographed or written about the same subject that you are interested in. It’s exciting to see how each of us uniquely interprets our surroundings. So, here are my personal impressions of the Fuji X100S.
It is important to mention that I am not being paid by Fuji, or anyone else for that matter, to use the camera or write this review. I’m doing this just as a way to give back to the photo community, so if you are inclined to purchase this system, please consider using our Amazon link. It won’t cost you a penny more, and it would definitely allow us to spend more time working on projects like this:
Why the hype?
The Fuji X100S is a small and light, retro-looking 16MP APC-C magnesium body camera with a fixed 23mm f2.0 lens (equivalent to a 35mm focal length on a 35mm camera) that captures 14-bit RAW. It looks and feels like a Leica M8 or M9, but it comes in at about a fourth of the price.
Size and weight
I was going to spend 26 days working in five Asian countries. With a limited amount of free time to explore on my own, I wanted a camera that would allow me to use any form of transportation (biking with a backpack full of lenses and accessories was not an option), that would capture RAW (a cellphone wouldn’t cut it here), and that was inconspicuous (the Canon 70–200mm f2.8 was out).
So, the main reason I chose this system was weight. Many years ago I was willing to carry two bodies with two lenses and a small daypack with water and accessories (monopod, memory cards, filters, batteries, more lenses, cable releases, etc.). Not anymore. I want to travel as light as possible and be able to fit ALL of my clothes and gear in a carry-on rolling backpack.

When I travel, I break all the rules my mom taught me: I talk to strangers, I eat all kinds of weird food (especially street food), I sleep as little as possible, and I intentionally try to get lost. I enjoy discovering cities on foot, often walking 12 hours in a single day. Deep inside myself, and for some masochistic reason, I also wanted to push the limits of my comfort zone. Not having a set of super-fast zoom lenses with me would be a major restriction—but also a liberation.

The Macro Mode focuses as close as 3.9″ (10cm). It works great and focusing is fast. Something to keep in mind when using the Macro mode is that if the Optical Viewfinder is on, the camera will switch to the Electronic Viewfinder.

Day 1. First issue.
After years of using Canon and Nikon DSLR systems, I naively assumed that all camera companies were up to date on battery technology. I was terribly mistaken. If there’s one issue with the X100S it is the battery life. Thankfully, and with proper planning, this is something that can be worked out.
The ONE battery I brought with me lasted a couple hundred images. Assuming I had not charged it completely I went through the same issue the following day. Finding digital gear overseas is often difficult, time consuming, and expensive. Locating batteries for this system in northern Thailand was a nightmare.
If you are planning to buy this camera, I’d recommend getting at least a couple of extra batteries. The original Fuji NP-95 is $38, but you can obtain much cheaper ($10) generic batteries, too. The best deal I’ve seen is this Wasabi kit with two batteries, charger, European plug, and car adapter for $20. A no brainer investment.
Why do you need a second charger? Well, it so happens that the Fuji charger does not tell you the percentage of charge that you have. It is either charging (the light on the charger is on) or full (the light goes off). For some reason, if you take a fully charged battery and attach it to the charger, it can take 10–15 minutes to show that it is full. To add insult to injury, it takes 180 minutes (three hours!) for one NP-95 to charge from dead to full. That’s 50% of the time the battery lasts under normal use without the LCD display. Fuji’s battery charger has no folding plug so it requires a long separate cord. One more thing to pack.
The battery issues continue on the camera: the battery-level meter simply goes from normal to dead in a few images. Just like that. Unlike a DSLR, a mirrorless camera sensor is powered up all the time, even if you are just focusing or reviewing images. If you use mostly the optical finder, turn the “OVF power save mode” on. The display’s info will be dimmed a bit, and the live histogram is no longer available, but it will greatly extend the battery life. I strongly recommend reading pages 18, 36, 41, 47, and 91 from the Camera’s Instruction Manual (available here as a PDF).
On paper, the NP-95 is rated for 300 shots per charge. After all these tweaks, I’m getting an average of 450 shots if I switch from EVF to OVF when possible, if I turn the camera off instead of keeping it on standby mode, and if I don’t use the viewfinder.
That’s a lot of ifs! The battery’s design is also poor, as it allows you to insert the batteries incorrectly and still be able to close the “battery-chamber cover.” You will know if you’ve done it wrong because the camera won’t turn on.
Having the battery life improved to a maximum of 450 pictures gives me about five hours, which is about a third of my working day when traveling. The poor battery performance and long charging cycles were by far the biggest drawbacks using this system on the road.
Focus
On several occasions I could not get the AF to lock, even in bright daylight. In low light the AF does hunt and it is slow. I also had a few instances where the camera “back focused” for no apparent reason.
The AF-C Mode (continuous auto focus mode) was extremely unreliable. The camera is simply too slow to track, lock, and capture a moving subject. Additionally, on AF-C Mode you can only focus on the dead center of the sensor. In my opinion, these two issues defeat the purpose of AF-C.
The manual focus works great. I love the focus peaking feature.
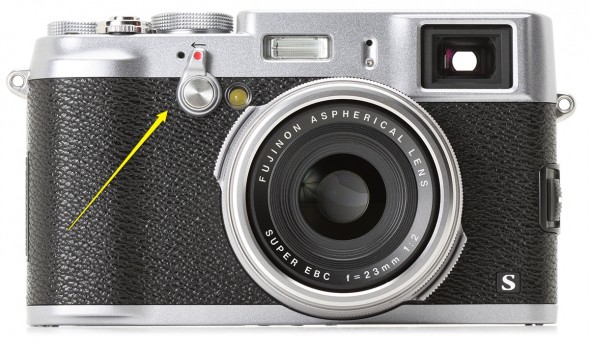
I absolutely love the hybrid viewfinder. It took me a couple of days to realize that the little switch on the front of the camera almost magically changes between the optical and electronic viewfinder.
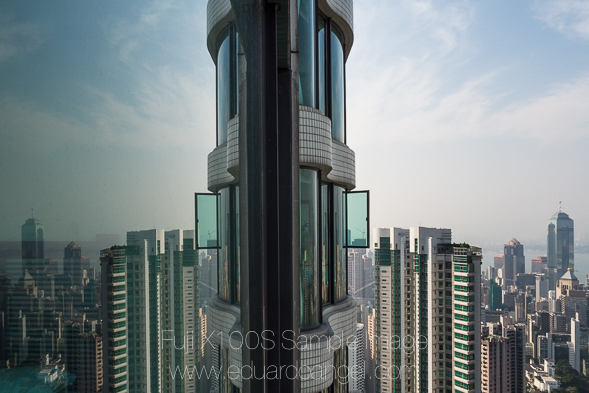
Lens
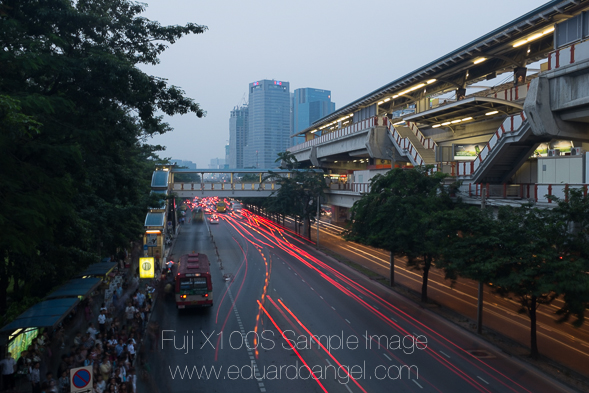
The fixed 23mm f2 lens is very sharp, and impressively corrected for distortion. In combination with the sensor’s ability to capture noise-free images up to 3,200 ISO this makes shooting under low-light conditions bliss.
Low Light performance.
As you can see, low light performance is impressive. The sensor performs very well up to ISO 3,200 and decently up to 6,400. Relatively long exposures are not an issue.

ISO 6,400
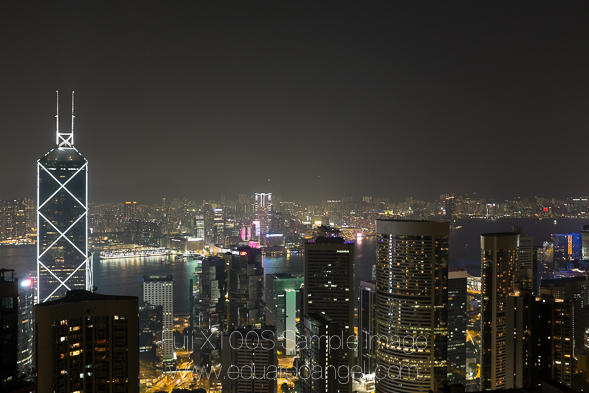
1-second exposure

ISO 1,600 at f2

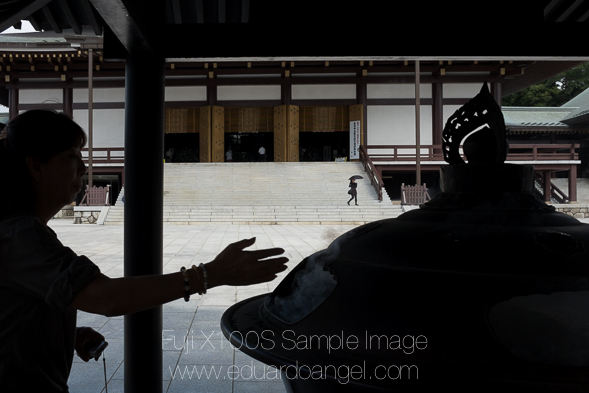
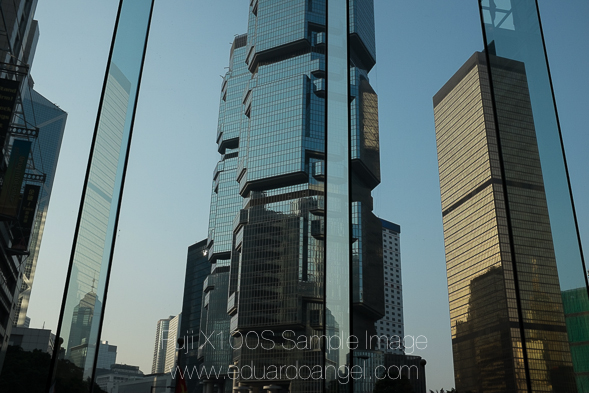
Dynamic Range – Highlights and Shadows detail.
Another excellent spec; the detail that this tiny sensor can capture is truly remarkable.


Movie Mode
If shooting video is extremely important to you, stop reading this right now and consider another camera. The camera offers Full HD (1920 x 1080) at 30fps or 60fps and a decent 36MBps bit-rate. But, to access the video mode, you have to select “Movie” in the drive mode menu. You can’t use the optical viewfinder. Manual exposure can only be modified before you start recording. The ISO and ND are inaccessible while in video mode. In terms of quality, if you have good light, perfect exposure, don’t care about sound, can pre-focus, and the camera doesn’t move, the footage is decent.
A three-stop neutral density filter is a welcomed feature. Unfortunately, it is not accessible during Movie Mode.
The built-in Panorama works well.

Workflow
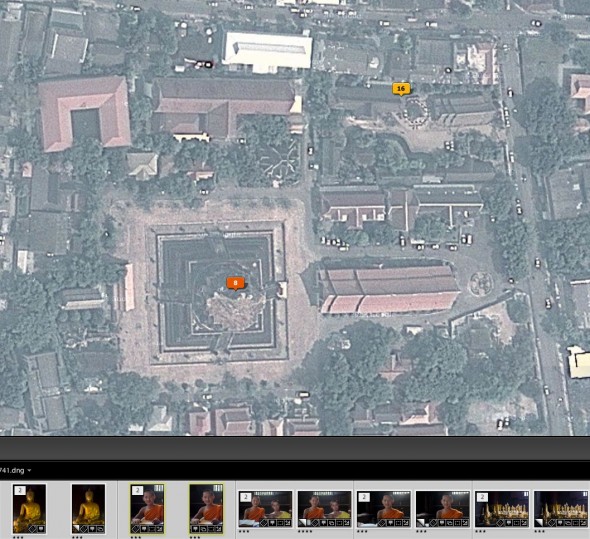
I download and back up my images at the end of each day when I’m on the road. I also add key captions (locations, names, etc.) and a few general keywords. I wanted to create Smart Previews and edit them in my “down time” (doctors offices, the DMV, and long flights are ideal locations). That didn’t quite work out. On a two-year-old Mac Book Pro and a fast portable external Hard Drive, Lightroom 5 took on average two-and-a-half hours to import 450 RAW images, convert them to DNG, and build Smart Previews, which I still consider the best feature in Adobe Lightroom 5.
So, every night, after a day of working and lots of walking, I’d download the cards through Lightroom and charge the batteries, take a shower, grab something to eat, call my wife, return emails and phone calls, plan the following day, and…continue to wait because neither Lightroom nor the battery were ready.
Future enhancements
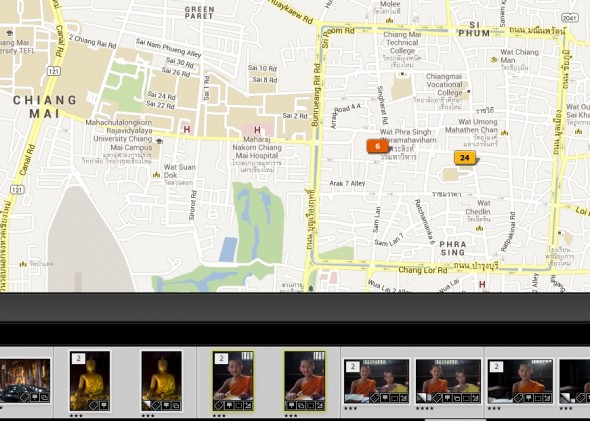
• I wish the camera had built-in GPS, which in combination with Lightroom’s Maps Module would make captioning images MUCH easier. My poor-man’s workaround is to simultaneously snap a picture with my cellphone at key locations. Since the phone adds the GPS information to the image I can later copy and paste the GPS coordinates to the relevant RAW and video files. Nothing fancy, but it works.
• It takes an annoying “long press” of the shutter button to wake up the camera from stand-by mode.
• If you’re shooting in burst mode, you can’t review individual images or zoom in/out. The images play back in a pointless slideshow. This was truly frustrating, as you can’t know if you got the desired image until you download the files.
Final thoughts
One day, many moons ago, as a student shooting for a newspaper, the photo editor asked me if I had more than one lens. I proudly answered, “Yes, I have three!” To which he replied, “Then use them! All your pictures look the same.”
That was a serious concern I had about spending a month with a single fixed wide-angle lens. I’m glad to report that the advantages in quality and weight greatly outperform this challenge.

The Auto White Balance works very well. The custom white balance is close to perfect.
Is this camera going to help me take better pictures?
Cameras are tools, no different from hammers or toasters, when you get down to it. I own very little gear because I prefer to rent the best tool for each job. That way I keep my overhead low and have access to the latest technologies.
That being said, after a few days getting used to the cluttered and somewhat illogical Camera Menu, I felt like shooting with my first Nikon FE-2, except now I had more than 36 frames and could switch the ISO as I pleased. There was, and is, an inexplicable emotional connection with the X100S—a feeling that I haven’t felt in a decade. Technically speaking, the camera is wonderful. But, there’s more to it. I can and want to take it with me everywhere I go. I have been taking more “snapshots” than ever before. I can get closer to my subjects, and shoot silently and almost invisibly.
If you have been drooling over this camera and are ready to pull the trigger, I hope this review provides that extra little push. It’s OK, go ahead and make the jump! You can tell your spouse that it was my fault. Please consider using our Amazon link. It won’t cost you a penny more, and it would definitively help support this site.

Feel free to leave your comments at the bottom of this page. Also, be sure to join me on Twitter and Facebook, and subscribe to our complementary Monthly Newsletter and our RSS feed.
Video
Upgrading to Adobe Lightroom 5 and Creative Cloud. Worth it?
Question: Should I get Lightroom 5? Answer: It depends.
Whether it’s worth upgrading to Adobe Lightroom 5 depends mostly on three things: workflow, system and cameras. (more…)
Video
The awesomest feature in Adobe Lightroom 5.
The single hottest, coolest, awesomest, and handiest feature in Lightroom since version 1 is….Smart Previews!
Why? Simply put, we can now edit our images in Lightroom 5 without having access to the original files. (more…)
Video
How to quickly enhance your photography portfolio.
On my previous post (I’d recommend reading it first if you haven’t) I walked you through my personal process to edit a large group of images into a more manageable portfolio.
Now is the time to enhance and fine-tune those “final” photos. (more…)
Video
Is Canon following Adobe’s steps?
Canon just released their “EOS Digital Solution Disk V28.1” software suite. As usual, it contains the “Digital Photo Professional”, “EOS Utility” and “Picture Style Editor” applications. So what’s the big deal? For the first time (as far as I can remember) the Solution Disk has been issued only on CDs, but this time it will be available as a download.No conspiracy theory needed here. The real reason behind the online delivery is that many new computers, including the latest Apple iMac (which is super fast and awesome) no longer come with CD drives, so we are all being forced to move to the cloud.
Canon EOS DIGITAL Solution Disk Suite
Support for Mac OS X includes:
• Mac OS X v10.8
• Mac OS X v10.7
• Mac OS X v10.6
And support for Windows OS includes:
• Windows 8
• Windows 8 (x64)
• Windows 7
• Windows 7 (x64)
• Windows Vista
• Windows Vista (x64)
• Windows XP
Keep in mind that you will need a serial number in order to download the software.
Supported cameras will include Rebel SL1, T5i and 1DC along with other updates.
And talking about Clouds and Adobe, on this post I added a link to Adobe’s MAX 2013 Keynote AND and a second link to the best deal for Cre¬ative Cloud I can find ($20 per month). Here’s a previous article on using Adobe Lightroom with Cloud Storage Solutions.
Video
10 (new) Cool Gadgets for Photographers and Filmmakers. Part 2
6• Convergent Design Odyssey 7.
Two super interesting monitor/recorders are the Odyssey7 and Odyssey7Q by Convergent Design. For $1295 and up you get a 7.7” 1280 x 800 OLED external monitor that also doubles as an external recorder capable of receiving 4K RAW data as well as other compressed and uncompressed formats onto two 2.5” SSDs.
Here’s the twist; out-of-the-box, these two products are monitors only, with all the usual settings (waveform, histogram, false color, vectorscope, zebras, and focus assist) but without any recording or playback capabilities. (more…)
Video
Post-NAB 2013 wrap-up.
Our Digital Technology Resource is a monthly conversation about news, trends, and events for photographers and filmmakers. On our upcoming issue we highlight the most relevant products and trends we witnessed at NAB, including:
• Edelkrone SliderPLUS
• Redrock Micro One Man Crew
• Blackmagic Pocket and 4K Production Cameras
• Atomos Ninja 2
• Convergent Design Odyssey 7
• Tascam DR-60D and Samson Zoom H6
• G-Tech Evolution Series.
• Adobe Lightroom 5 and Premiere Pro “6.5”
• Imagine Products ShotPut Pro
It is never too late to sign up. Do it now!
Did you miss a previous issue? Don’t worry, be happy. Here are the links:
January 2013 Issue
February 2013 Issue
March 2013 Issue

Video
Adobe Lightroom 4.4 is out. 25 new cameras supported.
Adobe just released a new Lightroom update making this version 4.4. Lightroom now officially supports over 25 different RAW file formats. Here is the complete list.
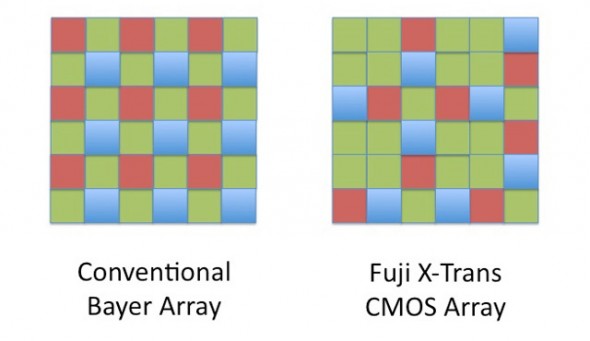
This version adjusts the White Balance for a number of Nikons, includes a correction to the demosaic algorithms for Fujifilm cameras with the X-Trans sensor, and adds support for new lenses like Canon’s EF 24-70mm f/4 L IS USM and Nikon’s AF-S NIKKOR 70-200mm f/4G ED VR are included. Unfortunately the Panasonic Lumix lenses are still missing.
According to Adobe, users are now (finally!) able to add contacts from their Address Book to email (on Mac). I’ll try this ASAP.
 These are the main improvements added and bugs fixed:
• The crop overlay tool resized incorrectly when used in conjunction with the “Constrain to
Crop” checkbox in the Lens Correction panel
• Background graphics were not correctly rendered within the Book Module
• Reading metadata from file would sometimes result in keyword and and GPS metadata to
not save for video files
• Updated the “Missing File Icon” for HiDPI / Retina dispalsy
• The supplied lens profile for the Sony RX-1 did not contain vignette information
• Preview in Develop Module was not updated with the latest adjustments
• Square tile artifacts while painting with brush
• Previews of photos in portrait orientation were blurry when viewed in the filmstrip in the
Develop module. (Mac only)
Click to keep reading (more…)
Video
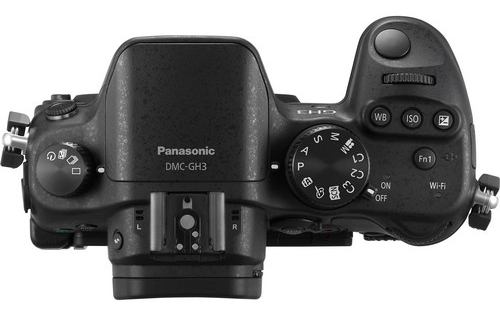
Shooting with the Panasonic Lumix DMC-GH3. Field report and impressions.
The friendly waiter at the Turkish restaurant in Sohar, Oman, saw the camera on the table and asked “Nikon? Canon? Which one is better?” To which I replied, “actually, this is the Panasonic GH3.” He stared at me, his expression turned from excited to perplexed to confused to annoyed within seconds. After an uncomfortable silence he finally asked, “Are you ready to order?”

That was pretty much my reaction when, a few weeks ago, just two days before I started teaching a “Digital Cinema for Photographers” event in Dubai, I found out that Panasonic, a major sponsor of the event, REALLY wanted me and my students to use a couple of GH3s and several lenses in my hands-on workshop.
Panasonic is one of the largest consumer electronics companies, and the GH3 is the third generation of their very successful Micro Fourth Thirds DSLM (Digital Single Lens Mirrorless) system. For a while I have been aware of the low-budget-filmmaking community’s devotion to the hacked DMC-GH2 and its ALL-I codec. I saw the DMC-GH3 at Photokina last year, but I had never before shot a single frame with a Panasonic camera. The bodies that I was given were running Firmware v0.5. Add to this a nine-hour time zone difference and jet lag, and you can begin to imagine my pain.
While I’ll be using some geeky terms, this is not an in-depth technical review, nor a scientific analysis of the GH3. You can dig into tech specs and MTF charts somewhere else. My goal is simply to share my honest and independent impressions, go over the things I liked and didn’t like, and communicate my wish list for future features. I want to emphasize that all the conclusions in this article are subjective and strictly based on my own personal experience.
“I have to warn you, I’ve heard relationships based on intense experiences never work.”
-Keanu Reeves in “Speed”
I have to respectfully disagree with Keanu on this one. Much to my surprise, the camera was much more intuitive than Sony’s NEX system, and several video features got my full attention right away.
FEATURES
• Full HD 1920×1080 60p/50p (NTSC/PAL) with 30p/25p/24p options.
• Ultra-high bit rate video recorded at 72 Mbps (ALL-I) or 50 Mbps (IPB).
• Capable of recording continuously for an unlimited time for NTSC and 29 min 59 sec for PAL.
• Native support for MOV (h.264), MP4, and AVCHD formats.
• Time Code support in the MOV and AVCHD formats.
• Extremely fast and accurate contrast-detection Autofocus.
• A 3.5mm mic input AND a headphone jack AND the option to manually adjust the sound recording levels via touchscreen controls.
• Full-time AF, AF Tracking, and Face Recognition AF are available for VIDEO. The Touch AF mimics rack focusing.
THE WORKSHOP STORY
Not having enough time to field test the Panasonic systems before the Workshop, I shot dummy clips in my hotel room and made sure that the footage would work in Adobe Premiere Pro CS6. The test went surprisingly smoothly. I then set both GH3 cameras to the same video settings: MOV at 1920×1080, 24p, 72 Mbps ALL-I, Standard Photo Style, White Balance at 5500K, got ND filters for all the lenses, extra batteries, and a few Class 10 SD cards. And then I prayed.
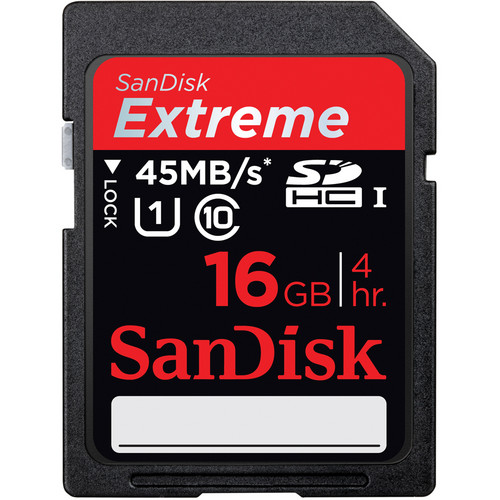
You must use a Class 10 SDHC card when recording Ultra-high bit rate video at 72 Mbps (ALL-I).
Note: It’s extremely important to point out that full HD on this camera requires memory cards with the fastest speed available. My “older” memory cards didn’t work, giving me only four seconds of recording time.
VIDEO
We spent the first day of my three-day Digital Cinema Workshop covering all the technical similarities and differences between stills and video. On the second day, we planned a location shoot with a Capoeira team and spent a couple hours shooting in the afternoon. On the third and last day we covered the different hardware and software requirements for post production and spent three hours editing the footage. I am especially proud of the short clip my students put together in such a limited amount of time and with newly acquired knowledge (and using brand new gear!).
Capoeira in Dubai. Student Project. from Eduardo Angel on Vimeo.
We could obviously use a few more days sweetening the audio, fine tuning transitions, and grading, but for a two-hour shoot and a three-hour edit, I believe this is a good example of what can be accomplished with great teamwork, interesting subjects, and the GH3’s many customizable options.
SAMPLE CLIPS
Below you will see a few additional sample clips, all shot as H.264, 1920 x 1080, 23.976 72Mbps ALL-I, using the GH3’s “Standard” profile (Contrats = 0, Sharpness = 0, Saturation = 0, Noise Reduction = 0). The Exposure and White Balance were set manually. The lens was the Lumix GX Vario 12-35mm F2.8 set on AF Tracking mode, which worked very well most of the time. Despite the lens having “environmental sealing,” as you can see the fine desert’s sand inevitably found its way to the sensor. I put the clips together on Adobe Premiere Pro CS6, and have NOT done any grading nor sharpening. These short clips are intended to show you what the GH3 is capable of, not to tell a specific story.
SOMETHING INTERESTING
So, mission accomplished, right? Not so fast. A couple of days later, as I was wrapping up my day, a friend asked “Are you busy? I wanna show you something interesting.” With only the GH3, the 12-35mm 2.8 lens, a 4GB card and a low battery I jumped into his car. The “something interesting” happened to be access to the Royal Suite at the 7-star Hotel Burj Al Arab—a notoriously difficult area to access. With limited amount of storage space and battery life I managed to capture a few keepers.

The 7-star Burj Al Arab hotel resembles a giant sail rising over the Gulf, with changing colors visible for miles at night.

The very next morning (on my “day off”), I headed out to meet an old friend for brunch at the Atlantis. Should you ever find yourself in this neck of the woods, I strongly recommend that you pay the Atlantis a visit. As we enjoyed the seemingly endless food, my friend received a call to drive to Abu Dhabi right away to pick someone up and then drive back to Dubai. Would I like to come? Guess what I had hanging on my shoulder? This time I had a full battery and a 16GB card, but nothing else to shoot the magnificent mosque and the impossibly opulent Emirates Palace. Once again, the GH3 did a fantastic job.
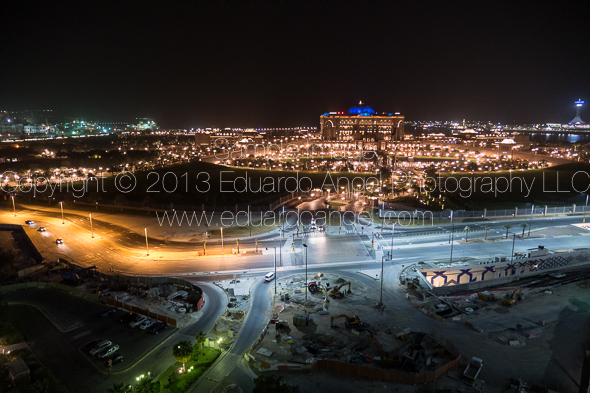
A nice view from a 25th floor overlooking the magnificent Emirates Palace in Abu Dhabi.
MORE FEATURES
These are some of the GH3’s features that are not obvious to the naked eye, but are interesting once you are aware of them:
• A magnesium alloy camera body that Panasonic describes as “splash proof and dust proof.”
• The Panasonic RAW files (RW2) work fine in Adobe Lightroom [add link to LR workshop] but the most current version (4.3 as of this writing) is needed. Unfortunately there are no Panasonic lens profiles available as of this writing.
• All the video formats worked seamlessly on Adobe Premiere Pro CS6. Even the video recorded at 72 Mbps was easy to preview and edit on a two-year old MacBook Pro (with 8GB of RAM and an external 7200 RPM Hard Drive as a Scratch Disk).
• HDMI monitor output can be sent with or without information overlays.
• I had a DMW-MS2 Stereo Shotgun Mic with me, but was happy to learn that the camera’s built-in internal microphones provide stereo audio.
• The GH3’s sensor has a 4:3 aspect ratio.
• Built-in Time Lapse, and HDR but unfortunately it works only for JPGs not RAW.
• Five physical function buttons, and two touch-screen function buttons, all customizable with close to 40 options to choose from.
• Virtually all the key shooting controls are within the right hand’s reach. This frees up the left hand to hold the camera or focus manually.
• Excellent battery life, lasting a full day under normal operation. For extended video sessions I’d consider getting the DMW-BGGH3 Battery Grip.
• Apparently (I have not tested this) the GH3 is also capable of real-time image output to the LVF or the rear monitor AND to an external monitor via HDMI.
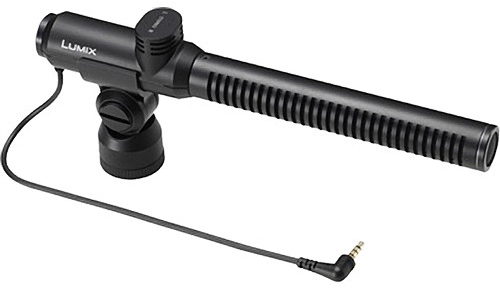
DMW-MS2 Stereo Shotgun Mic
LENSES
I shot extensively (more than 2,000 images in 18 days) with the Lumix GX Vario 12-35mm F2.8. The lens is tiny. And fast. And awesome. It has the equivalent focal length to a 24-70mm F2.8 on a 35mm system but it is a fraction of the size and weight. As you already know, this is a very good start when dealing with packing issues.
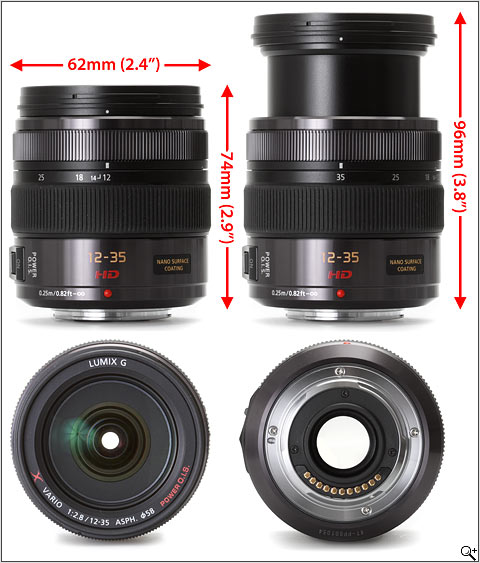
Lumix GX Vario 12-35mm F2.8
In terms of depth of field, the lens behaves like a 16-45mm F3.5 lens on an APS-C sensor, or a 24-70mm F5.6 lens on a Full Frame sensor. It is hard to get used to this, especially when shooting another system simultaneously, but it is not a disadvantage per se.
Click to keep reading (more…)
Photography
Adobe Lightroom Tips and Tricks 006. My Ten Bookmaking Steps.
Custom Book Layout is such a major addition to Adobe Lightroom 4 that it deserved its own module. Blurb provides excellent value, but you can also print at home or using another service.
Even though at first the Book Module doesn’t seem as complex as the Develop Module, there are so many options (including almost 200 professionally designed templates) that it is easy to get lost and frustrated.
This past weekend my students at ICP requested a super simplified version of the steps I take in order to create a book. Today I’d like to share my 10 Bookmaking steps in Adobe Lightroom 4:
1• Determine what the book is about. What is the concept or story?
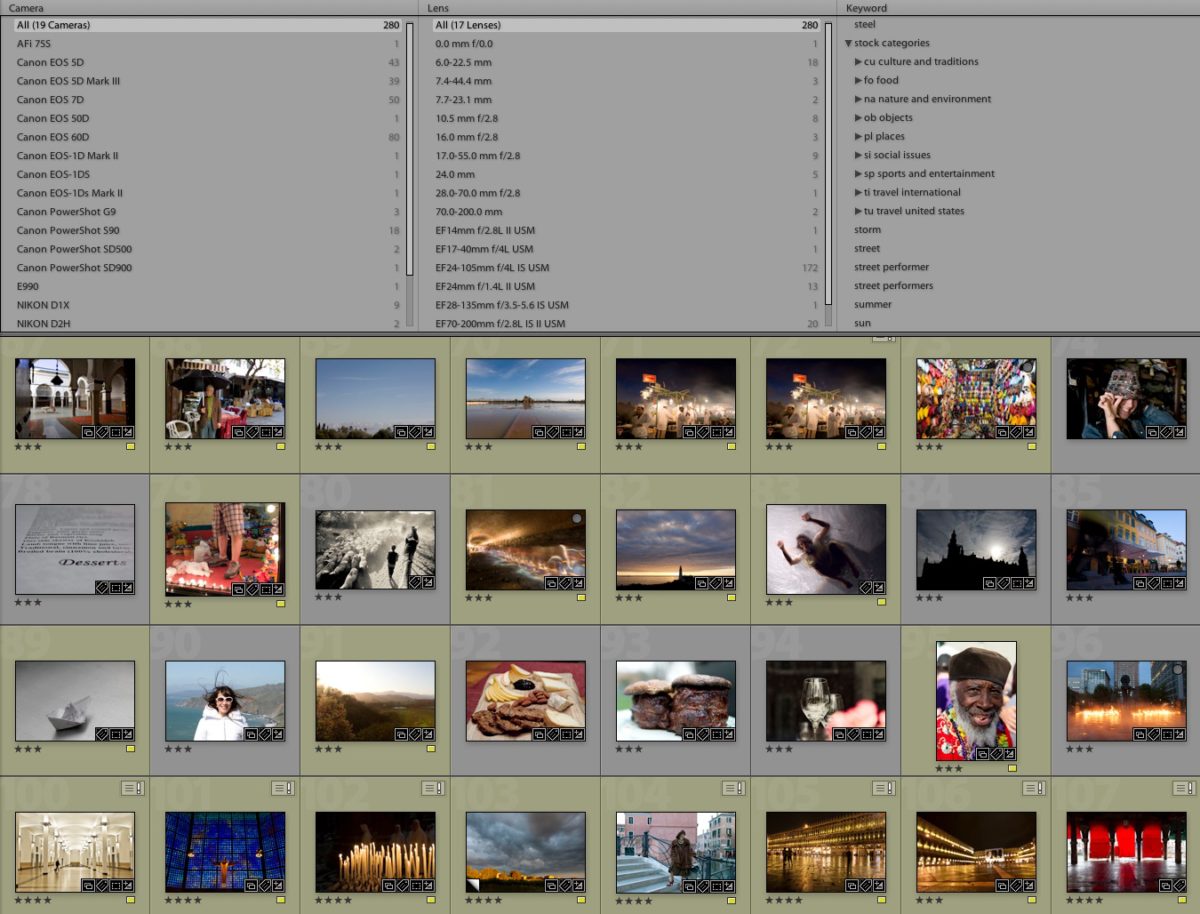
2• In the Library Module, select the best images that are appropriate for the story.
3• Still in the Library Module, create a temporary Collection (it can even be the Quick Collection) for the best images. At this point, don’t worry about enhancing each individual image. You will have time for that later.
Click to keep reading (more…)
Video
Watching snow for 24 hours. Time-lapse.
Time-lapse photographs of a massive snow storm over a 24-hour period. Literally.
I set a Canon EOS 7D on “brainless” mode: Manual Focus, Auto ISO, Auto White Balance, and Program. All I had to do was to replace the batteries twice (you will see when I moved the camera slightly if you pay attention to the video), and change the capture intervals (there’s really not much happening at 3am.)
The tethered shooting was done through Canon’s Digital Photo Professional software. To quickly put the video together I used Adobe Lightroom.
I have done similar experiments in the past, and I am now ready for something awesome in Dubai.
Video
Adobe Lightroom Tips and Tricks 005. Viewing Options.
Grid View, Loupe View, Info View. With so many options, which one should you use and when? Check the tutorial below and learn a few shortcuts that will help you speed up your editing process.
If you have specific questions or want to learn more, we are now offering virtual one-on-one sessions to give you customized solutions and personalized training no matter where you are in the world. Sign up now!
Video
Adobe Lightroom Tips and Tricks 004. Creating Storyboards.
Today’s Tip & Trick is about creating a storyboard in Adobe Lightroom. Have you used storyboards on previews projects, and if so, which application did you use?
If you don’t need all the Adobe Creative Cloud bells and whistles, consider their photography plan which includes Photoshop CC + Lightroom 5 and 20GB of cloud storage for only $9.99/month!
Got specific questions or want to learn more? We offer virtual one-on-one sessions to give you customized solutions and personalized training no matter where you are in the world. Sign up now!
Video
Adobe Lightroom Tips and Tricks 003. Editing Capture Time
Pretty busy week, so we will keep this one nice and short.
Tip 003 – Editing Capture Time.
An issue that many photographers experience while shooting away from home is that they forget to change the time settings on the camera. When downloaded, the images will display the incorrect capture time. Thankfully, this is very easy to fix in Lightroom.
Simply select the image(s) you want to update. Go to Metadata and click on “Edit Capture Time.”
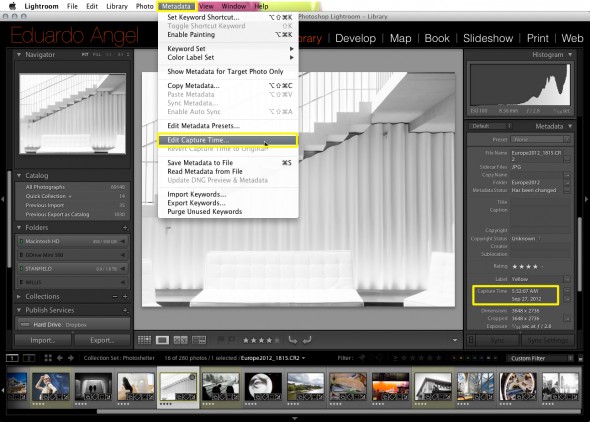
As you can see below, there are three options. Select the one that better matches your needs.
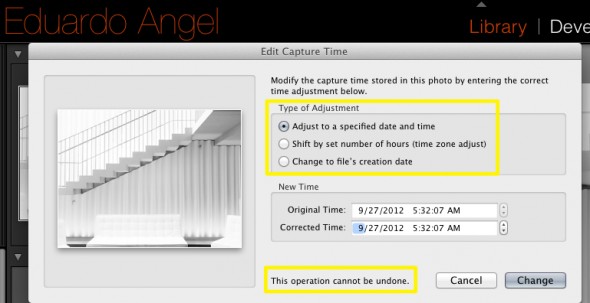
Another situation when this becomes extremely handy is when scanning images. Since the embedded info will be missing a Capture Time you can easily add it this way.
Keep the questions coming and we will keep answering them!
If you don’t need all the Adobe Creative Cloud bells and whistles, consider their photography plan which includes Photoshop CC + Lightroom 5 and 20GB of cloud storage for only $9.99/month!
Got specific questions or want to learn more? We offer virtual one-on-one sessions to give you customized solutions and personalized training no matter where you are in the world. Sign up now!
Photography
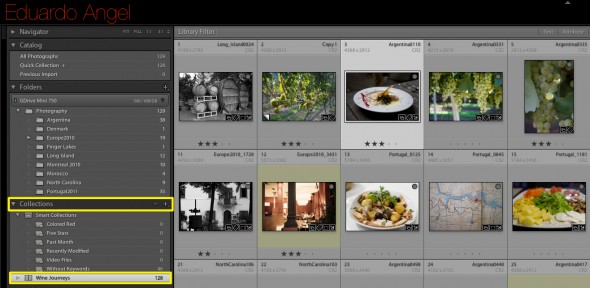
Adobe Lightroom Tips and Tricks 002. Exporting directly to Dropbox.
Here’s our second Lightroom Tip & Trick: How to quickly export images from Lightroom to Dropbox and share the link with your clients. Unless you LOVE burning CDs and DVDs you can really use this one. If you don’t have a Dropbox account, you can get one with 2GB of storage for FREE. Yes, you read that correctly. Now, you and I can get an additional 500MB of bonus space each if you choose to use this link which is also free.
This is one way of doing it. Another way is to set up your Dropbox folder as a Hard Drive in Lightroom under your “Publish Services” (see image below).
Click to keep reading (more…)
Photography
Streamlining Adobe Lightroom • NEW Weekly “Tips and Tricks” Series.
The more photos we take, the more photos we need to edit, and the more we need to retouch, back up, search and find. Digital imaging has been great in many ways, like instant review and approval, but it is not making our lives any easier when it comes to time spent in front of the computer.
Photographers need constant access to our photos; we need them to put portfolios and proposals together. After every assignment we need to retouch and deliver the files. Clients will invariably request changes, other versions or different resolutions. When a job is completed, we often need to update our website and blog and start putting new proposals and presentations together.
To make things event more interesting, with recent developments in telecommunications, our clients are expecting that we deliver files right away, and from any location. That is a challenge that we did not have before. All this put together is what I like to call the “constant image cycle”.
Challenge 1
• The more photos we take the more tools we need to manage, organize, and find them.
Challenge 2
• Need to constantly access images to get assignments (proposals, portfolios, presentations, etc.), edit shoots (select best images, retouch, etc.) and deliver final assets.
Challenge 3
• Photographers are expected to deliver images almost instantly and from any location.
All these “challenges” rely on the same non-renewable resource: Time.
I have been a Lightroom user, beta tester, instructor and evangelist since version 1. Actually, I remember beta testing the very first version under the secret code name “Shadowland.” I now use the software almost every day.
After all these years and playing with the app almost every day, I have discovered many great ways to streamline my workflow, mostly by using Lightroom as a database. Starting next week, I’ll be sharing a weekly tip on this blog. Some tips might be familiar to veteran Lightroom users; some approaches might be entirely new. Some will help you to get things done quicker, while others will entirely replace outdated steps. I hope you join me on this project, and as always feel free to ask questions, comment on the tip of the week, and suggest improvements.If you are interested in other topics, please let us know here (and get a chance to win a $100 Amazon Gift Card!).
UPDATE 20130115 Tip & Trick #1, and Tip & Trick #2.
UPDATE 20130214 Tip & Trick #3, and Tip & Trick #4
If you have specific questions or want to learn more, we are now offering virtual one-on-one sessions to give you customized solutions and personalized training no matter where you are in the world. Sign up now!
Video
The Crème de la Crème: The best articles of 2012.
Wow! What a year! We completed 200 Consulting projects, over 30 Photography and Video Workshops, 50 videos, 50 tutorials and close to 200 blogs posts….all in one year.
How was this even possible? One, this is a team effort, where everybody does what they love and excel at. Second, great time and project management, which is paramount in an industry that keeps changing (and sometime evolving) every single day.
We want to sincerely thank our subscribers (if you are not one, it is not too late. Join here) and followers for all of their continued support and feedback.
Today we would like to highlight our 10 most popular articles of the year. Later this week we will publish the 10 articles that for whatever reason didn’t get much attention but we feel are very relevant and worth your time.
Here we go!
1) Upgrading to Adobe Lightroom 4 in 7 simple steps.
No matter what previous version of Adobe Lightroom you use, it is very easy to install and upgrade to the latest Lightroom 4 platform. Find out how easy this is below.

2) Canon EOS M Hands-on Review and Canon EOS M Images.
After several tests, we discussed the best and not so great features of Canon’s EOS M. Also, we shot some sample images with this mirrorless gem.
Canon EOS M Review & Canon EOS M Images

3) Canon EOS Mark III, 5D3, 5D Mk III has arrived!
An in-depth technical analysis on the latest, newest, meanest Canon EOS system. Our overview included the most important and newest features.

(more…)
Video
Cloud Storage Solutions and Adobe Lightroom.
In the past couple of weeks, we have done several One-on-One Consulting sessions where the “Cloud Storage” question came up. This is a very quick overview of the most popular online storage options with pricing and direct links to each.
My own situation:
• My Lightroom Catalog has 70,000 RAW Images. I shoot a lot, but I am merciless editing.
• The entire catalog (NOT the RAW files) takes about 26GB of space.
• The RAW files take about 860GB of space.
This means I need about 900GB of storage space if I wanted to move my Lightroom Catalog, including all RAW files, to the Cloud.
 Dropbox customers are provided with 2 GB for free.
100 GB
Monthly $9.99
Yearly $99.00
200 GB
Monthly $19.99
Yearly $199.00
500 GB
Monthly $49.99
Yearly $499.00
IMPORTANT: If you don’t have a Dropbox account, use this link to get started. You get 2GB for free, and we both get an additional 500MB as a bonus. Hurry up!
Click to keep reading (more…)
Video
PhotoPlus 2012 Workshops
The 2012 PDN PhotoPlus Expo is the largest photography and imaging show in North America, attended by over 24,000 professional photographers and enthusiasts. This year we are presenting two awesome seminars: The Power of Lightroom 4 and Digital Cinema Essentials for Photographers.
If you have any questions don’t hesitate to contact us!
Video
Adobe discontinues support for CinemaDNG on Premiere Pro.
We have watched this comparison test between Blackmagic’s Cinema Camera (4:2:2 10-bit image), and Canon’s 5D Mark III (4:2:0 8-bit image) way too many times.

And here’s a low-light comparison between Sony’s FS100 and Blackmagic. We believe the footage speaks for itself.
We are seriously considering getting Blackmagic’s amazing camera next month when it finally becomes available. Because of this, we are extremely surprised and dissapointed by Adobe’s sudden decision to drop support for their own CinemaDNG format on Premiere Pro. CinemaDNG is one of the many features we really like from the Blackmagic Cinema Camera. This is Adobe’s statement:
“The Cinema DNG Initiative has been discontinued and is no longer hosted on Adobe Labs. The CinemaDNG format continues to be an open format, and its development is not limited to Adobe. CinemaDNG files can still be opened by any current Adobe application that includes the Camera Raw plug-in (note: which is NOT the case fro Adobe Premier Pro) for importing DNG files.”
Right after our NAB 2012 wrap-up report (where we highlighted Blackmagic’s Camera AND the announcement of Adobe Premiere Pro CS6) Adobe had this to say:
(more…)
Video
Life after Photokina: Fuji’s retro sexy X-E1.
During Photokina Olympus, Panasonic, Sony and Fujifilm announced new mirrorless systems. Fuji has not one but two new cameras, the X-E1 and the XF1. The X-E1 is noticeably smaller than the X-Pro1, but it retains the same Leica-esque retro rangefinder design.

The quality of the EVF is amazing, the grip is very comfortable, and the overall size-to-weight ratio is excellent. The X-E1 is available for preordering on Amazon for $900 body only or $1,400 with the 18-55mm f/2.8 lens.

Video
Will Lightroom 4 support all my files? Maybe.
Updated 9/22
I’ve been getting a lot of emails asking whether Adobe Lightroom 4 (and/or Adobe Camera Raw 7) will support the file format for certain new cameras.
In Lightroom 4.1 or later, you can import and work with TIFF 16-, 24-, and 32-bit floating point images – also known as HDR (high dynamic range) images. You can use the Develop module controls to edit HDR images, and then render the images for export or printing as 8-bit or 16-bit images. Lightroom can now import DNG format HDR images, but you need to make sure the images are processed version 2012.
To keep things simple, here’s the complete list of currently supported file formats:
• JPEG
• TIFF (8 bit, 16 bit, 32 bit)
• PSD (8 bit, 16 bit)
• DNG
• RAW – Here is the complete list of supported cameras. As you can see, the list keeps growing and growing and now includes Hasselblad, Mamiya/Leaf, and PhaseOne Medium Format Digital Backs.
There are two important exceptions:
PSD files saved without the “Maximize Compatibility” setting enabled
Files with dimensions greater than 65,000 pixels per side
As you already know (if you have been following this blog), Lightroom 4 also supports the most popular HDSLR video formats, including MOV, MPG, AVI, and AVCHD.
Keep in mind that the AVCHD support is limited to MTS and M2TS video files. Video editing applications like Adobe Premiere Pro may need the AVCHD file structure to process the files, which can be a pain. Final Cut Pro 7 won’t even take the MTS files without transcoding them first.
This is how the typical AVCHD file structure looks like:

If you find this information useful please help us share the love. It is good karma!
Video
Adobe Lightroom 4.1 is (finally) available.
The Adobe Lightroom 4.1 update brings support for several new cameras including:
- Canon EOS 1D X
- Canon EOS 5D Mark III
- Canon EOS 60Da
- Canon PowerShot G1 X
- Fuji X-Pro1
- Leaf Credo 80
- Nikon D4
- Nikon D800
- Nikon D800E
- Olympus OM-D E-M5.
Other additional features and enhancements are:
• The ability to process HDR TIFF files. (16, 24 or 32-bit TIFF files)
• Additional Color Fringing corrections to help address chromatic aberration.
• Save photobooks created in the Book Module to JPEG
• Publishing photos to Adobe Revel is now accessible via a Publish plugin
• Corrections for issues introduced in previous versions of Lightroom.
To see all the original features see this article and to understand the new VIDEO features check this one.
How to install the new version? Easy.
1. Open your Lightroom 4 and when the software update dialog pops up click “download.” This will take you to Adobe’s download page.

2. Click on “proceed to download” and “download now.”

3. Save the file to the desktop (so it is easier to find it). The download should take about 3 minutes or less.

4. Double click on the installer, follow the step-by-step instructions.
5. Enjoy.
In two weeks we will be presenting an awesome 2-day Lightroom 4 Workshop at the School of Visual Arts (SVA). We hope to see you there.
Video
H.265: A New Standard for Digital Cinema?
A new video codec is expected to replace H.264 as early as next year. H.264 is one of the most common formats for recording, compressing, and distributing high-definition video, not in small part because it is the codec found on several HDSLR systems such as Canon’s EOS 5D Mark III. Another big advantage is that it is currently supported by for most video sharing websites like YouTube and Vimeo. Additionally, runs natively in both Lightroom 4 and Adobe Premiere Pro CS6, which dramatically decreases the time wasted transcoding and rendering files.
But, apparently there is (or technically, will be) a new kid on the block. The Moving Picture Experts Group (MPEG) and the Video Coding Experts Group (VCEG) are teaming up and plan to release H.264’s successor as early as January 2013. The new kid’s name will likely be H.265 or MPEG-H Part 2.
Just how much more efficient will H.265 be? Well, H.265 is expected to provide a significant improvement in data transmission and streaming efficiency compared to H.264. It will have almost twice the amount of compression ratio from for a similar quality level. This means that I’ll need to buy less memory cards, and less external hard drives. Both will make my accountant really happy. Below is the only video test comparing H.264 and H.265 we were able to find. It was performed on an Android tablet by Qualcomm, a San Diego-based chip-maker that is listed as a member of the international standards group developing H.265.
H.265 will be designed to support all new and current streaming technologies including devices working at 4K and Ultra HDTV (also known as 8K or 4320p) resolutions. Did you know that Ultra HDTV definition contains about 16 times the amount of pixels that are present in a 1080p video stream? That’s kinda insane! Check out the chart below to see things in perspective.

The H.265 codec sounds promising, but (there’s always a but) it will have to fight for widespread implementation with another codec called VP8. This format was purchased by Google two years ago and was released it as a royalty-free alternative under the Creative Commons license. Nvidia (Qualcomm’s main competitor) has built VP8 decoding support into its newer Tegra 3 chips alongside H.264 support, and several companies including Skype have adopted VP8 as their preferred format. Adobe also announced that the Flash Player will support VP8 playback in a future release. Who will win? Let’s wait and see.
Video
How to switch from iPhoto to Adobe Lightroom.
Question: I would like to start using Lightroom as my photo editing software but up until now all my photos have been stored on my iMac and in iPhoto. I am tearing my hair out trying to figure out how to 1) transfer my iPhoto library to an external hard drive and then 2) transfer that to Lightroom. I’ve been reading about this on the Web but am skeptical of trying to do it myself.
Answer: The first step is to find out where are your images stored. Go to Applications/iPhoto and right-click on “show package contents”.

You should now be able to see the iPhoto “library.”
The next step is to decide if you want to keep the images where they are or move them to a new location. Using Adobe Lightroom you can accomplish both tasks. I personally would prefer to MOVE the images to a fast and reliable external hard drive that is only dedicated to the images. More info about Hard Drives here and here.
In Adobe Lightroom’s Import dialog, navigate to the folder that contains you iPhoto Library, make sure MOVE is selected, and select the new destination on the (ideally) external Hard Drive.

The pictures will be MOVED from the iPhoto location, and imported through Lightroom.
By the way. iPhoto is BAD for several reasons. Just two mention two: By default, it creates additional folders and subfolders with the capture time, making your workflow even more time consuming and painful.
Video
Adobe Creative Suite 6: is your current system supported?
As part of Adobe’s Photoshop CS6 Public Beta announcement, the company said that it will continue to provide official support for Windows XP, and Windows 7, but will be dropping official support for Windows Vista. As you might know, Lightroom 4 is no longer officially supported on Windows XP. For Mac OX OS, Adobe is officially ending support for Macintosh systems that are not 64-bit capable. Premiere Pro CS6 requires Mac OS X v10.6.8 or v10.7, and Windows 7 with Service Pack 1, but it is not clear if Windows Vista and/or XP will be supported. We have been beta testing Premiere Pro CS6 for several months and I can tell you this: it is sweeeeet!!! Actually, most of our “Conversations with Friends” have been edited on CS6.

![]()
If you are just getting started with video and want to explore a video editing application, you could also consider Premiere Elements 10. Elements is a slightly less powerful, but still very capable version of Premiere Pro with an easier-to-use interface. It is important to know that Premiere Pro is a 64-bit only software and requires a computer with a 64-bit processor and 64-bit operating system. Premiere Elements 10 includes both 32-bit and 64-bit versions to run on both systems, but the 32-bit version won’t be able to access more than 4 GB of RAM. The same is true for the old Final Cut Pro 7 and older.
If you are curious about which NVIDIA graphics cards are better for Adobe’s CS6 Suite, go here.
Tomorrow we will show the quick and easy way to tell if your Mac has a 32-bit or a 64-bit processor.
Questions? Comments? Please post them below.
Video
Catching up with the coolest tech news. Summary.
I’ve been on the road for the past 2 weeks, with very limited internet access. Today, I finally had some time to catch up with the latest technology news (1683 articles and 268 emails). These are, in my opinion, the most interesting and relevant announcements:
• Filmmaker Jeff Desom took Alfred Hitchcock’s famous 1954 film “Rear Window” and turned it into a single panoramic time-lapse video.
Two years ago I set up my camera to take a picture every 15 seconds for 36 hour and edited 698 still images into a 29-second video.
• Recently I was interviewed by PDN about the “13 Products you need to add HD Video to your business.” Do you agree or disagree? Did we miss something? We would love to hear your comments below. The article is also available on PDN’s May print issue.

• Blurb posted a cool article about how we use the Book Module on Adobe Lightroom 4. If you are interested in exploring this option don’t miss one of our upcoming seminars. Here’s the sample book (about wine!) we created.
click here to continue (more…)
Video
Are you eligible for a complimentary (free) Lightroom 4 upgrade?
Adobe doesn’t notify customers who purchased single-user licenses about complimentary post-announce upgrades, BUT according to a somewhat obscure company policy, users who bought software (full or upgrade) soon after a new version was announced, might be eligible for a complimentary upgrade. If you followed my instructions on a previous post to purchase Lightroom 4 50% off, you might be one of the lucky ones.You need to contact Adobe directly to find out if you fall in the eligibility period. Let me know how it goes.
If you already purchased the upgrade and have questions about the installation, follow these simple steps here and here.

Video
Upgrading to Adobe Lightroom 4 in 7 simple steps.
The following steps can be used to upgrade Lightroom 1, Lightroom 2 or Lightroom 3, as well as Lightroom 4 Beta catalogs.
Step 1. Download and Install Lightroom 4
Step 2. On your Mac’s finder, find the location of your Lightroom 3 catalog. It should look something like name.lrcat

Step 3. Right click on that file and select “open with Adobe Photoshop Lightroom 4”

Step 4. You should see the “Lightroom Catalog Upgrade” dialog. Be very careful with this step. Catalog names can NOT be changed later. I strongly suggest you click on “change” and determine the best location and name for your upgraded catalog.

—Click to continue (more…)
Video
Installing and upgrading Adobe Lightroom 4.
Today we would like to show you how to install Adobe Lightroom 4 in 60 seconds or less. On Saturday morning we will post a step-by-step tutorial on how to upgrade your Lightroom 3 (or 2, or 1, or even 4 Beta) Catalog to Lightroom 4.
And by the way, don’t forget to come back tomorrow for a new episode of our “Conversations with Friends.“
Video
Adobe Lightroom 4 is shipping. Price cut in half.
The full version of Lightroom 4 is available now and Adobe cut the price in half: The full version (which used to cost $299) will now be $149. The upgrade version will only cost $79. The beta version (which was downloaded more than 250,000 times) will expire on March 31, 2012.
For an in-depth review of Lightroom’s newest features check our previous post. Also, if you live near New York or plan to visit during the Summer, check one of our upcoming events “What’s New in Adobe Lightroom 4,” and a 2-day hands-on Workshop “Creating Custom Photo Books with Adobe Lightroom 4.”

Adobe Lightroom 4 Geotagging
Video
Canon EOS 5D Mk III, 5D3, 5D Mark III has arrived.
Ok. Let’s start from the beginning: We are looking at a 22.3 Megapixels, Full Frame (36 x 24mm) CMOS sensor system, powered by a DIGIC 5+ processor. Check this article if you want to fully understand the differences between the DIGIC 4 processor on the 5D Mark II, and the new DIGIC 5+ on the 5D Mark III.

Some of the highlighted features include:
• Dual card slots (1 SD/SDHC/SDXC and 1 CF). Sorry, no XQD on this one. What is awesome about the dual cards is that you can a) record the same data to both cards, or b) record different file sizes or types to each card, or c) automatically switch to the second card when the first card is full. That’s great when shooting long interviews, or concerts, for example.
• HDR with +/- 3 stops
• Improvement in noise reduction by 2 stops
• Multiple exposure mode
• 63 zone dual metering system
• +/- 5 stops (the 5D Mark II has only 3 stops)
• iFCL metering system with a 63-zone dual-layer sensor
• File Formats: AVI, RAW, JPEG, H.264, MOV, MPEG-4
• Full HD video recording: 1080/30p, 24p, 25p; 720/60p, 50p; 480/60p, 50p
All the typical features are here: Minimum Shutter Speed (30 sec), Maximum Shutter Speed (1/8000 sec), 100% coverage viewfinder, etc, etc, etc. As expected, durability on the Magnesium Alloy chassis has been improved including a 150,000-cycles shutter, and water and dust additional resistance.
These are the specs that REALLY got my attention:
• It is now possible to check two images side-by-side for sharpness, exposure, etc at different aspect ratios (1:1, 4:3, 16:9) with the new “Comparative Playback” function.
• There’s a Q button that will process RAW to JPG on camera.
• The new camera shares the same exact 61-point High Density Reticular AF system found in the EOS 1D-X (for half the price).
• There’s an iPod-like button to make changes in the movie mode without adding noise to the clips. Smart!

• The 5D Mark III uses the same batteries (LP-E6) as the 7D and 60D.
• The ISO war keeps getting better. The Mark III offers ISO 100-25600 (expandable up to ISO 102,400) for stills, and 100-12800 (up to ISO 25,600) for video. Wow! Now we really could use an iPad as a Key Light!
Here’s an interesting set of high-res JPEGs samples shot at ISO 50 to 102,800. The test was performed under low level halogen lights, which are perhaps the most challenging to digital sensors and noise reduction systems.
Video Features.
There are several serious improvements on this front:
•There are a couple of new video Modes: “Silent and Low Vibration,” but I don’t recall seeing them on the prototype I tested.
• The video resolution is Full HD (1920×1080), and the video format is the same H.264, which I personally love because it runs natively on Adobe Premiere Pro and Lightroom 4, and plays extremely well with online sharing platforms like Vimeo and YouTube.
• The recording buffer has been extended from 12 minutes to 29 minutes and 59 seconds. The 4GB limit is finally over.
• Following Nikon’s D800 improvement, we now have a 3.5mm headphone jack for live audio monitoring and a Wind Filter. Other ports include USB 2, HDMI, Mic Input, and Wireless.

• The LCD screen is virtually the same 3.2″ 1.04 million as the Nikon’s D800. With a screen this size photographers are out of excuses for not using Histograms the way they should.
• There’s a built-in info menu while shooting video, which comes super handy to quickly check important settings like White Balance, Resolution, ISO, Picture Style, etc.
Regarding audio, the changes are pretty exciting:
“The camera includes manual audio level control with 64 levels, adjustable both before and during movie recording. There is also an automatic audio level setting, or sound recording can be turned off entirely. A wind filter is also included. Sound can be recorded either through the internal monaural microphone or via an optional external microphone through the stereo mic input.”
—Click to continue (more…)
Photography
Bye Bye Phocus. Hasselblad gives Lightroom away.
In about two weeks, Hasselblad will start including Adobe Lightroom when you buy an H4D system. Currently only the H4D-60 is fully supported, and there are many lens profiles missing. It is also unclear if the offer extends to Lightroom 4 when it starts shipping or not. Stay tuned.

Video
50% off on Adobe Lightroom 4, today only.
Here’s the deal: the full version of Adobe Lightroom is normally $299. The upgrade price is generally $99. Today only, B&H is offering Lightroom 3 for $69. If you are running an older version, or need additional licenses, you can buy version 3 today, and upgrade to version 4 when it becomes available in early April. You will effectively get the new version for almost half price.
To really understand why this is such an amazing deal, check all the new features on Adobe Lightroom 4. Don’t wait. The deal expires tonight, Feb 15, at 11:59PM EST.
 .
.
Video
Adobe Lightroom 4 HDSLR video support explained.
UPDATE March 6, 2012. The full version of Lightroom 4 is available now and Adobe cut the price in half: The full version (which used to cost $299) will now be $149. The upgrade version will only cost $79. The beta version (which was downloaded more than 250,000 times) will expire on March 31, 2012.
My birthday was yesterday, and the present arrived this morning. Lightroom 4.0 (public beta) FULL VERSION is now available as a free download from Adobe’s website.
Important things to consider:
• You do not need a serial number and the beta version will not update your current Lightroom 3 (or earlier) catalog.
• The public beta comes in three flavors: Mac (OS X v10.6.8 Snow Leopard) or v10.7 Lion), Windows 32-bit, and Windows 64-bit. Make sure you download the correct version. Each compressed download is about 400MB.
• File support for Lightroom 4 beta, is exactly the same as in Lightroom 3.6 and Camera Raw 6.6.
• The public beta will expire on March 31, 2012, when the final Version 4 becomes available.

Here are the new features, organized from super awesome to awesome:
• HDSLR video support (full details below)
• Soft proofing (found under the Develop Module, not the Print Module as one would expect)
• Photo book layout
• Email directly from Lightroom (works with Gmail, Yahoo, Hotmail, and AOL)
• Publish videos directly to Facebook or Flickr
• Geo location (via GPS metadata) with the Map Module
• Enhanced DNG workflows
• Adobe Revel (Carousel) export workflow
• Additional local adjustments including Noise Reduction and White Balance
• Powerful new Shadow and Highlight controls
• Simplified basic adjustments

Video
Regarding Video Support this is what Adobe has to say:
“Lightroom 3 added the ability to import, manage and tag video files but as the popularity of video capture increases it’s important to provide a single, robust workflow solution that can support all of your imaging needs regardless if they’re still images or video captures. Lightroom 4 adds native playback for a wide variety of formats from mobile phones to high end DSLRs.”
Here’s what I have to say: In version 3, we were able to import video files along with our still images, but to see the clips Lightroom needed to access Quicktime. Now we can play the files inside of LR. Also, by using similar shortcuts from well established NLE (non linear editing) software applications like Final Cut Pro and Adobe Premiere Pro, now we can set In and Out points directly in Lightroom. Shift+I (In) and Shift+O (Out).
Photography
How to Sync Catalogs with Adobe Lightroom 3.
Tuesdays Tutorials.
I am often shooting on location, and I need to make sure that my images are safe and properly backed up. I start by creating a temporary Lightroom catalog, usually with the client’s name. For this tutorial I am going to name it “Temporary Catalog TBD.”

Click on Import and the Import dialog opens.


We can see that I have 2 external hard drives connected to my laptop, my MAIN external hard drive is called “ONE TB” and a SECONDARY external hard drive is called “ORANGE 120”.
Video
Weekend Wrap up.
What a great weekend! Tons of new friends, and a few exciting announcements at the PDN PhotoPlus Expo in New York. My Adobe Lightroom and Digital Cinema seminars went great, big thanks to Victor Ha from Cinevate for his awesome hands-on demo on High Production Value. The 2-day HDSLR Workshop at B&H was really fun. We had a great group of photographers transitioning into digital cinema!
Thank you all for the great feedback and support. Here are some pictures.


If you are interested in HDSLR Cinema, check my upcoming workshops in Washington D.C. (Nov. 5-6), and Los Angeles (Nov. 11-12).
Video
Is this the future of Video editing?
Adobe just released some “early-stage technology ideas” during the recent Adobe MAX conference, and by far my favorite is “Video Meshes” which basically is a new way to edit videos that includes the ability to create 3D fly-throughs of 2D videos, AND change focus and depth of field.
Imagine the possibilities: Lightroom meets Premiere
meets Video Meshes meets the recently acquired Iridas. Iridas, just in case you missed it, is a leader in high-performance tools for digital color grading and enhancement of professional film and video content, including stereoscopic technology. Adobe is getting really serious about these things lately.
How long will it take for this to develop into a real product? Any guess?
I am also impressed with the gazillion of Cloud apps they have announced lately. But that’s another post for another day.
Video
Can’t miss seminars at PDN’s PhotoPlus Expo 2011.
Last week, my great friends Ted Kawalerski, Matt Stanton, and Justin Katz helped me shoot this 45-second video to promote my upcoming seminars at PhotoPlus Expo in New York City.
On Friday, October 28, from 8:45 to 11:45 a.m., I’ll be co-teaching “Portrait Lighting Techniques & Lightroom Workflow” with Bobbi Lane. Expect a very energetic and intense seminar.
The same day, from 3:45 to 5:45 p.m., I’ll be presenting “Intro to Digital Cinema.” This 2-hour class is specifically designed for photographers transitioning into HDSLR video, and my goal is to provide enough tips and resources so that attendees will be able to start shooting video by 6 p.m. that same day. I guess I love challenges. As the title says, this is an introductory class.
To truly understand all the technical concepts, filmmaking techniques, and upcoming trends of this amazing digital revolution, I suggest you attend one of my upcoming 2-day PDN HDSLR Video Workshops in New York (Oct. 30-31), Washington D.C. (Nov. 5-6), and Los Angeles (Nov. 11-12).
Let me know if you have any questions!