Video
The Sound of The Girl with the Dragon Tattoo.
Video
The Sound of The Hunger Games.
Video
The Sound of Prometheus.
Video
The Sound of Argo.
Video
The Sound of Skyfall.
Video
The Sound of The Hobbit: The Desolation of Smaug.
Video
The Sound of Transcendence.
Video
The Sound of Tomorrowland.
Video
The Sound of Oblivion.
Video
The Sound of The Revenant.
Video
The Sound of Gravity.

Winner of 7 Academy Awards, including Best Director! Astronauts Ryan Stone and Matt Kowalski are on a routine spacewalk when disaster strikes. Their shuttle is destroyed, leaving them alone in space – tethered to nothing but each other. Click on the image to watch the movie now for only $3.99
Video
The Sound of The Dark Knight Rises.
Video
The Sound of Inception.
Video
The Sound of Interstellar.
Video
Color By Numbers: Jean-Luc Godard.
Video
Color by Numbers: Hayao Miyazaki.
Get a Lynda.com on us!
Video
Color by Numbers: Sofia Coppola’s Pastels.
Video
Color by Numbers: Napoleon Dynamite.
Video
Color By Numbers: Amélie.
Video
Color by Numbers: Steven Soderbergh.
Video
Color by Numbers: The Grand Budapest Hotel.
Video
Color by Numbers: Zodiac.
Video
The (completely unnecessary) remaking of Oldboy.
Video
The 180 Degree Rule.
Video
The Long Takes.
Video
Six Uses for the Bird’s-eye Shot.
Video
How Paintings Matter in Movies.
Video
The Three Types of Hollywood Editing.
Video
The Cutaway Shot.
Video
The Graphic Match Cut.
Video
Filmmaking Essentials for Photographers. Mini Courses.
Why Filmmaking Essentials?
One of the main challenges photographers face when starting to shoot video is to focus too much on hardware and software, and forget about the most important part: the story. While this informative course includes some technical information, the main goal is to provide an overview of the many aspects of filmmaking, and identify potential business opportunities with motion. Click HERE.
The “Filmmaking Essentials for Photographers” course is based on a popular event we have been presenting for several years, but it has been greatly enhanced with additional visuals and examples. Some of the clients and sponsors for the live event include Adobe, Adorama Pro, B&H Photo, Cinevate, Future Media Concepts, Gulf Photo Plus (Dubai), HOW Design Conference, International Center of Photography, Lynda.com, McCann Erickson, NAB Show, Panasonic, Photo District News, PhotoPlus Expo, Photokina (Germany), Savannah College of Art and Design, School of Visual Arts, Sony, and X-Rite, among others.

Click on the Image to access FREE Tutorials.
Why these Mini Courses?
Sometimes we don’t have time for three-hour lessons; rather, we just need a quick and concrete answer for a very specific question. Because of that, in addition to longer courses we’ve released these mini courses, averaging three-to-five minutes each. Click HERE.
Click on the Image to access FREE Tutorials.
Video
Filmmaking Essentials for Photographers. Online Intro Course.
In 2011 I was invited along with National Geographic photographer David McLain to present a series of two-day workshops nationwide. The events were produced by Photo Quest Adventures and sponsored by PDN, Sony, Adobe, and other leading brands. The main goal was to help photographers transition into video by simplifying key concepts and providing shortcuts, resources, and advice on what gear to buy.
I have been honored to teach “Filmmaking Essentials” at all major industry events, from PhotoPlus to Imaging USA to NAB, from South America all the way to Dubai, Hong Kong, and Thailand, and at home in New York.
Few people know that I never use the same presentation twice. Each and every time I add things I’ve learned, plug in valuable feedback from attendees, students, and this website’s readers, and I strive to improve the educational experience with better examples and shorter explanations.
When looking at the advancements in digital technology since those first workshops it seems like decades have gone by. Today, we have access to a variety of brands and models of very compact cameras that can see in the dark, shoot 4K or higher resolutions, offer incredible frame rates, and even offer GPS and WiFi features so they can be easily controlled by smartphones and tablets. The future is definitively here.
But something quite odd has been happening to my personal and professional focus. The more gadgets we have at our disposal, the more I’ve shifted towards the craft of storytelling. Instead of getting more stuff, I’ve been increasingly interested in constructing and enhancing my stories to better engage the viewer. Naturally, this approach has been reflected in the educational content I produce.
Now, and for the first time, I’m proud to offer an awesome version of my one-hour presentation online. Click HERE.
The “Filmmaking Essentials for Photographers” course is based on a popular event we have been presenting for several years, but it has been greatly enhanced with additional visuals and examples. Some of the clients and sponsors for the live event include Adobe, Adorama Pro, B&H Photo, Cinevate, Future Media Concepts, Gulf Photo Plus (Dubai), HOW Design Conference, International Center of Photography, Lynda.com, McCann Erickson, NAB Show, Panasonic, Photo District News, PhotoPlus Expo, Photokina (Germany), Savannah College of Art and Design, School of Visual Arts, Sony, and X-Rite, among others.
Who is this course for?
Well, as the name implies, this version of “Filmmaking Essentials” covers concepts already mastered by advanced filmmakers or by experienced photographers who are very technically savvy. But I’m confident everyone else could learn a thing or two.
As often as possible we’ll be adding new courses, covering topics like pre-production and post, tips for one-man crews (like journalists) working stills and video assignments, advice on getting started with Color Grading, and many other fascinating subjects. As mentioned above, most of these courses are not and probably won’t be hardware or software driven, but would focus predominantly on answering the why’s, not the how’s, of the fascinating craft of filmmaking.
Also as a first, we are offering several mini-courses (averaging three minutes each and many of them for free) for those who need concrete answers to very specific questions.
So, if this is the kind of content and format you desire, vote with you wallet and let your voice be heard.
Thank you for your continued support. Click HERE to start learning.
Click on the Image to access FREE tutorials.
Video
A filmmaker’s perspective on Japan.
Back in 2011 I made the best decision of my life: to get engaged. Wanting to “pop the question” at an unforgettable location, I asked my wife, then girlfriend, to write down her top five destinations that she had not yet visited. Coincidentally, and even though we both have traveled extensively, her first pick matched mine: Japan. The decision was made, air tickets were purchased, and hotels booked, but the timing was off. Just a few days before our departure, and with the ring well hidden in my camera bag, the Tohoku earthquake hit Japan. It was the fourth most powerful earthquake in the world since modern record keeping began in 1900, and the most powerful earthquake ever recorded in Japan.
A few weeks ago we FINALLY had the chance to visit this incredible country and culture, and on this article I’d like to share some of the most amazing things we learned and saw. Like some of my previous videos there’s a generous mix of stills, videos, soundscapes, music and narrations.
First things first
Most of us learned in school that Japan closed its borders in 1639 for more than 200 years, keeping only one seaport open for foreign trade exclusively with Dutch and Chinese sailors. A lot has changed, of course, and the country is currently the world’s third largest economy after the United States and China. This is truly a miracle for a nation that consists of more than 6,800 islands, has a population of 127 million people, and is smaller than the states of Montana or California.
As a little kid I spent countless hours poring over my grandparents National Geographic magazines. I dreamt about far and exotic places like “Antofagasta,” which I related to cannibals, “Ushuaia,” which to me was a synonym for the end of the world, “Oaxaca,” which I imagined full of little skulls everywhere, “Marrakesh,” with stunning belly dancers and crazy sword-fighting warriors, and “Kyoto,” elegant, peaceful, and extremely expensive. I loved the sound of each place.
Now, a “few” years later, I’ve had the privilege to visit all of these magical places and work in well over 700 cities in 50 countries, covering 40% of the world (according to Tripadvisor). Compared to my childhood pipe dreams, some countries have been much more interesting (Hong Kong and Thailand), and a few hugely disappointing (Russia and Vietnam top that list). There are no cannibals in Antofagasta, you can see little skulls in Oaxaca for “Dia de los Muertos,” and Ushuaia can’t be described in words. But Japan, in fact, so far, has been the one experience to closest match my dreams.
A World of Contrasts
If I had to define the country in a single word it would be contrast. Not necessarily as in the wide social and economic disparities one sees in India, China, or South America, but in the everyday culture itself; super-modern buildings next to architectural crimes, decadent meals followed by inedible dishes, massive pedestrian crossings and jam-packed subway cars followed by serene gardens, and very polite and quiet people during the daytime that get insanely wild and loud after dusk.


Random Fun Facts
Coming from New York, it always strikes me how clean and quiet other large cities are in comparison. Even Los Angeles and Houston seem muted in comparison. In that regard, Tokyo, the most populated metropolitan area in the world, is impossibly silent. And spotless. And huge. For example, Tokyo doesn’t have an actual downtown, but 23 of them, some with a daytime population seven times higher than their nighttime population.
Having been born in Colombia and experiencing first hand the country’s well documented violence during the 90s, it is hard to grasp how Japan, with the tenth largest population in the world can have the second lowest homicide rate, with only TWO gun-related homicides per year, and a conviction rate close to 99%. My brain can’t even process that information.
There are many fascinating things about Japan, from the expected, like magnificent temples, pristine gardens, and stunning package and lighting design, to the highly unexpected like the super-salty cuisine, and the lack of English speaking people and information in English even in popular tourist areas. Regarding tourism, we based most of our itineraries on Frommer’s and Fodor’s guides, which proved to be excellent sources of information.


We also tried to understand why there are virtually no public trash cans, but no garbage on the streets, millions of people everywhere, but no benches, and restaurants with vending machines, but no napkins. I’m still looking for those answers. Please hit me on Twitter if you have a good guess. And, speaking of Japanese vending machines, one can use any of the 5.5 million to buy beer, wine, canned coffee, cigarettes, food, comic books, toilet paper and even “adult literature and pleasure products.”
To widen our Japanese experience, we stayed at a high-end hotel in Tokyo, and at a Ryokan in Kyoto. The Ryokan, a traditional Japanese inn with tatami floors, paper blinds, a low table for tea and super tiny pillows, provided a unique, but not very comfortable, experience. As an added bonus we located a Ryokan that offered a private Onsen, or spring bath, that was masterfully built with exquisite wood, and harvested the local volcanic waters. Of course, Japan being Japan, even this relaxing moment had many strict rules to be followed in precise order before even touching the water. Overall it was an interesting experience, especially after walking 30,000 steps each day (according to my wife’s pretty handy Fitbit).
One early morning we got the rare opportunity to attend sumo training. As architecture buffs we used some rainy afternoons to visit buildings and stores by our favorite Japanese designers. We tried hard to cover as much of the Japanese culinary spectrum as possible, from quick lunches at shopping centers’ basements, vending machines, and food trucks, and dinning at traditional Izakayas where we tried delicious Yakitori and horse sashimi.
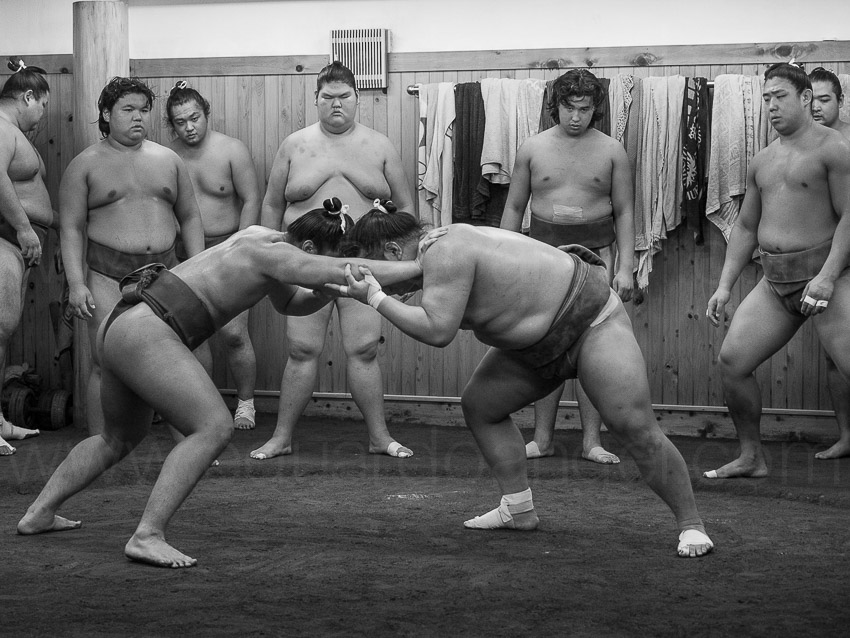
Experiencing a sumo training in Tokyo.
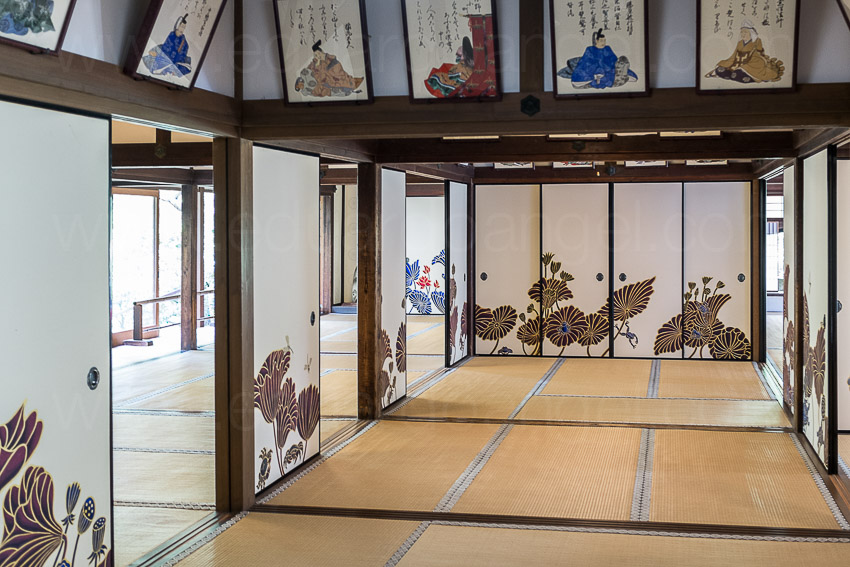
Inside an ancient Ryokan in Kyoto.
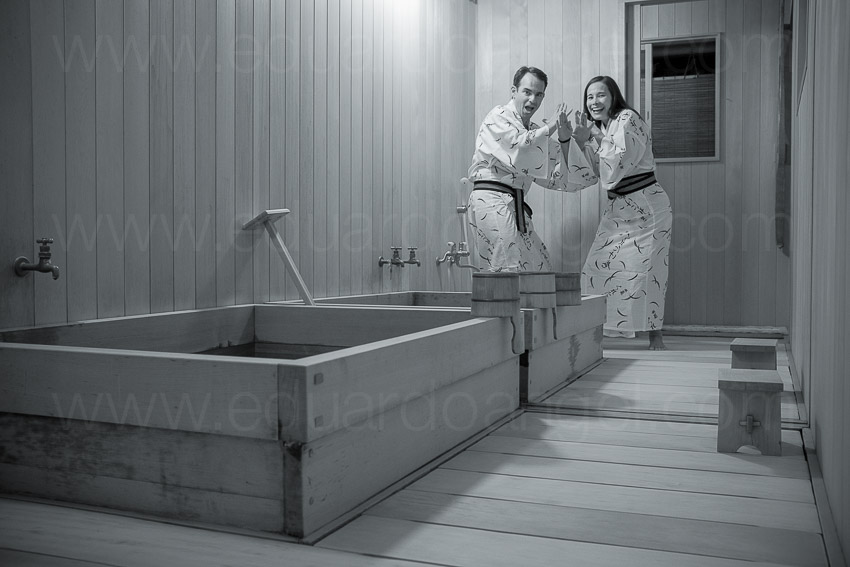
The famous Onsen.
We obviously “had” to fit in a few Michelin-rated restaurants as the respected “foodies” publication has awarded Tokyo the most stars of any city in the world. More than the food itself, the service, presentation, and attention to detail are what truly offers a remarkable experience.
More Random Facts
Japan imports 85% of Jamaica’s annual coffee production, but the fancy coffees we tried were consistently inconsistent. I might get shot for saying this, but the $1 coffee at 7-Eleven was MUCH better than most of the $8 fancy brews we tried. And I’m Colombian, I do know my coffee.
Japan is also the world’s top importer of reggae music and has the largest proportion of jazz fans in the world. We treated ourselves with a jazz concert (and grossly overpriced drinks) at the Park Hyatt‘s bar, from “Lost in Translation” fame. The city views from the fancy bar are great, especially at nighttime, but you get pretty much the same view for free only two blocks away, from Tokyo’s Metropolitan Government Building, where you can also get a very filling lunch for about six dollars.

Tokyo at night from Tokyo’s Metropolitan Government Building.
Gulping down your drink and slurping is NOT considered bad manners (mom, are you reading this?), but somehow eating or drinking while walking down a street is considered very rude and nobody does it. The Zen proverb “When walking, walk. When eating, eat” is silently but effectively enforced all the time, and everywhere. One day we had to go back to our hotel, just a few blocks away, to finish our Bento box lunch.
We did enjoy bowing on meeting someone, but sitting on the floor with your hands in your lap and your legs tucked under you, not so much. Perhaps because I’m less flexible than a tree. When wearing my first kimono I created a small “fashion emergency” with the Ryokan’s owner, as one should always wear the left side over the right side. The opposite of this is only observed at funerals. Something similar happens with chopsticks; do not point them at other people, never wave them in the air or stick them upright in the rice, since they’ll look like sticks of incense at a funeral. How are you supposed to know all this?
Cash is definitely king, and many ATMs in Japan do not accept international debit cards, with the wonderful exception of the ATMs found at the 10,000 7-Eleven stores. Coins are required for buses, trams, and lockers. We had read that Internet access was horrible, but I have to disagree. Both our hotels, many subway stations and bus stops provided free Internet access. If all you need is checking your map or access something on Dropbox you should be fine. If you are planning to stream movies or video games, stay home.
Packing Tips
In terms of packing, we broke a new personal record for this trip. We were able to fit everything into ONE suitcase. In case all the women reading this article are wondering, yes, my wife wasn’t too happy at first, but she came to appreciate my logic while navigating major transport hubs like Shinjuku, which serves 4 million passengers a day, and holds the title as the world’s busiest station.
In addition to the single suitcase, my wife had a very light daypack, and I brought my favorite photo backpack.
Regarding photo and video equipment, I’ve been traveling extremely light and small. This time I brought two Panasonic GH4s (Amazon • B&H), two Panasonic Lumix lenses (Amazon • B&H) , and a Fuji X100S (Amazon • B&H). This is pretty much the same gear I’ve used on assignments in Europe (article on Sigma’s website), Turkey, and commercials like this.
Something I failed to pack (and struggled to find in Tokyo) was a “3-Prong to 2-Prong Adapter.” Considering one can get two for $6 on Amazon, it was very painful to waste precious time walking from store to store and trying to explain what a “3 prong” means with body language and childish drawings. To connect multiple devices I ALWAYS bring two essential items: a mini power strip to charge phones, batteries, and laptops using a single outlet, and a compact USB hub, to connect multiple hard drives to my laptop. This year I’ve been using these small and cheap external hard drives on my travels, and so far they’ve worked perfectly. If you are interested in seeing what’s inside my camera bag, I wrote an article with “The Essential 41 Items” for photography and video assignments.

The Final Product – The Video
Shooting stills, and video, and recording soundscapes while traveling alone is hard, I’m not gonna lie. Doing all that with your (extremely patient) wife is even harder, but totally worth it.
Obviously it’s impossible to understand a country, city, or even a neighborhood in just a couple of weeks. I’ve spent nine years in New York and every weekend we find something new to do, see, or eat. But, we only have one chance to get a first impression, and I believe those first reactions are great ways to identify interesting trends and cultural differences.
The video below has tons of additional information about Japan in general and our travel adventures in particular. If you like traveling—and eating delicious food—I’m sure you will enjoy it, and if you do, please SHARE the love!
If you are looking to expand your creative options by adding video into your skills set or enhance your craft, don’t miss these courses on Lynda.com.
Video
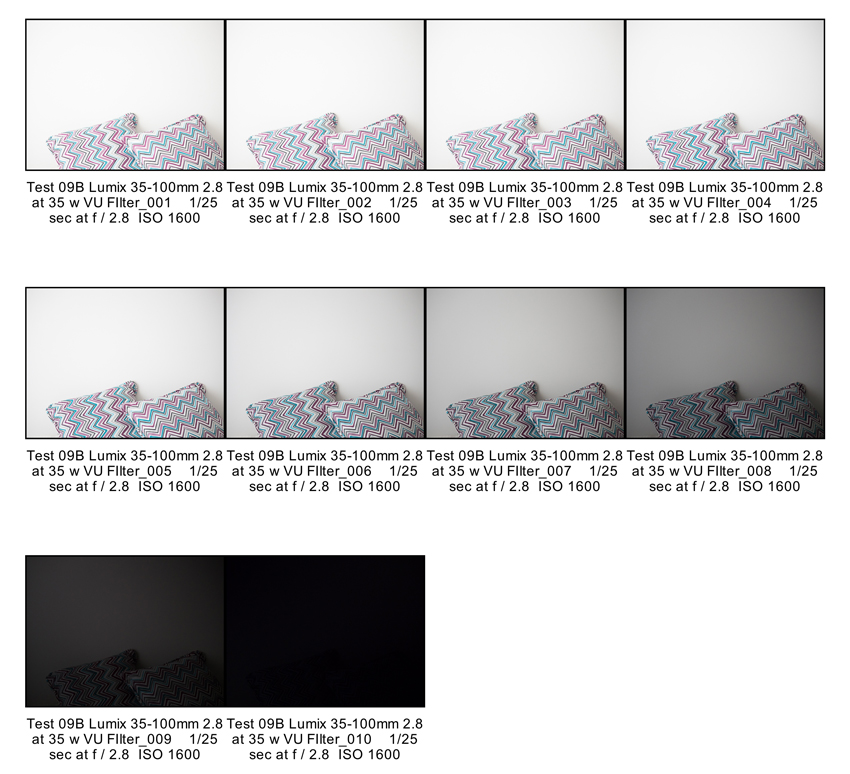
Is a $350 ND filter three (and a half) times better than a $100 one?
For a long time I’ve been using a Genus Variable Neutral Density (77 mm) filter with my Canon and Sigma lenses and a Metabones Speedbooster Adapter on a Panasonic GH4.

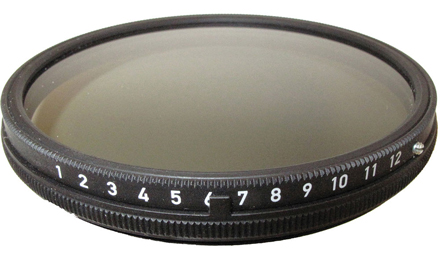
Since I recently got a couple of Panasonic Lumix lenses with a 58mm filter, it was time to buy another ND. I was originally planning to get a Genus or Tiffen filter (about $100 on Amazon), but noticed a $350 Heliopan, among many other cheaper options.
Would the Heliopan (costing three times as much as the Genus) be three times as good as the Genus? The only way to answer this would be getting one, doing a few non-scientific tests, and look at the images side-by-side. So that’s what I did.
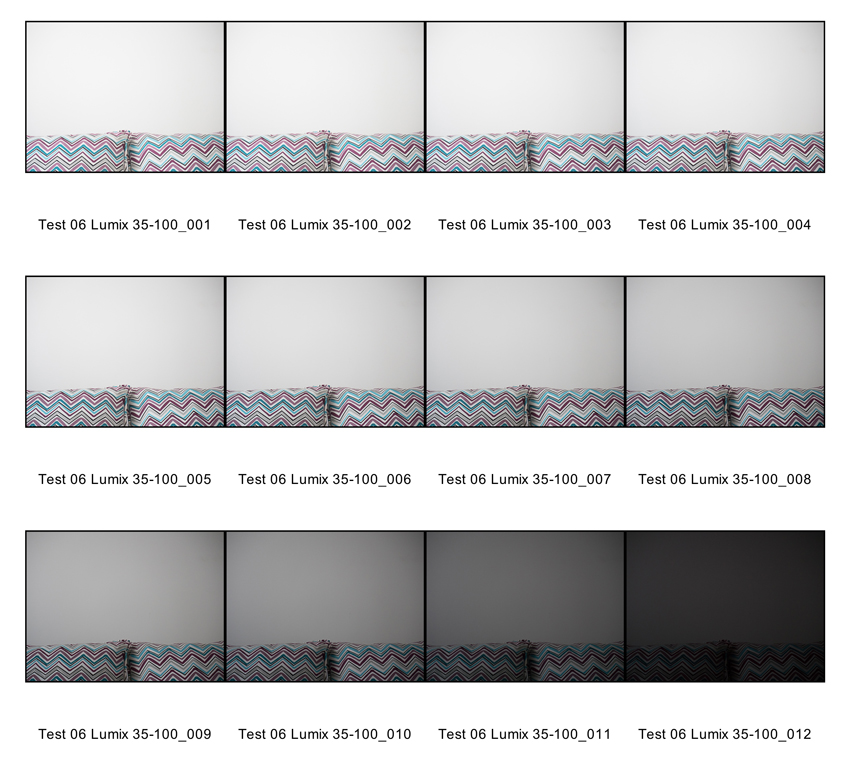
All the tests where performed with a Panasonic GH4 on a tripod, pointed to the same wall, with diffused available light, within a 30-minute period. So, even though that light might change a bit I don’t think it is a significant factor to see the drastic differences below. Here are the most meaningful tests:
Lumix 12-35mm f2.8 at 35mm (70mm equivalent) with Heliopan Variable ND

Lumix 35-100mm f2.8 at 35mm (70mm equivalent) with Heliopan Variable ND
Canon 70-200mm f2.8 at 70mm with Genus Variable ND
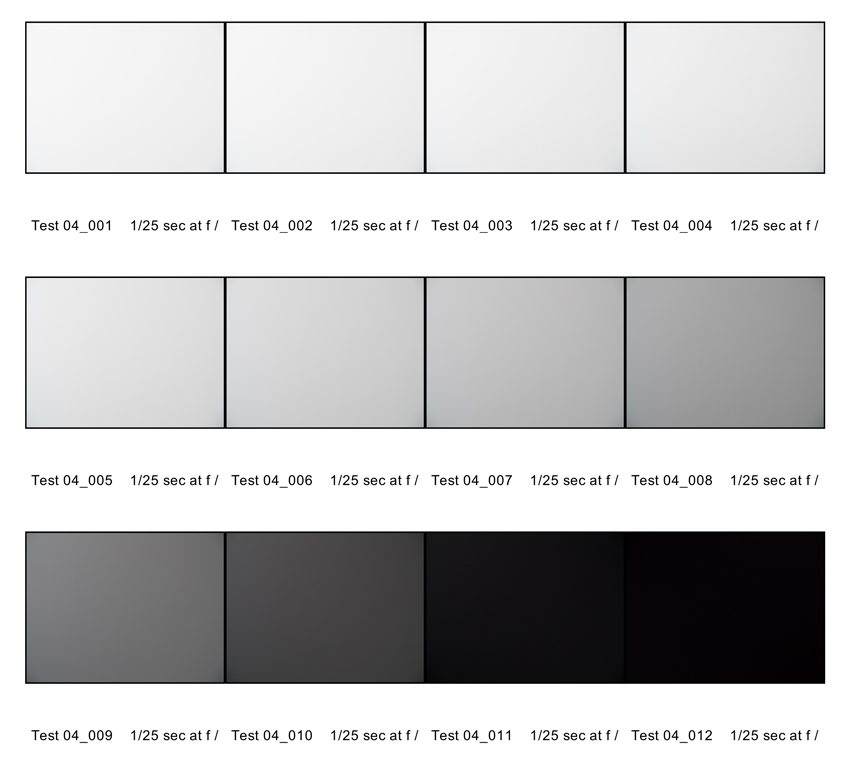
Wow! What a difference between the Genus and the Heliopan! The first one is not only $225 cheaper, but the vignetting wasn’t as noticeable.
At that point I started wondering how much of that nasty vignetting was created by the lens and NOT by the ND filter. So I brought the widest Canon lens I had available a 24mm f1.4, and did another test.
Canon 24mm f1.4 at f2.8 with Genus Variable ND.
I was at a loss. There was some vignetting after drecreasing 4 stops, but never nearly as bad a the Heliopan on the Lumix lenses.
So the next step was to compare the Lumix 12-35mm f2.8 at 35mm (70mm equivalent), the Lumix 35-100mm f2.8 at 35mm (70mm equivalent), and the Canon 70-200mm f2.8 at 70mm WITHOUT any filters!
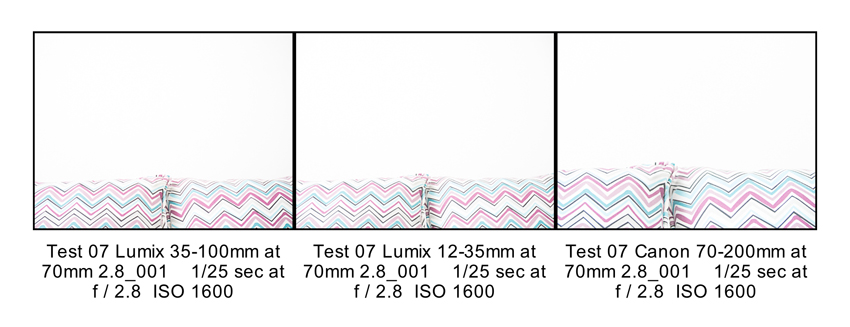
I didn’t see any issues or major differences between the Panasonic and Canon lenses, so I concluded that the Heliopan Variable ND filter was causing the vignetting issue. I returned the Heliopan and got a Vu Variable ND filter for my Panasonic lenses. Here are the results:
Lumix 12-35mm f2.8 at 35mm (70mm equivalent) with Vu Variable ND
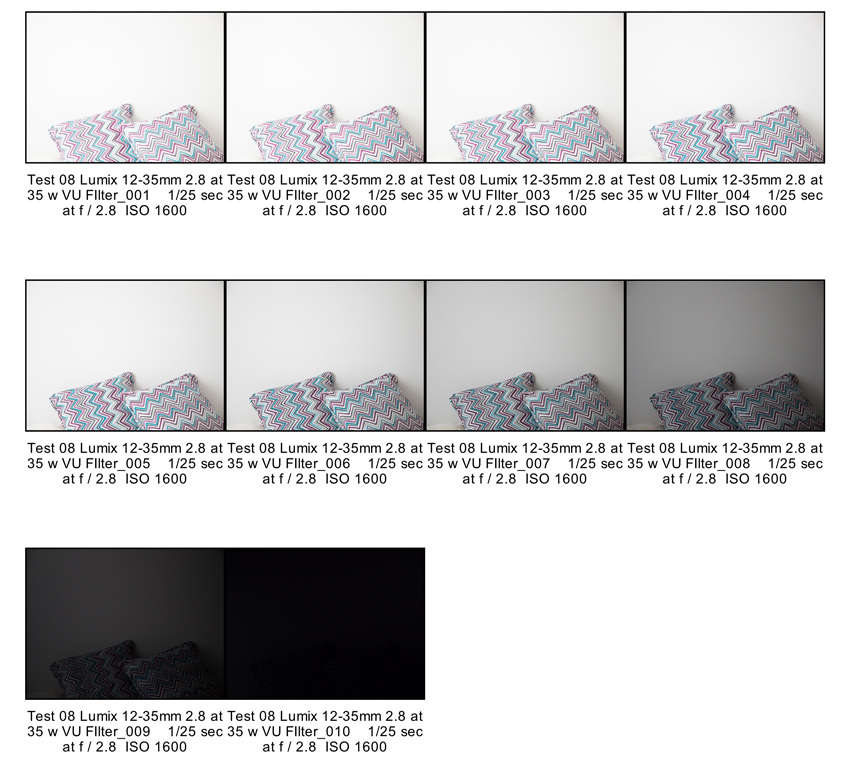
Lumix 35-100mm f2.8 at 35mm (70mm equivalent) with Vu Variable ND
Lumix 12-35mm f2.8 Lens – Heliopan vs. Vu side-by-side

Lumix 35-100mm f2.8 Lens – Heliopan vs. Vu side-by-side

• Conclusions
None of this filter + lens combination is perfect. All the filters create some sort of vignette. After putting all the tests side by side, I picked the ones with a) the LEAST amount of vignetting and b) the smoothest transition between one stop and the next one. Based on my won non-scientific experiments, with MY lenses, camera, computer, software, firmware, etc and only with one (somewhat) constant lighting scenario, the $102 Genus and the $125 Vu seem far superior than the $350 Heliopan.
Are you planning to buy one of these filters? Support upcoming tests and articles by using these links: Genus, Heliopan, Vu.
Did you find this article helpful? Please check out these online courses where I cover other essential filmmaking tools and techniques. Enjoy!
Video

The Panasonic GH4 V-Log L. Graded and Ungraded Samples.
A few tests comparing the Panasonic GH4’s default camera profiles with the brand new V-Log L.
The (very quick) grading was done on Premiere Pro CC 2015 and the super awesome Lumetri Color Engine.
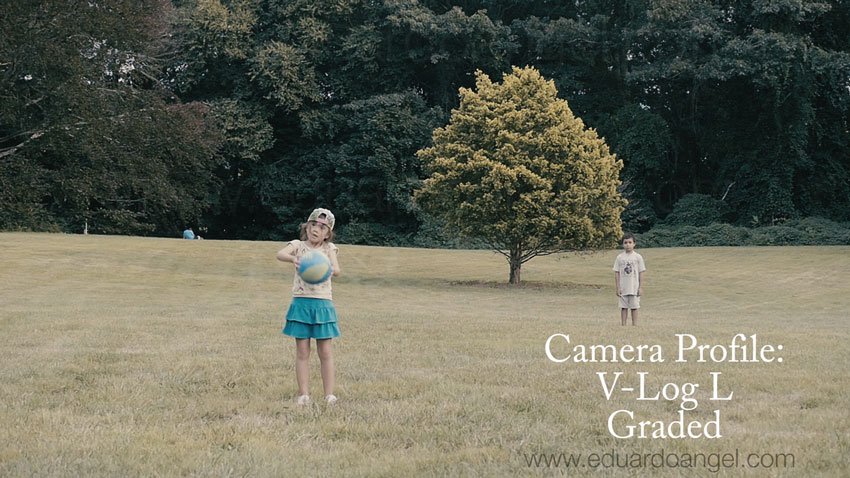
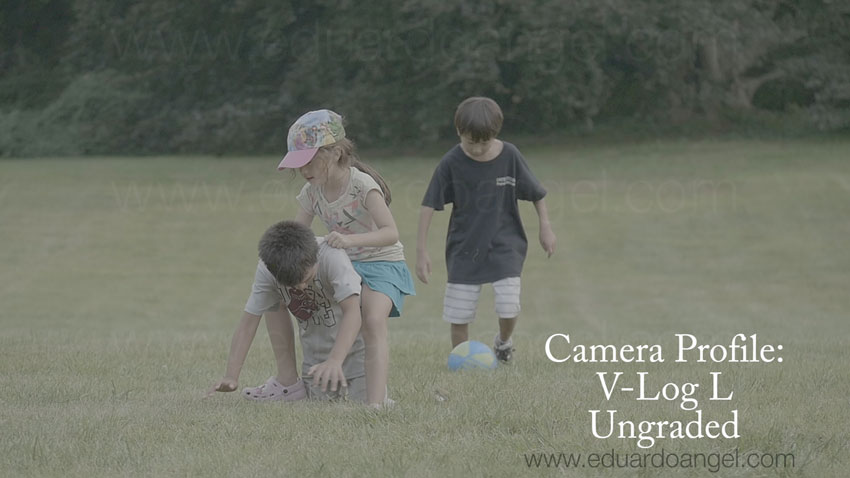
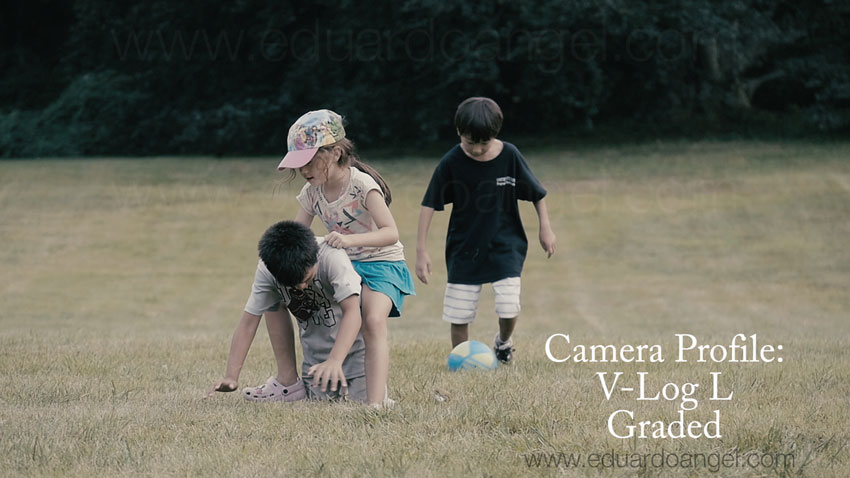


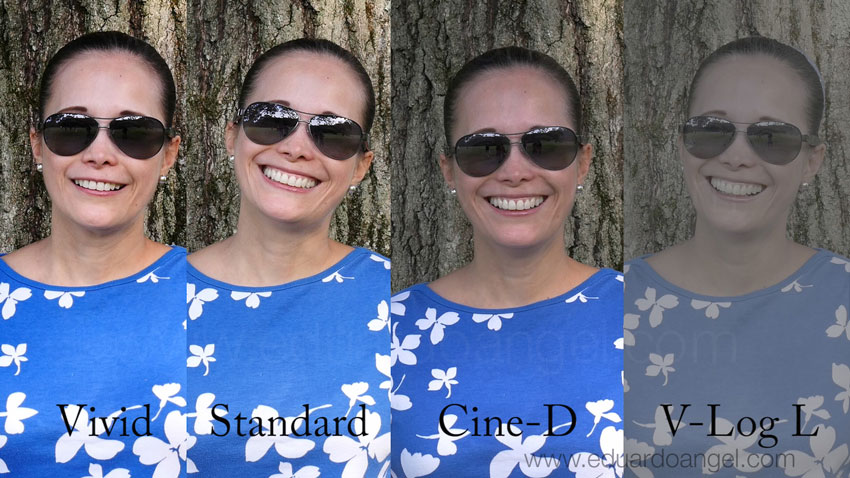

Why is V-Log important? Why should we care about camera profiles and external recorders? Read this and watch this to learn more.
Installing V-Log L on your GH4 is far from intuitive and user friendly, but we’ve got you covered. A complete step-by-step tutorial is available for free right here.
The GH4 firmware update (version 2.3) including V-Log L will cost $100, and it will be available in 2 weeks. You can pre-order it now right here.
Related Posts
- Hybrid Assignments Equipment List: The Essential 41 Items.
- The eternal quest for “the best” digital camera.
- Shooting Anamorphic and V-Log with Panasonic’s GH4. Valuable Lessons.
- 7 things we discovered after shooting 4K with the GH4. You won’t like #4.
- The Pros and Cons of external recorders: Atomos Shogun.
- 4K video under $2K. Meet the Panasonic Lumix GH4.
- I Just Got a Panasonic GH4 – Now What? Hard Drives.
- I Just Got a Panasonic GH4 – Now What? Batteries.
- I Just Got a Panasonic GH4 – Now What? Memory Cards.
Video
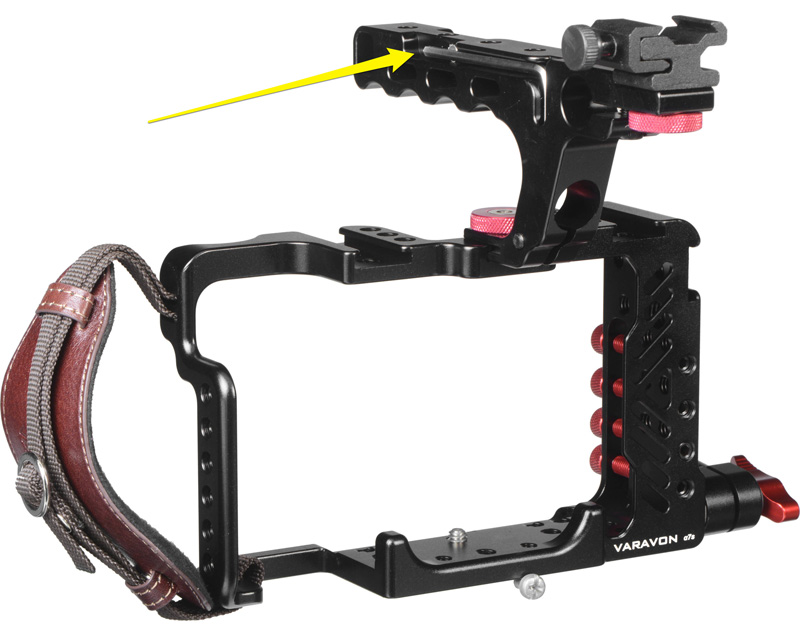
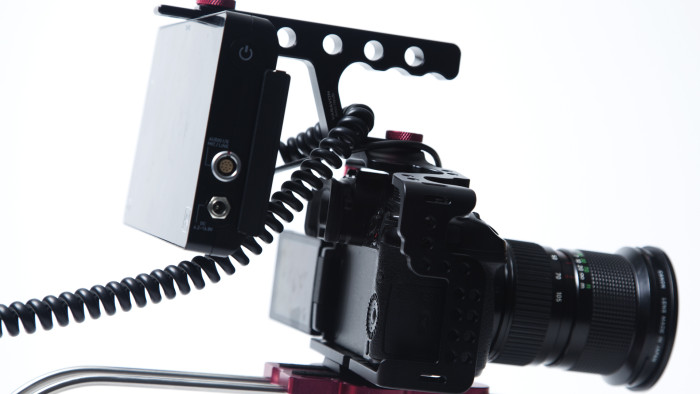
Hands-on Review: Varavon’s Armor II Cages.
There are (too) many video accessories and gadgets, so it’s becoming increasingly hard to determine where to spend our hard earned money, and what will truly make a significant impact on our video productions.
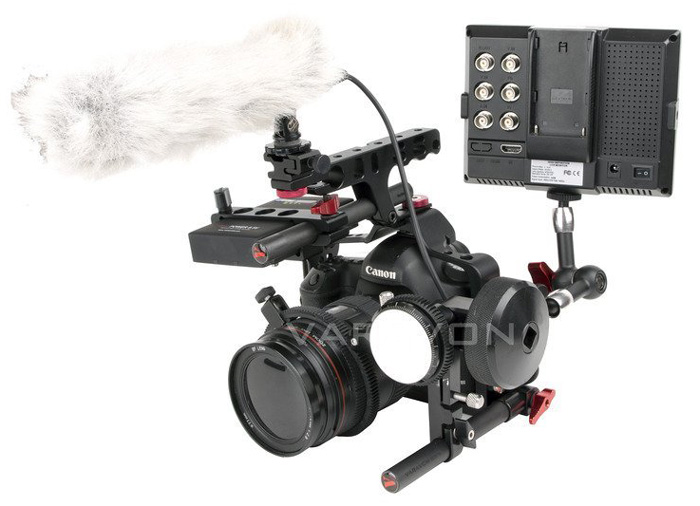
For the past few months we’ve been testing a number of new cameras and accessories. Today I’d like to highlight a company with two accessories in particular: Varavon’s Armor II Cage for the Panasonic GH4 and Varavon’s Armor for the Atomos Shogun.
You might have read my recent article titled “The eternal quest for ‘the best’ digital camera” where I posed the seemingly unanswerable question “what’s the best cinema camera (for us) right now?” Here’s the article, in case you missed it.
The article’s conclusions were somewhat vague, simply because even with all the readers’ feedback we received via Twitter (@EA_Photo), we couldn’t come up with a hard and fast answer. Most of our assignments require capturing video, stills, and sound on location, usually run and gun style, with a fast and small crew traveling as light as possible. This might or might not match your production needs, so it’s important to keep in mind that we are coming from that angle.
It is important to clarify that I am NOT being paid by anyone to write these reviews. I just want to share with others what’s working and what isn’t working for us, and hopefully save you some time. God knows I could use a few extra hours every day.
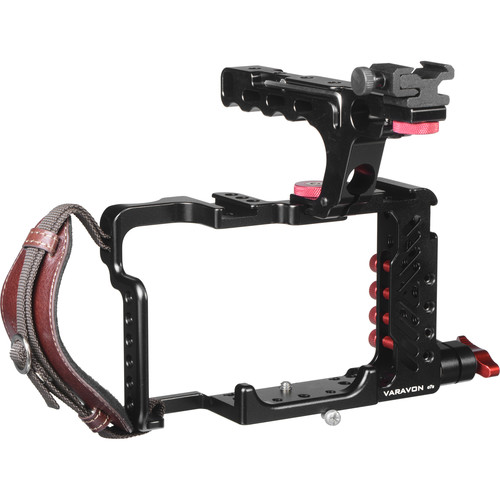
Varavon’s Armor II Cage for the Panasonic GH4
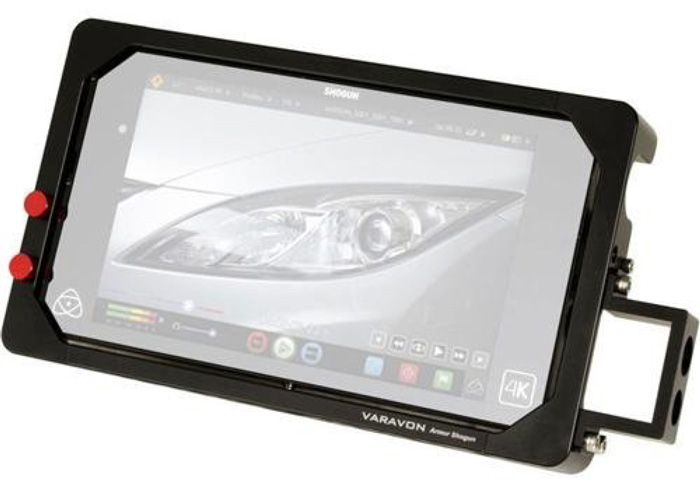
Varavon’s Armor for the Atomos Shogun
Armor II Cage – My Impressions
Varavon reminds me of the early days of Edelkrone; small, humble, and fast. Both companies share a serious commitment to true innovation through useful, high-quality products.
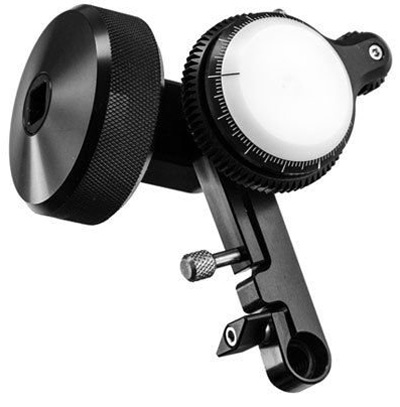
Edelkrone Follow Focus
Small details matter. A lot. For example, the Armor II Cage includes a magnetic Allen key, cleverly “hidden” on the top handle’s side. It’s one of those things that makes you wonder why no one else has thought of this before! Every product that requires an Allen key (from sliders to tripods to stabilizers, all should come up with a similar solution.
Varavon has clearly spent some serious time thinking and testing this product. With the GH4 camera mounted on the cage, one can still replace the battery and the memory card. The cage also works perfectly with a Metabones Speedbooster allowing us to use our preexisting Canon and Sigma lenses.
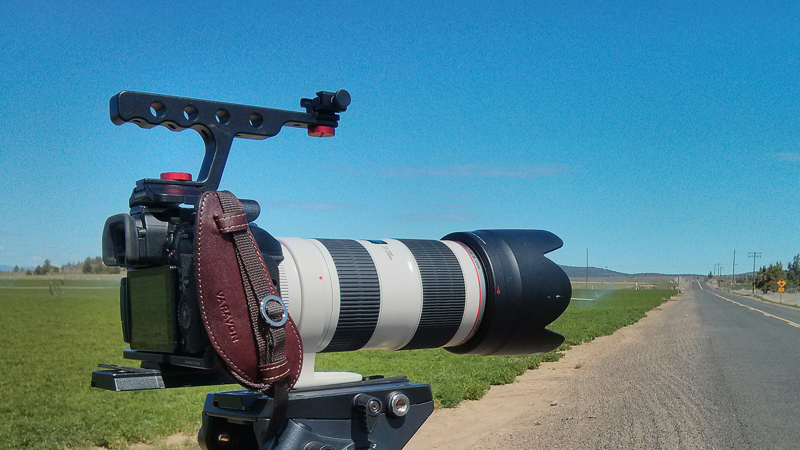
Personally, if you only need ONE reason to get this cage, it’s the top handle, as the GH4 (or 5D Mark II or a7S II) body instantly shapes into a cinema camera. In addition to the obvious ergonomical advantages (especially when doing low-angle shots or quickly mounting/removing the camera to/from a tripod) the cage provides several mounting points, a cold shoe mount and one 15 mm rod clamp, allowing us more options to attach a wide variety of accessories like focus rings, microphones, electronic viewfinders, external monitors, etc.
Around the cage there are something like 40 ¼ threaded mounting points, but in real life one can use about five or six without getting in the way of standard camera operations. The previous version of this cage (which I also own) didn’t have a “front and back rod adapter” which can be used as an additional contact point or to mount additional accessories like a follow focus.
Apparently there’s a version of the Armor II Cage with an ENG-style rotating handgrip, but mine doesn’t move. The handgrip (with beautiful leather) is fixed, yet very comfortable on most shooting situations.
If you buy the camera rig, I’d recommend adding a few 1/4″ Male to 1/4″ Male Threaded Screw adapters so you can easily attach accessories like an audio recorder or a small LED light (which, by the way, work GREAT to add some catchlight to your subjects when shooting exteriors on cloudy days). It would be even better if Varavon starts including a few of them in their kit (wink wink).
Armor for the Atomos Shogun – My Impressions
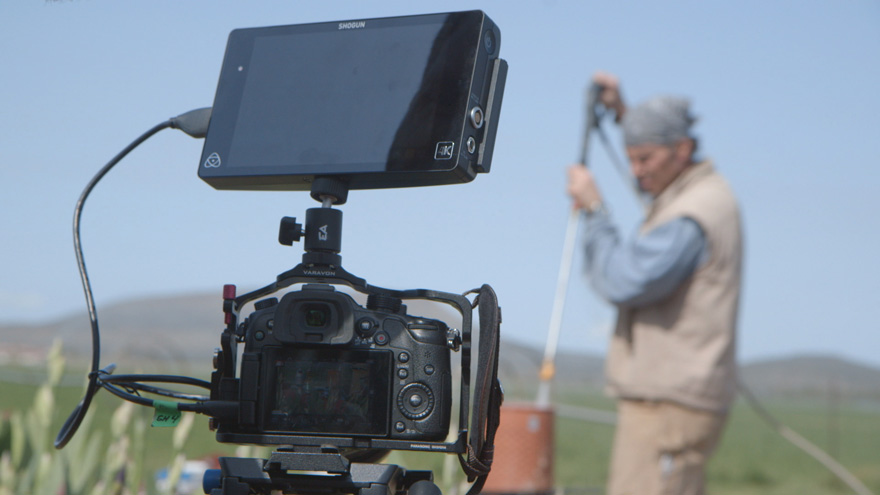
Now, let’s talk about the Armor for the Atomos Shogun. I wrote an extensive post about the Shogun, so I won’t go into a huge amount of detail here, but suffice it to say that the Shogun is a godsend.
In a nutshell, the Shogun provides an exquisite 1920 x 1080 ultra sharp (and fairly accurate) image, with many additional features (like LUTS) to record HD or 4K in ProRes with clean sound already synced into fast and reliable Solid State Drives. The not so great part is that the Shogun is VERY fragile. We take great care of our gear, and our monitor cracked on our second or third assignment.
So for additional protection, the Armor Cage is great, but it seems designed for studio situations, when heavy duty camera support is readily available as the cage alone weights almost a pound.
For the most part, Varavon’s design does not interfere with the function of the Shogun, but the Armor Cage doesn’t accommodate the much needed sunhood (which should be included on the Shogun’s kit but it is not). Not being able to attach a much-needed accessory seems like an important oversight.
The selling point for this accessory is, in my humble opinion, the many additional mounting points, the clever sliding SSD Safety Latch, an audio clamp to protect the XLR cable, and (maybe) the HDMI cable locking screws.

In our case, the optional L brackets (purchased separately) have not added significant versatility, so I probably would recommend skipping them.
Conclusion
The build quality on all Varavon products is outstanding. I like the Shogun Cage and if we are shooting for an extended period of time indoors I’d bring it along.
I love the Armor II Camera Cage for the GH4. It has changed the game for us, and as long I use the GH4 I’ll keep enjoying the added versatility and improved form factor the cage offers. I can definitely recommend this accessory for anyone who needs more versatility but is hesitant to add unnecessary weight to his/her camera package. To see the complete list of gear we bring on location, click HERE.
If you are interested in learning more about which accessories are important, why and how to use them, consider watching these courses on Lynda.com
- Video for Photographers 01: Filmmaking Essentials
- Video for Photographers 02: Filmmaking on Location
Did I miss anything? Feel free to continue the conversation here.
Video
Video for Photographers: Filmmaking Essentials.
As we have covered in numerous articles before, still photographers can reasonably quickly learn the most essential filmmaking techniques and greatly expand their creative options and the range of professional services.
In our latest Lynda.com course we help bridge the gap between still pictures and moving images, by explaining and showing, what it takes to transition from one craft to the other. We tried our best to include the most essential video productions techniques; from framing and lighting for continuous shots to directing the viewer’s attention and incorporating camera movement and sound, and even offering a brief overview of our post-production workflows.
This course, our fifth on Lynda.com is the “theory course.” Our goal is to explain why certain techniques, steps or tools are important. Other topics include:
• Understanding the 5 Cs of cinematography
• Choosing the right camera
• Framing for continuous shots
• Lighting techniques
• Using camera movement to enhance your story
• Leading the senses with sound
• Working with different microphones
• Editing and post-production considerations
A follow-up “practical” course (available in a few weeks) will cover hands-on composition, camera movement, sound and lighting techniques, among other useful tips like packing and working with very small budgets and crews.
Enjoy!
Video
Hybrid Assignments Equipment List: The Essential 41 Items
In aviation, an MMEL (Master Minimum Equipment List) is a categorized list of on-board systems, instruments and equipment that must be operative in order to flight. Any additional equipment not included in the MMEL may break temporarily but it won’t make the aircraft inoperative. Here’s an attempt to create a hybrid MMEL for three different crew sizes.
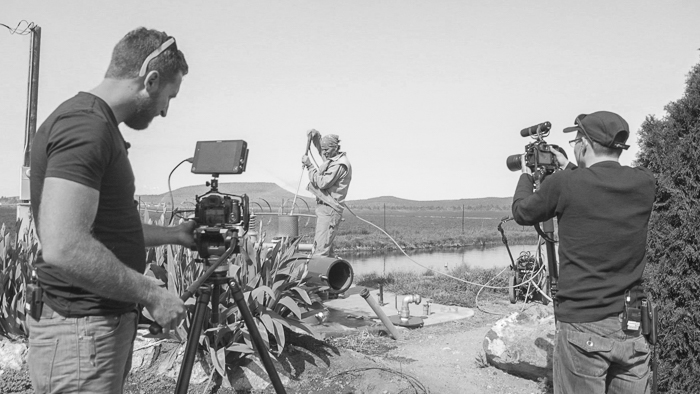
Let’s start with the definition of “Hybrid.” What I normally mean by this term are productions or assignments where one or two people are required to be the photographer, filmmaker, sound recordist, producer, and even editor. And, these gigs are becoming increasingly popular. It sounds crazy and these sorts of shoots can be. One of the keys to making them run smoothly relies on great planning and working with less equipment that gives you more control in less time. It also helps to team up with other people who can complement our weaknesses.
Short and one-man crew hybrid projects
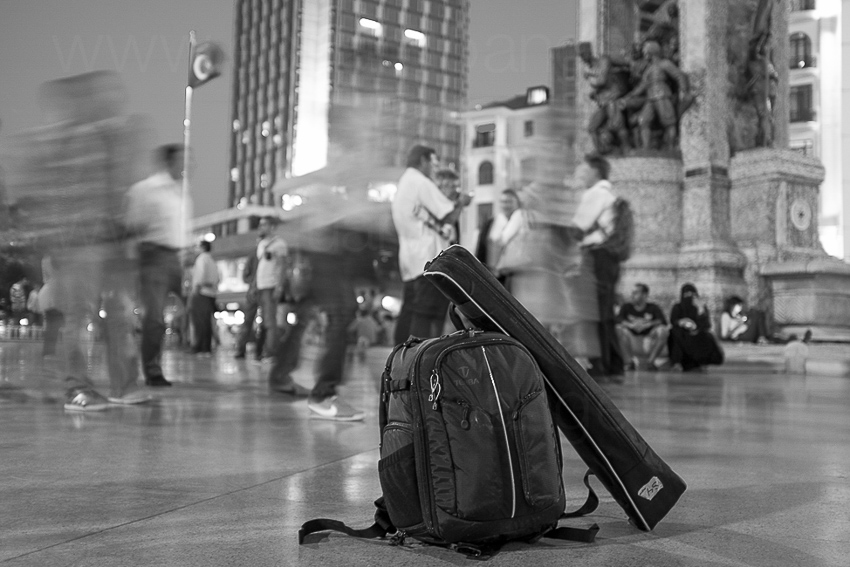
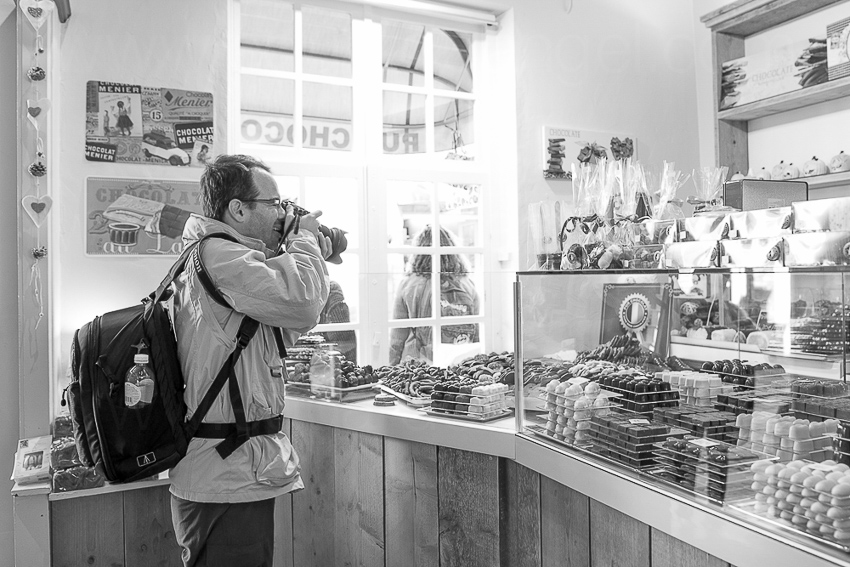
One substantial challenge for photographers shooting video is how to travel as light as possible while carrying a full production and post-production setup that is literally on their back. Here’s a picture of my backpack, which contains every single piece of gear that I’d need for from one up to three days, except some clothes and toiletries that will go on a small backpack.

Bag for a 1-day or 2-day gig by myself.
1. Media Credentials which sometimes, but not always, can give you special access, get you discounts and the most important part, allow you to travel with some heavy or oversized gear without paying a fortune. Here’s a link to Delta, American, and United Media Baggage policies.
2. Two external portable hard drives. I suggest this one, or this one.
3. Audio field recorder like the H4n (or a more current model and smaller version like Tascam’s DR-05) to capture interviews and my own production notes.
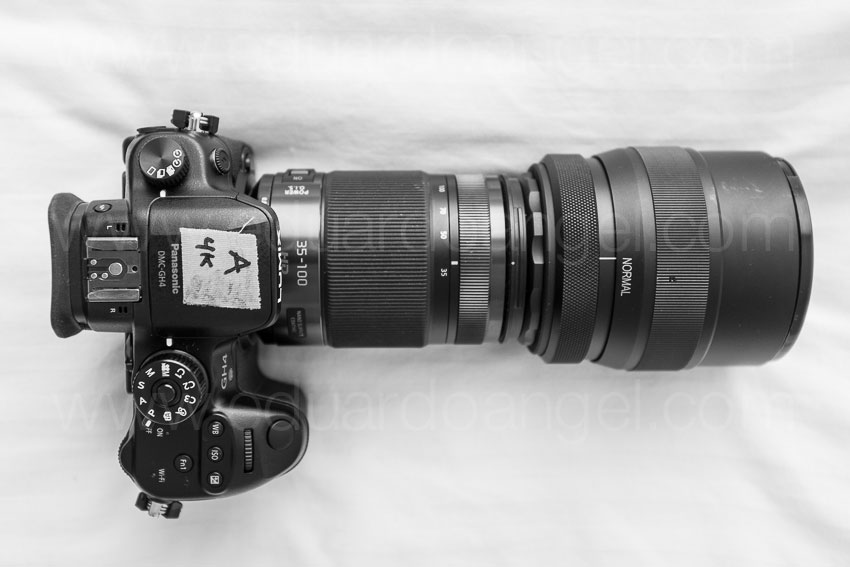
4. Camera A for video, in this case a Panasonic GH4 (Amazon and B&H) with a Lumix 35-100mm 2.8 lens (Amazon and B&H). I’m in love with this lens. So small, yet so sharp!
5. Camera B for video, another Panasonic GH4 with a Lumix 12-35mm 2.8 lens (Amazon and B&H)
7. Camera for stills and location scouting; I always carry my Fuji X100s (Amazon and B&H)
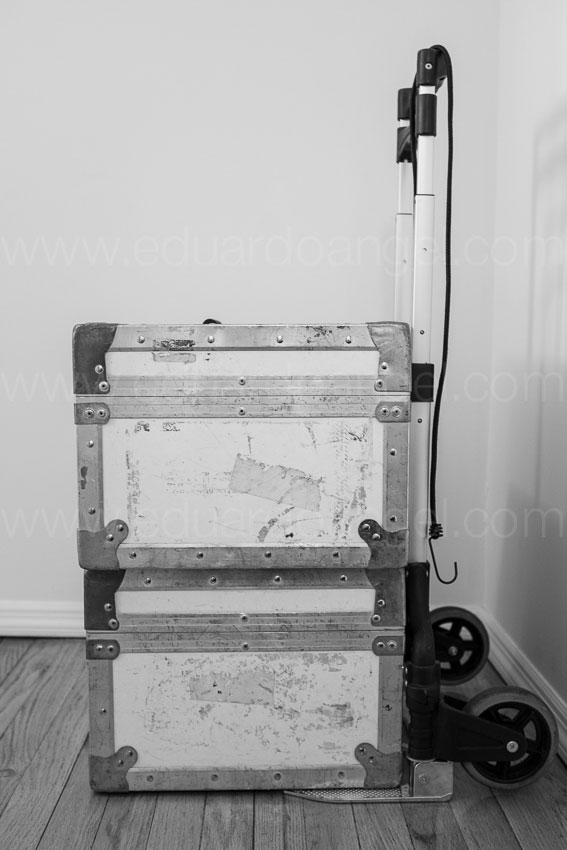
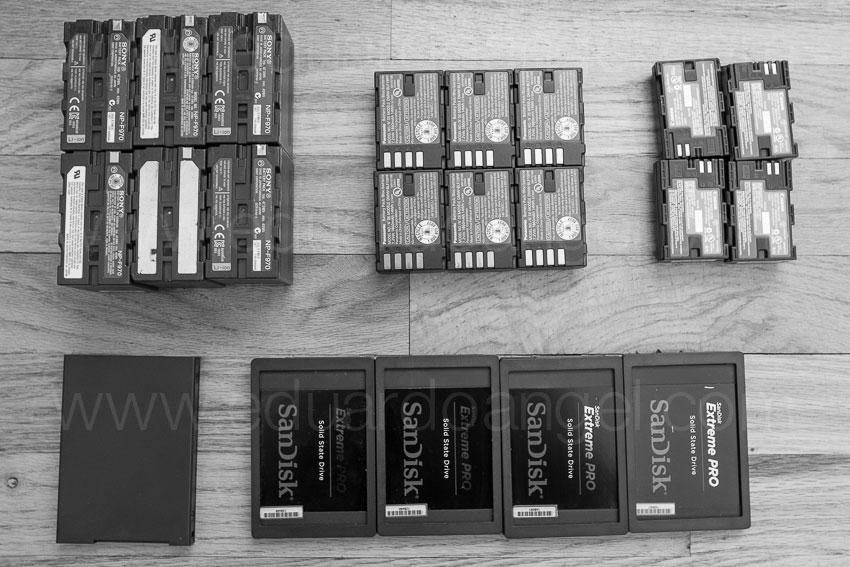
8. A variety of Tenba Tool Boxes (Amazon and B&H) to pack all the batteries, chargers, cables, adapters and other small accessories.
9. A small tripod (Amazon and B&H)that sometimes serves as an improvised handheld rig. A car mount works great for time lapse and even to hold the H4n or small lights during interviews.
10. At least one Rode VideoMic (Amazon and B&H) to capture some ambient sounds or interviews.
11. A 15″ MacBook Pro (Amazon and B&H) with Adobe Creative Suite (Amazon and B&H) and Shot Put Pro.
12. One of my favorite photo bags ever, the new Tenba Shootout (Amazon and B&H)
13. In terms of lighting, for these assignments I try to use mostly available/natural light, but I bring a 5-in-1 Collapsible Reflector.
And here’s my typical outfit and setup for some of these solo hybrid gigs.
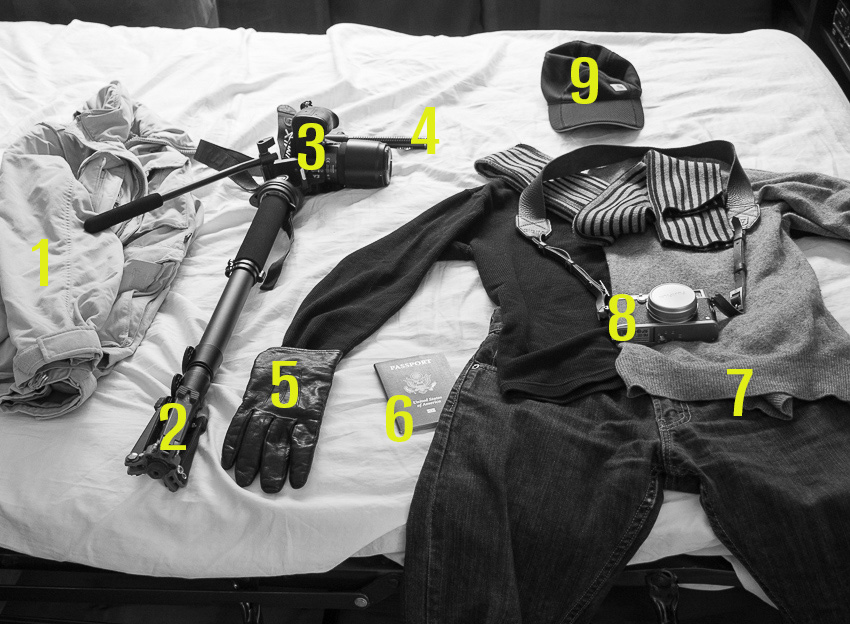
My outfit for hybrid shoots.
1. My good ol’ Columbia jacket/vest has been traveling with me to more than 40 countries. It has lots of pockets, a hoodie, and because it has a self-stowing pocket, it sometimes doubles as a pillow on the road. A priceless item, to be sure.
2. Benro S4 Video Monopod. Small, relatively light, and sturdy. Works great.
3. Panasonic GH4 with a Lumix 35-100mm 2.8 lens.
4. Rode VideoMic Shotgun
5. I always bring gloves unless I’m going to the Caribbean in July. Montreal was pretty cold and wet!
6. Obviously, the most important tool if you are crossing any borders: the passport. This website compares the “power” of passports from many different countries, and, as Americans, we are blessed to have the most powerful one.
7. I like to dress in layers and in dark colors when shooting on the road. Black hides dust and stains very easily. A cashmere sweater is worth its weight in gold.
8. Camera for stills: The Fuji X100s is especially handy after a very long day, when I don’t want to carry more gear but still want to capture a few night scenes of nice-looking dishes during my evening meal.
9. A hat—another essential item.
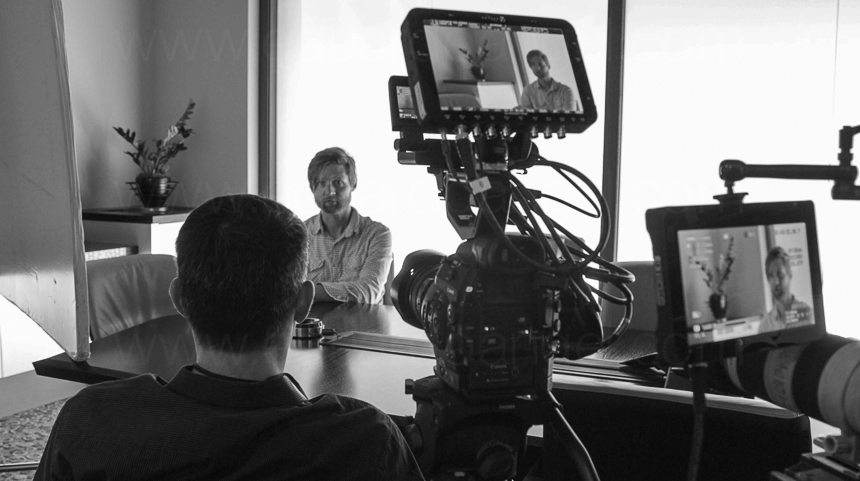
Longer projects and bigger crews
For a longer hybrid assignment where I’ll have one or two more people (gaffer/grip and a second camera/DIT) I’d bring a few more items. In this case we wouldn’t need to carry everything on our backs, but we definitely need to pack as little and light as possible.
We would bring a Tenba Transport Rolling Tripod/Grip case, to pack one or two Benro S8 tripods, a Benro S4 monopod, a very compact and portable slider that would take the same fluid head from the S8 tripod and/or the S4 monopod. Some grip accessories that I consider essential are at least a couple of adjustable Gaffer Clamps, and a couple Collapsible Reflector Holders which also double as boom stand. These two light and inexpensive items effectively function as one, and sometimes two, additional crew member. A no brainer if you ask me.
On the camera package I’d include an external monitor/recorder like the Atomos Shogun with plenty of Solid State Drives (you can also rent them for only $28 per day!), and all the charges and cables you can imagine, and a power strip (get one with a long cord) that becomes essential when downloading all the footage every night AND charging all the batteries for the next day. I use one Tenba Roadie Hybrid bag for the most expensive, essential and fragile items, namely cameras, lenses, Shogun and hard drives. The brilliant design of the Roadie Hybrid allowa me to treat is as a standard rolling carry-on, but I can also use it as a (very heavy) backpack on uneven terrain, subway stations, etc.
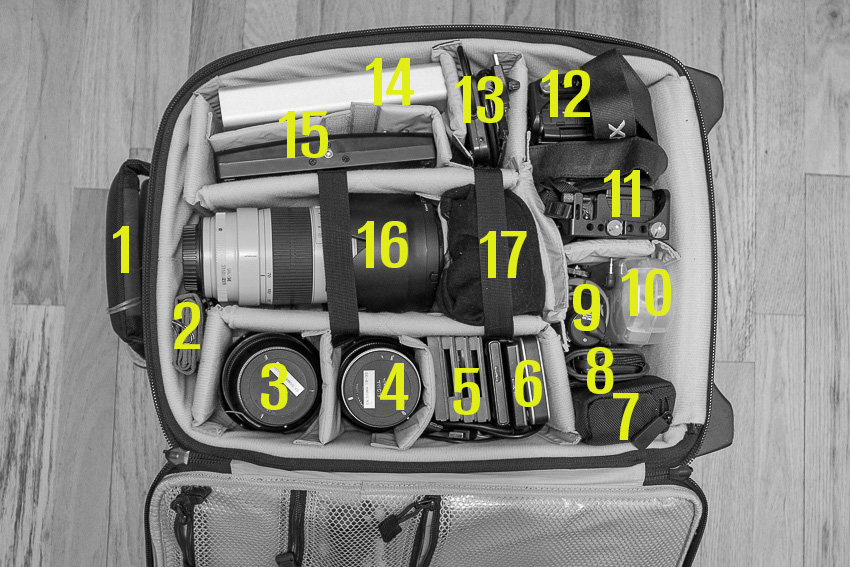
Here’s a view of my carry-on bag.
My carry-on bag for longer jobs and/or when I have a bigger crew.
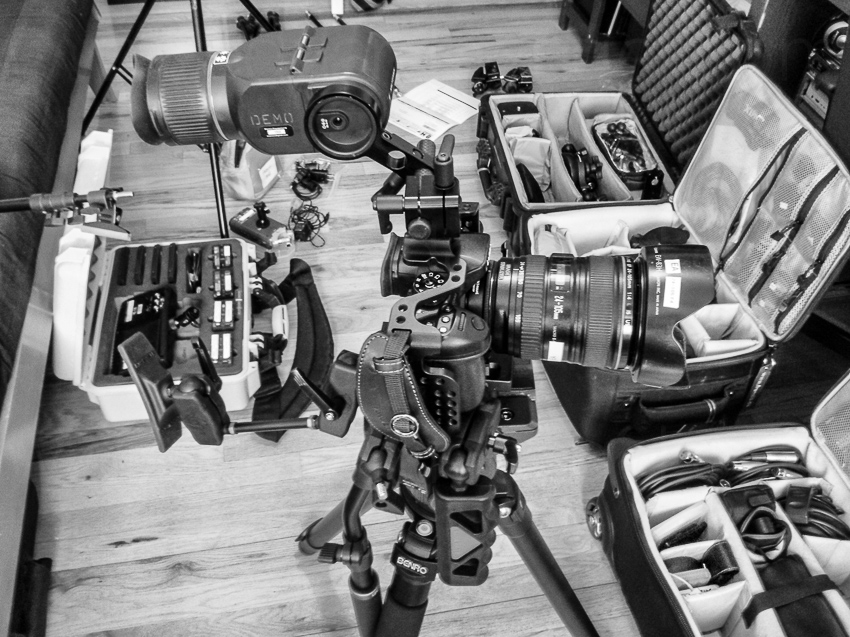
1. Tenba Roadie Hybrid bag
2. Media pouch with ten 64GB SD cards
3 and 4. Sigma 18-35mm f/1.8 and Sigma 24-105mm f4. These are the same lenses I used last year on another one-man Hybrid project in Istanbul and Europe
5. SanDisk Solid State Drives for the Atomos Shogun
6. Two external portable hard drives
10. H4n Audio field recorder.
11 and 12. A couple of Panasonic GH4 bodies with Varavon cages, one with a Metabones Speedbooster (for the Sigma and Canon lenses) or a couple of Canon C100 Mark II or C300 Mark II bodies if the job doesn’t require stills.
13. USB 3 reader for Solid State Drives (included with the Atomos Shogun kit)
14. 6TB G-Tech External Hard Drive (compact, super fast and awesome)
15. Atomos Shogun
16. My sharpest and heaviest lens, Canon 70-200mm f/2.8 [
17. Panasonic Lumix 12-35mm 2.8 lens and Panasonic GH4 with a Lumix 35-100mm 2.8 lens. These lenses are the equivalent to a 24-70mm 2.8 and a 70-200mm 2.8 but super light and small
18. In terms of lighting I usually bring two or three 1×1 Bi-Color LED Panels with batteries and two Chimera 1×1 Lightbanks with grids. That pretty much covers all me needs. Another option is a Fiilex kit, which I like a lot, but find it way too expensive. I’ll need light stands and cables.
19. Depending on the job we would add another camera movement tool, like a Glidecam or a Ronin or even jibs and dollies. It depends on too many different factors.

All the bags packed. The LED lights are in the back seat.
Well, there you have my little setups for hybrid assignments. Obviously, there isn’t a perfect setup of gear list, just like there isn’t a perfect camera, but these items have been working great for us. I hope this article benefits some of you involved or interested in run and gun, single-operator scenarios like weddings, events, corporate shoots, documentaries, red carpet premieres, product launches, sporting events, video podcasts, and even student films.
If you are interested in some packing and traveling tips, especially when shooting overseas, or what to do the day before your video/shoot shoot, we have written about that too. Did I forget anything? Let me know here!
And of course, there are those crazy long, crazy hectic, crazy complex and crazy awesome projects that require everything and the kitchen sink.

Video

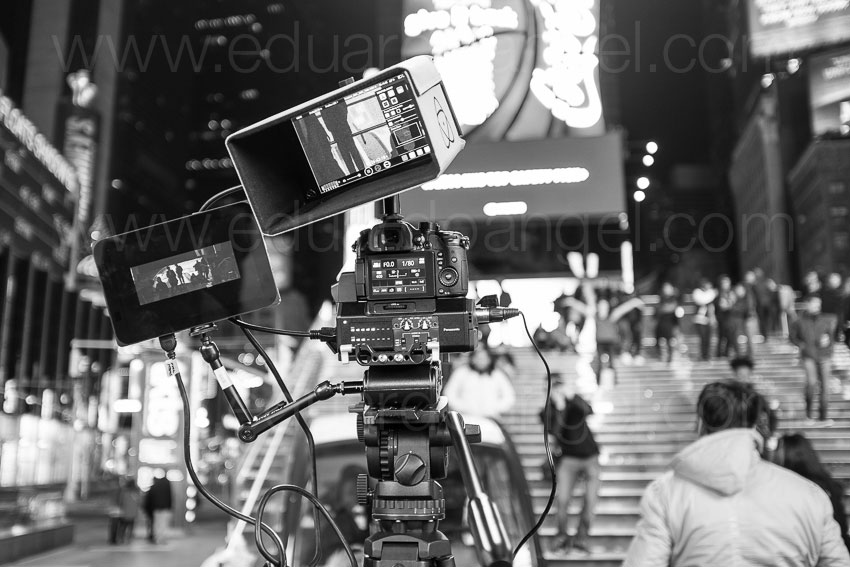
Shooting 4K Anamorphic and V-Log with Panasonic’s GH4. Ten Valuable Lessons.
UPDATED: I just added two video tutorials: one comparing “Panasonic’s V-Log L vs. Cinelike D” and the second one “Conforming 4K Anamorphic Footage in Adobe Premiere Pro.”
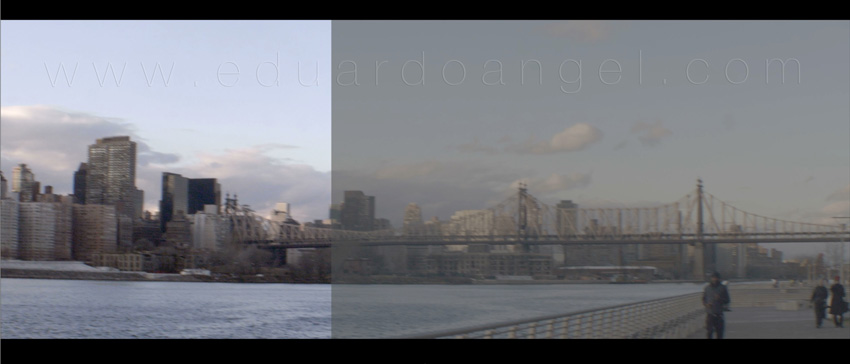
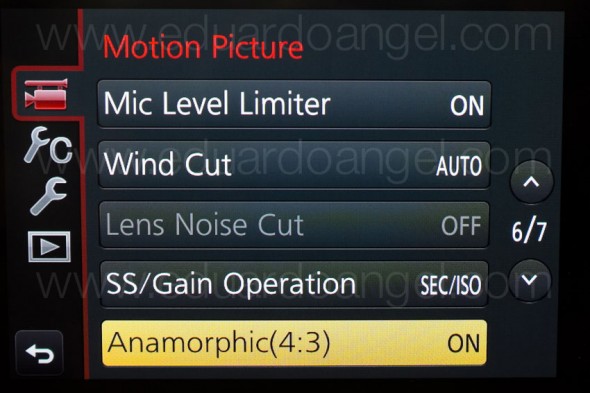
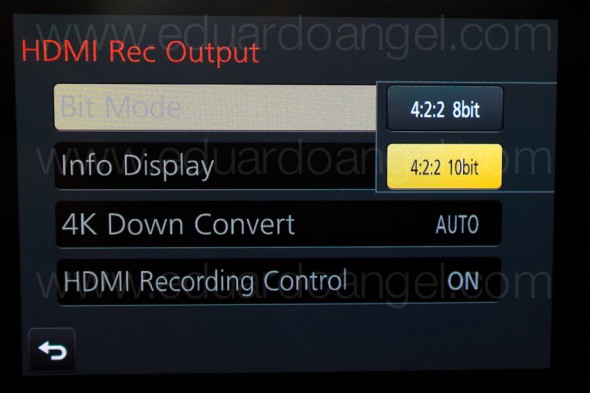
Anamorphic is enjoying a huge comeback. The reasons to go this route vary from project to project, but generally it’s the desire to achieve a different look and use as many pixels from the sensors as possible. Panasonic’s Firmware Update v.2.2 (available here) enables an Anamorphic (4:3) Mode capable of recording video in 3328 x 2496 pixel (equivalent to approx. 8.3-megapixel) resolution at a frame rate of either 23.98, 24, 25 or 29.97 fps. With an anamorphic lens such as 2x Lomo lenses (see below) we now can capture and un-squeeze a 3356×2496 image in post-production. To make things even better, 4:2:2 / 10 bit HDMI output is also available.
Just like in 2013 when we had the opportunity to field test a GH3 in the Middle East and last year when we shot with one of only three prototypes world-wide of the GH4, for the past couple of weeks I had the privilege to work with director Davis Northern, DP and tech wizard Sean Davis and many other talented people on one of the very first GH4 Anamorphic AND V-Log L projects, shot exclusively for Panasonic North America and produced by The Digital Distillery.
Panasonic 4K Anamorphic and V-Log L – Official Video from The Digital Distillery Inc. on Vimeo.
The project was exciting and very challenging, as working with hardware prototypes and beta versions of software or firmware always is. We had a lot of moving pieces and an extremely tight deadline, but I’m proud of the final results and very satisfied with the lessons learned. This article covers some of the most significant ones, and it is written from my very own personal perspective. As always, I try my best to be as objective and brand agnostic as possible. The lessons aren’t in any specific order and some links will take you to articles with additional information . Please consider using our links to help support our very time consuming articles and tutorials.
Ready? Let’s go!
1. Shooting Anamorphic
It can definitely be achieved by a very small crew on a small budget. We mostly shot with a crew of three, with very limited gear and time. I’ve always assumed you needed a 2-ton truck and a crew of 30 to pull this off. Clearly, this was not the case for us.
2. Lenses
In terms of lenses, we opted to keep a “low profile” while keeping our options open. In other words, we rented a set of vintage anamorphic Lomo lenses (35, 50, and 75mm) and tested an SLR Magic as well as a Letus AnamorphX 1.8X Pro Adapter and a Veydra Mini Prime.
A. Lomo:
The lenses are huge and heavy. Lomo 50mm + 75mm with case = 25lbs. Lomo 35mm with case = 35lbs with each case weighting about 30lbs. Not ideal for the “guerilla” approach we needed for this project. They definitely have a unique look, but are very hard to focus, especially when using a very flat profile. We rented the set for $500/day or about $1,700 for a week including tax. Not cheap by any means but definitely worth the investment in terms of time and quality.

If I were to shoot this project again (or on upcoming anamorphic projects) I probably would test the Cooke Anamorphic/i Lenses (25, 32, 40, 50, 75, 100, and 135mm with a 2x squeeze). Unfortunately these lenses cost about $30,000 each, and the rental rate is about $500 per lens, per day.
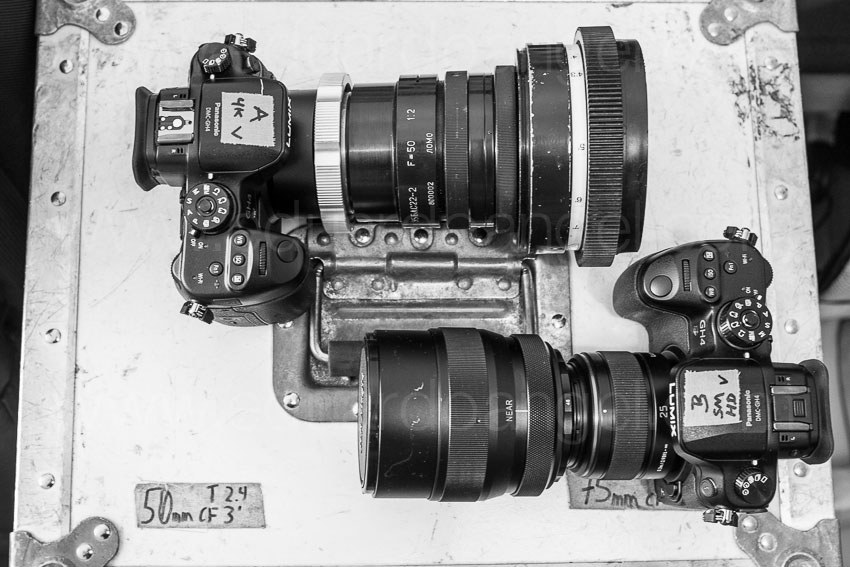
B. SLR Magic:
We had access to a very nice selection of Panasonic glass that we wanted to use with an SLR Magic adapter. The first challenge was that the front diameter on all the lenses has to be below 62mm in order to use the step down rings. The second limitation was (for the Panasonic lenses) that anything wider than 28mm would vignette. We could have used the Panasonic 12-35mm lens, at 28mm or longer (kind of pointless), but for some odd reason with the SLR Magic adapter it vignetted all the way even at 35mm. The Panasonic 35-100mm didn’t vignette at 35mm. Go figure. The next usable lens on our Panasonic arsenal was the beautiful 42.5mm Noticron f/1.2, but we needed a step DOWN ring (from 67mm to 62mm) that wasn’t included with the kit. The last option was the Panasonic 35-100mm f/2.8 lens, which worked well but focusing was a MAJOR issue (not Panasonic’s fault). I found the SLR Magic system very finicky and unreliable and unfortunately I can’t recommend using it.
C. Letus Anamorphx:
The Letus Adapter worked much better than SLR Magic but it was also cumbersome. A matte box is pretty much required and there was an issue with one of our widest lenses. The lesson here is, if you are shooting anamorphic, use the real thing.

3. Storage
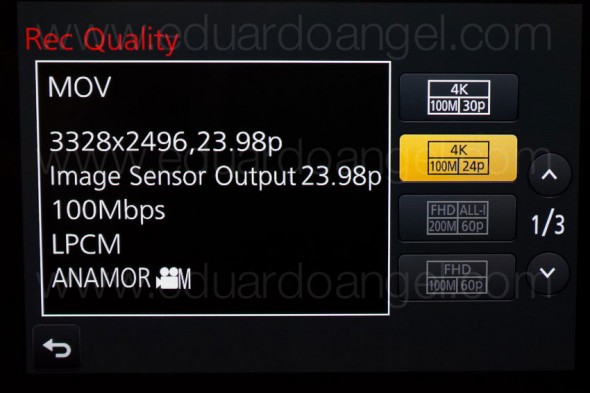
There’s some heavy math involved when shooting Anamorphic. An anamorphic lens produces roughly a 2X horizontal squeeze of the image onto film. Traditional anamorphic lenses were designed to work on a 4:3 standard. The anamorphic footage captured with the GH4 on the Atomos Shogun is 3840×2160, so not technically 4K but pretty close. Shooting internally (to an SD card) the footage is 3328×2496, so greater vertical resolution than the 4K standard, but not full 4K horizontal resolution. To keep things in perspective, the 4K footage out of the GH4 4096×2160.
As you would expect, the files are huge. Shooting ProRes 422 you need about 4GB per minute of footage. Two cameras: 8GB, after only one backup you are at 16GB per minute. So somewhere around 20GB per minute is a pretty safe storage estimate for a two-camera setup. As always, we trusted all our very valuable assets to G-Tech Hard Drives.
Regarding Solid State Drives, Atomos has a great chart with all the supported drives for the Shogun and other devices. Make sure you triple check the chart before investing in one.
One SECOND of footage takes about 50MB so even if you are shooting into seemingly endless Solid State Drives, being smart about when to start rolling and when to stop can save a lot of storage.
4. HDMI
As we were shooting, Atomos was literally finishing writing the Shogun’s firmware update (available in May or June as a free download) will enable a number of awesome features:
- Anamorphic de-squeeze for Panasonic GH4 and standard lenses
- RAW recording to ProRes, DNxHR and Cinema DNG for compatible RAW formats
- Expanded RAW compatibility to include Sony FS series, Canon, Arri and AJA
- 3D LUTs on HDMI/SDI output
- Cinema 4K DCI support
- Uncompressed V210 support
- Genlock
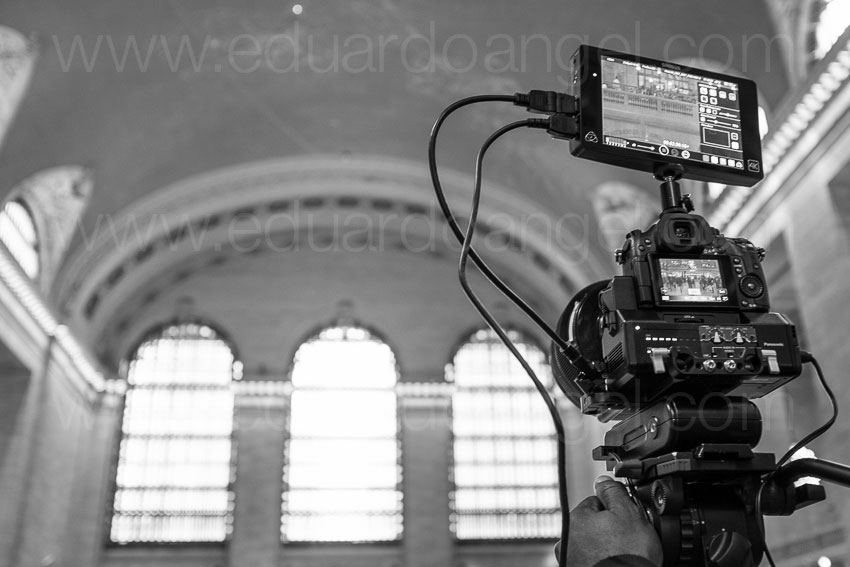
We had to use a Small HD Pro7 (to de-squeeze) and the Shogun (to record in 4K). The setup seems pretty obvious after a lot of trials but it wasn’t at first. Here’s the executive summary that will hopefully save you some time and stress:
1. Micro HDMI to Standard HDMI cable from the GH4’s HDMI OUT to the Atomos Shogun HDMI IN
2. Standard HDMI to Standard HDMI cable from the Atomos Shogun HDMI OUT to the Small HD HDMI IN
3. In the Shogun, the 4K downconvert option should be OFF while connecting the Small HD and turned ON when everything is properly connected.
Our Small HD had a nasty tendency to constantly lose signal for no apparent reason, so step #3 had to be repeated many times throughout each shoot.
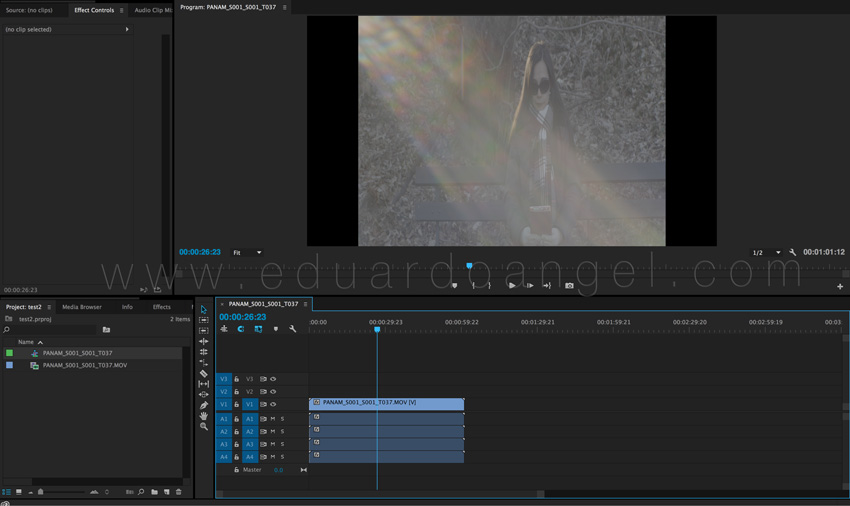
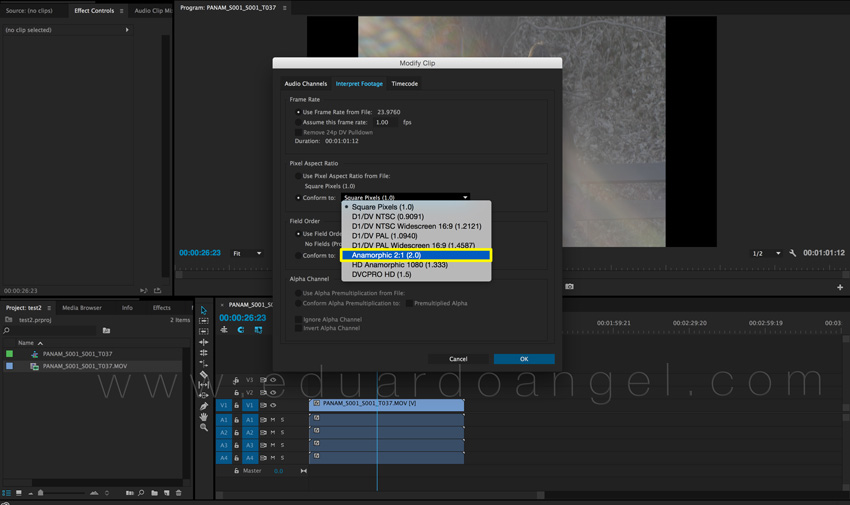
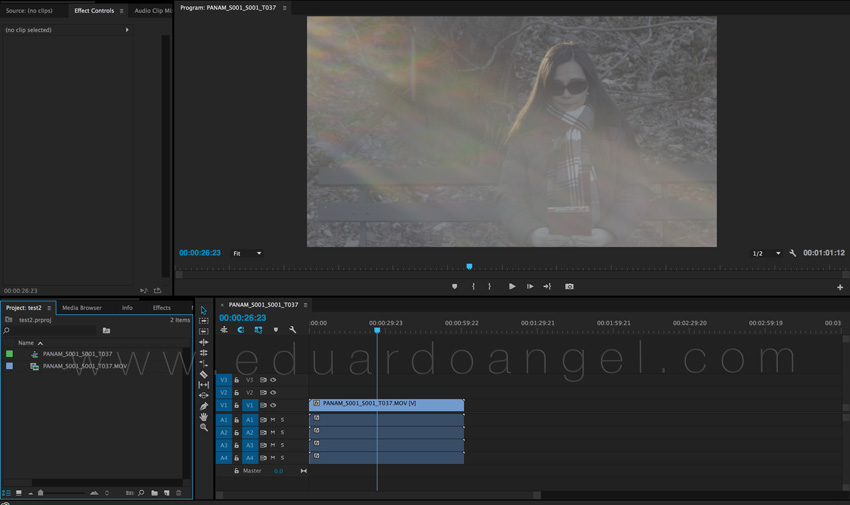
5. Premiere Pro CC 2014 Workflow
To be totally honest, I was shocked by how easy it was to conform the footage in post. Here’s what you need to do:
1. Import the footage the way you normally do.
2. Select the anamorphic clips.
3. Go to clip > Modify > Interpret Footage
4. Under “Pixel Aspect Ratio” select “Conform To” and “Anamorphic 2:1 (2.0).
5. Create a “new sequence from clip” and start cutting.
6. Done and done. Wow!

Here are some screen grabs from the camera’s LCD:

6. Focus
Focus is super, extra, hyper critical, especially when shooting with a very flat profile like the one we used. Unfortunately we couldn’t trust the SmallHD and had to rely 100% on the Shogun at a 1:2 zoom.

7. Accessories
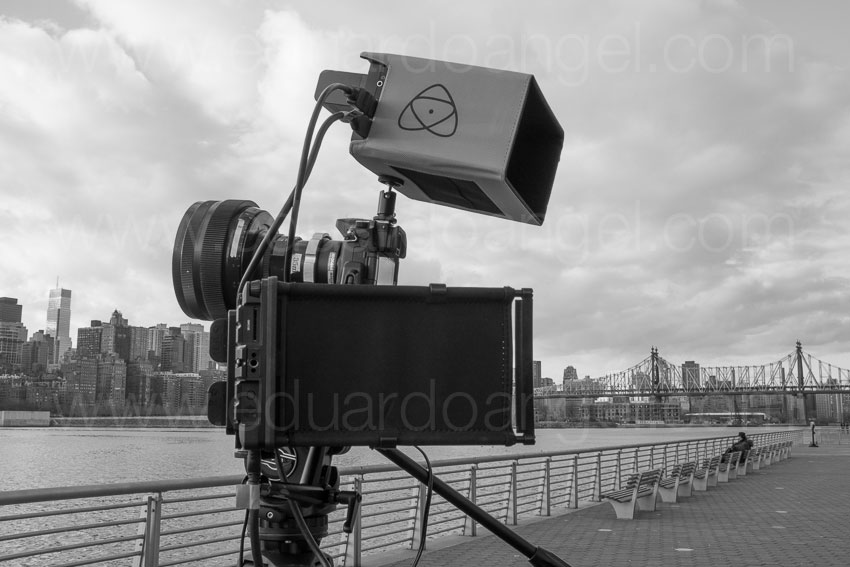
• A sun hood for your external monitor is absolutely essential (if given the option get the black version).
• Obviously you will need lens adapters if you are planning to use the SLR Magic or Letus AnamorphX options.
• Make sure you get plenty of batteries, The small battery that comes with the Shogun lasts about 30 min only and we got about one hour of recording time with TWO Canon batteries on the Small HD. Instead of buying tons of batteries I’m a big fan of renting them (more here). The same goes for additional Solid State Drives.
8. Bonus lessons:
• Shooting anamorphic takes a lot practice and fine-tuning. I’d recommend scheduling at least a full day to test all the gear before a shoot.
• If we keep a small footprint and move fast, we can get a lot done.
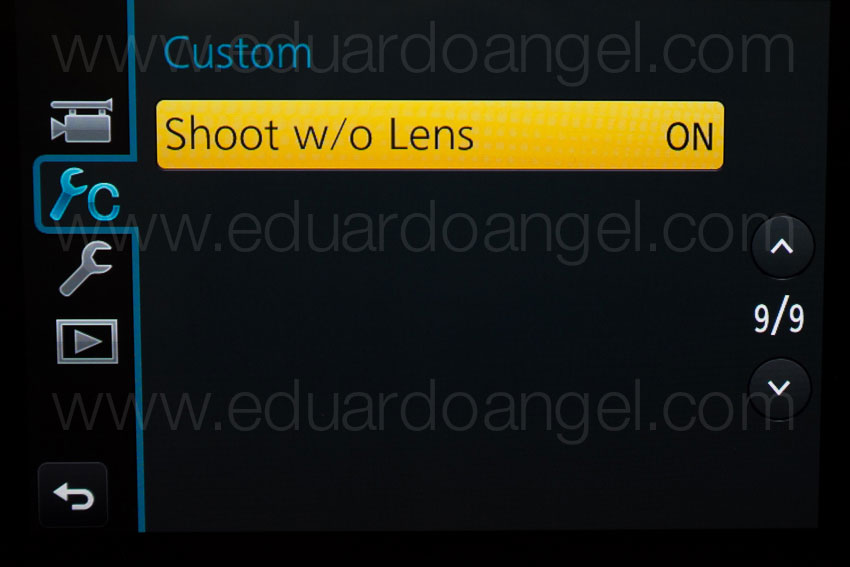
• The “shoot without lens” on the GH4 must be turned on in order to work with the Anamorphic lenses.
And…..here are two more videos (not anamorphic) shot with the Panasonic GH4. Check them out and let me know if you have any questions or comments via Twitter (@EA_Photo)
Video
In the Mood for Love Redux.
I love Asian cinema and I feel a strong and special attraction and respect for Wong Kar-Wai’s work, especially his earlier collaborations with Chris Doyle. Wong Kar-Wai is known for his “romantic and stylish films that explore—in saturated, cinematic scenes—themes of love, longing, and the burden of memory.” In terms of photographing urban landscapes, especially at night, I can’t think of a better cinematographer than Doyle.
For the past couple of months I’ve been revisiting his movies, his video interviews, and reading as much as possible about his production methods and unconventional approaches to filmmaking.
Check out the following books to learn more about this amazing director:
“The Sensuous Cinema of Wong Kar-Wai” by Gary Bettinson
“Wong Kar-Wai: Auteur of Time” by Stephen Teo
“Wong Kar-Wai” by Peter Brunette
The long-awaited and complete Kar-Wai retrospective with more than 250 photographs and film stills will be released in September but it can be can pre-ordered now.
In order to better understand his compositional and directorial choices I imported “In the Mood for Love” into Premiere Pro and selected my favorite scenes, including those critical to the story, those that are brilliantly original, and scenes that are flawlessly executed or contain a number of technical achievements (like the impeccable use of dolly moves). I then re-cut all my favorite scenes from the original 94 minutes into a single 18-minute clip (below), always trying to keep the integrity of the story. My goal here is to help someone who hasn’t seen the movie grasp its (very convoluted) story in one 18-minute clip.
If you haven’t see the movie, I highly recommend it, and I’d love to hear from you once you see it.
If you have seen the movie, did I leave any key cinematic moments out?